Adding an Agent to the Queue
To Add an Agent to a Queue
- Double click on the required Queue to display the Properties Screen.
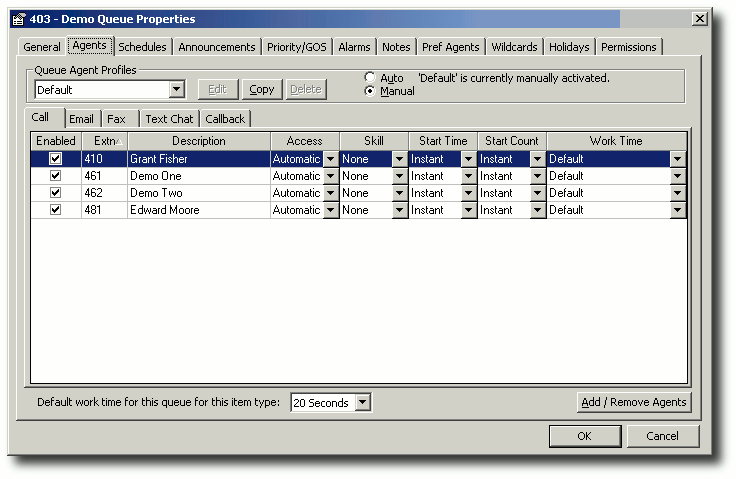
- Click on the Agents Tab to display the screen below.
- Click on the Call Type Tabs, eg: Call, Email, Fax. These Tabs allow you to add agents to the relevant forms of media queuing. Please note that Email, Fax, Callback, Text Chat, etc, are all additional modules to the core Contact Centre.

- Click on the Add/Remove Agents button
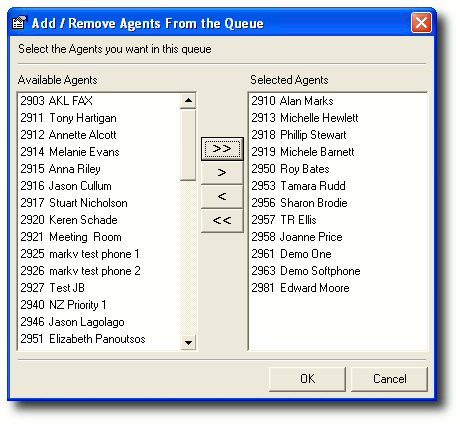
This will display the Add/Remove Agents from the Queue screen.

- Select required Agents and move using the Move buttons (>> > < <<).
Click OK when selection is complete.
- The Properties Screen/Agents Tab will re-display showing additional agents included.
Click OK.
A description of the fields available on the Agents Tab is set out below.
Enabled
Enables the agent to get calls or to restrict calls to them.
Extn
The extension number of the agent.
Description
The name of the user associated with this extension.
Access
Agents have different access levels to be in a queue. Depending on your requirements, you can set different access levels for agents.
Double click in the access column of the selected new agent.
Select access level.
Click OK.

Automatic The agent will receive calls automatically if they are logged into the queue.
Pickup The agent can pick up calls if they are not logged into the queue. This feature only available on the IPFX for NEC platform.
Overflow The agent will receive the call if no other logged in agents are available.
Skill
Each agent is assigned a skill level from 1 to 9 depending on company requirements. An agent with a higher skill level will receive calls preferentially over agents with lower skill levels. Use the drop-down menu beside your selection and choose from None to 9. Click OK.

Start Time
Agents can be assigned a start time for a queue call that will enable the call to be delivered to their extension after the call has been queuing for a specified timeframe.
Select from the drop-down menu. The available range is from Instant to 180 seconds.
Click OK.

Start Count
Agents can be assigned a start count for a queue call that will enable a queue call to be delivered to their extension after a set number of calls have been queuing.
Select start count from the drop-down menu. The available range is from Instant to 50.
Click OK.

Work Time
Work time is the time available to the agent to process a finished call before receiving the next. Calls with not be delivered to an agent during Work time. Work Time can be set individually for each agent.
Use the drop-down menu and choose from Default to 120 seconds.
Click OK.

Note: The system will look at the following settings, in the given order of priority, to determine an agent's Work Time:
- An agent's own Work Time setting (this may be either manually set or by set by default)
- The agent's Work Time from the Queue extension default.
- The Global Queue Work Time setting.
- The Work Time setting for the Queue item type (i.e. media).
Default Menu for this Queue Item Type
Set the default time here for the selected item. Click OK.

Select from the drop-down menu. Select from None to 120 seconds.