To Add Agents to a Preferred Group
- Select the Preferred Agent Group you wish to set up by double clicking on the Group.
- Right Click on the queue you wish to add your preferred agents to and select properties.
- Select the Preferred Agents Tab from the Queue Properties Screen to set up rules that will apply to suit your queue environment.
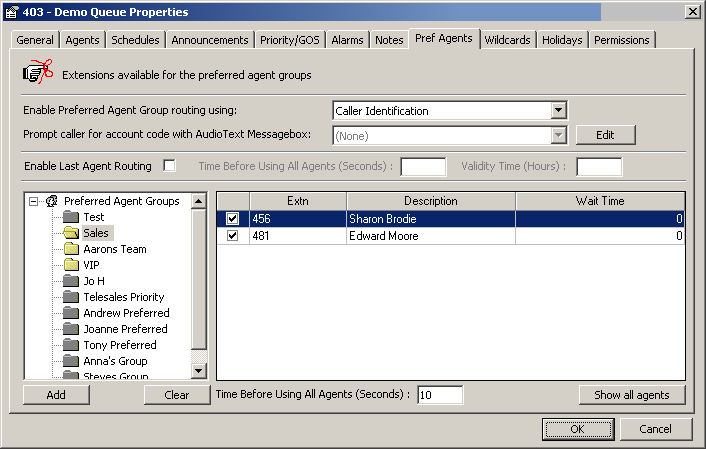
The Queue Properties Pref Agents screen displays, as shown below.

Note: If the Preferred Agent Group is 'greyed out', this means that this Group is not in use within this Queue. If you wish to activate this Preferred Agent Group, double click and then proceed to add extensions to it.
How to use the fields to set up Preferred Agent Groups.
Enable Preferred Agent Group Routing using
This is set to None by default. You must select one of the following options to ensure that Preferred Agent Routing will operate:
- If you select Caller Identification from the drop box
This ensures that when you enter a CLI within the Company Directory for a customer, the call is routed to a preferred agent.
- If you select Caller Identification and Account Code from the drop box
This ensures that when you enter a CLI and/or Account Number within the Company Directory for a customer, either the CLI and/or Account Number can be used to route the call through to the preferred agent.
The selection of Caller Identification and Account Code will also enable the "Prompt Caller for Account Code with Audio Text Message Box" field. Select the required message from the drop-down menu.
The Account Prompt message will be played to all callers who come into the queue with an unknown CLI. This will be played prior to any queuing or queue announcements.
Click the Edit button beside the Prompt Caller for Account Code with Audio Text Message Box.

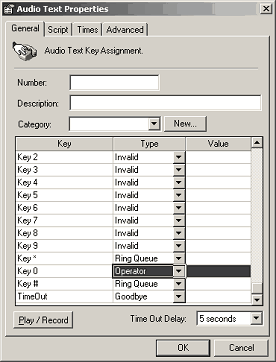
This will display the Audio Text Properties Screen.

This Message Box must be set up as per the diagram above with all key presses exact to operate.
- Key 1 to 9 - Invalid
- Key * - Ring Queue
- Key 0 - Operator
- Key # - Ring Queue
- Key Timeout - Goodbye
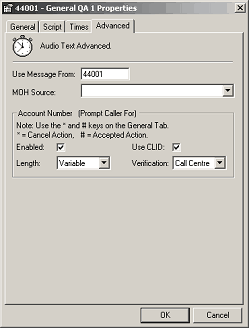
When complete, select the Advanced Tab to complete Message Box settings:

- Select Enabled.
- Select CLID.
- Select the length of your account code from drop box or select variable if unknown account code length.
- Select Verification:
- None - Any value is accepted and it is sent through to the agent in the Screen Pop.
- Call Centre - This value is verified against the Company Directory of the IPFX product and sent through to the agent in the Screen Pop. Based on this verification, the call will be sent through to the Preferred Queue or Preferred Agent Group that this account number belongs to. This must be selected when using the Caller ID or Account Code option.
- External - This value is verified against an External Customer Database (please refer to your voicemail vendor as customisation is required). This requires custom development to be operable.
- Click OK.
Extn
This field shows the extension numbers belonging to the selected queue.
Description
This field is a description of the named user of the extension.
Wait Time
This field details how long you wish calls to wait for that agent before trying another agent in your Group. The wait time is accumulative, eg: the entire time the caller has been waiting.
Add 
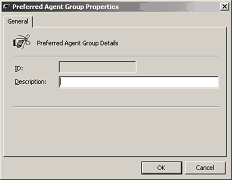
Click this button to add a Preferred Agent Group to the system which will be available for all queues.
The screen below displays.

Enter new description.
Click OK.
Clear 
Click this button to clear the Preferred Agents for the selected Queue.
The screen below will display.

Click Yes to clear, or No to cancel.
Time before using all agents
Check this box to display (in seconds) the time required to elapse before the call is diverted to another Agent (i.e. the Preferred Agent is unavailable).
This time is cumulative, eg: if the agent has calls routing to them at 10 seconds and then the time before using all agents is 30 seconds - the 30 seconds is the entire time the caller has been waiting, NOT, 30 seconds after the call was waiting at the Preferred Agent.
Show all agents
Shows all extensions that are part of the queue, so that you can select who you want in the Preferred Agents group.
Note: Each queue can use the same Preferred Agent Group with different agents in them as they are queue specific. ie: This is per queue only and you can have multiple agents in multiple groups.
Tip To route a call through to a Preferred Agent, the agent must be part of a queue if you do not wish them to take normal queue calls, then ensure you select them to be on Auto access with a Start Time of Never and a Start Count of Never.