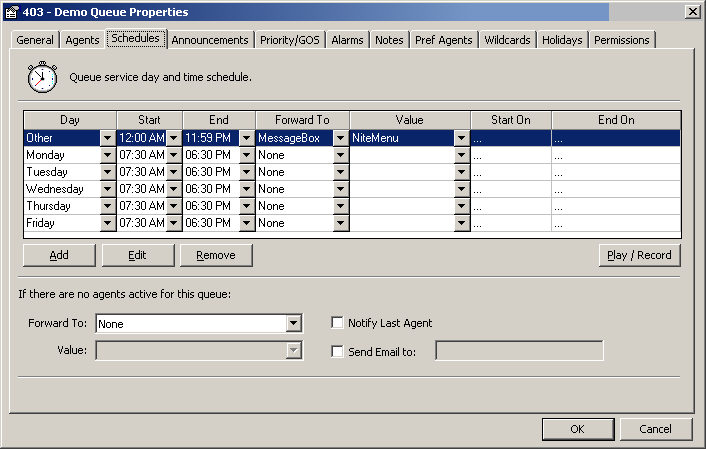
Schedules Tab
Queues can be set to open and close automatically by setting a schedule. For after hours scheduling the queue can be sent to a message or another queue.

A description of fields available on the Schedules Tab is set out below.
Day
Selecting a day (Monday to Sunday) will apply the given schedule only on the selected day of the week. If the same day of the week is listed more than once, the more specific schedule applies. For example, the following settings will open the queue on Mondays from 9am to 5pm, except for the Monday of October 1st 2007 when the queue will be forwarded to a message box instead:
Day |
Start |
End |
Forward To |
Value |
Start On |
End On |
Monday |
09:00 AM |
05:00 PM |
None |
|
... |
... |
Monday |
12:00 AM |
11:59 PM |
MessageBox |
29999 NewYears Message |
1/10/2007 |
1/10/2007 |
Select Other to have the schedule apply to days of the week not otherwise listed.
Start
The time the queue or specified action is to login and become live. Select from the drop-down menu.
End
What time the queue or specified action is to logout Select from the drop- down menu.
Forward to
You can forward the queue to three options: None, Message Box, Queue.
None |
will not forward the queue anywhere. For day queues, this would be the most common. |
Message Box |
will forward the queue to a message box that is specified under value. |
Queue |
will forward the queue to another queue that is specified under value. This will not change reporting statistics. |
Note: If you change the Forward to option back to none when it was previously a queue, you will not be able to take out the previous queue number from the value section. This is not an issue as the 'Forward To' option will override the 'value' option.
Value
When you forward the queue to Message Box or Queue, you must insert a value into the Value field.
For a Message Box, this will be an Audio Text Message value and for Queue, will be another Queue number.
Start On
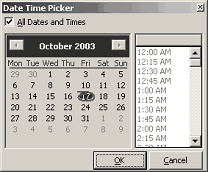
- Double click in this field to display the Date Time Picker screen.

- Select the start on date and time.
- Click OK.
End On
- Double click in this field to display the Date Time Picker screen.
- Select the End on date and time.
- Click OK.
Add
Click the Add button to add days to the screen: 
This will schedule the following day based on the selected day, with the same start and end times.
Edit
To edit the Message, select the day (it must be forwarded to a message box) and click on the Edit button: 
The message box properties will appear. (See Audio Text).
Remove
Click on the day you want to Delete and click on the Remove button:  . The selected day will be deleted.
If there are no agents active for this queue
Forward to and Value
When there are no agents logged into the Queue, select a destination from the drop-down menu to avoid a queue call being unattended. When this field is populated the Value field becomes available. i.e.
- If Queue is selected, the Value field drop-down menu lists all available queues.
- If Message Box is selected the Value field drop-down menu lists all available message options.

Notify Last Agent
Check this box to automatically warn the last agent who attempts to log out.
Send an Email
Check this box and enter a valid Email address to whom an Email message (Supervisor, Team Leader) is to be sent when a queue is left unattended. (If this box is not checked the address field is not available).
Play/Record
Allows you to listen to or record the required greeting.
The system will phone your extension with an options menu to listen, re- record or cancel the message.