Step 8. Improve the ShowPage Page Design
WAM085 - Enhancing the User Interface
In this step you will change the layout of the Enter Employee Details page, by moving the fields into logical groups on the page. You will also insert <fieldset> tags around each group of fields.
- The fieldset tag displays a "group box" around an area of the screen. The fieldset tag may include a <legend> tag that defines a caption displayed at the top left corner of the box.
- The fieldset tag must enclose the complete table, if a table is being used to lay out a number of fields and labels.
- The fieldset tags may not enclose a number of rows within a table.
- For more information on all HTML and related topics, see www.w3schools.com
The finished page design (showpage) will look like the following:
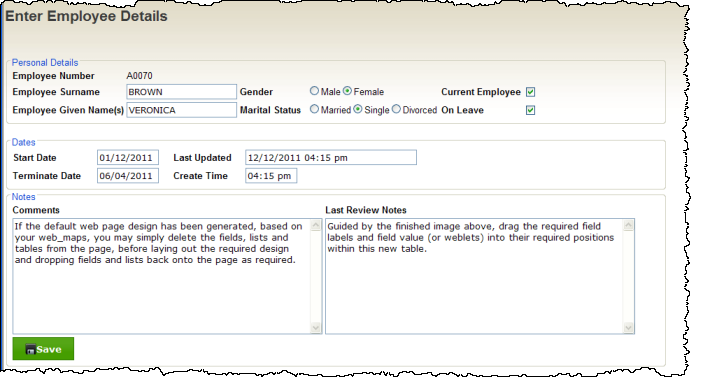
To redesign this web page, follow the details steps provided. However, bear in mind that other approaches could have been followed:
- If the WAM is initially compiled before any web_maps are defined, the web page will be blank.
- Recompiling the WAM when all the required web_maps have been defined, will list the field and list mappings on the WebRoutine Output tab. The page may then be defined in the Design view, by dragging and dropping fields into their required locations.
- If the default web page design has been generated, based on your web_maps, you may simply delete the fields, lists and tables from the page, before laying out the required design and dropping fields and lists back onto the page as required.
- In this exercise, you will insert new elements into the page (tables) and drag and drop fields and labels on the page in the Design view to achieve the result required.
- As you work through this part of the exercise, refer to the image above for guidance on the end result required.
1. Open the showpage WebRoutine in the Design view.
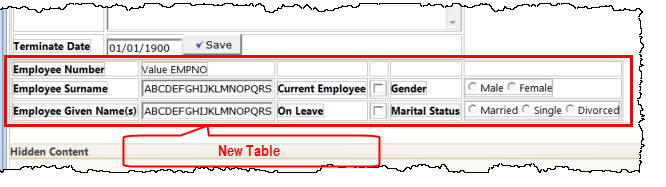
2. In this step you will create the Personal Details area containing employee number, surname, given name, gender, marital status, current employee and on leave fields.
Insert a table at the bottom of the page with 3 rows and 6 columns
3. Guided by the finished image above, drag the required field labels and field value (or weblets) into their required positions within this new table.
Note: You may find an easier approach is to Cut (Ctrl+X) each element from the existing table and then Paste (CTRL+V) it into the new table.
4. In the new table, select each table cell (that is, the <td> tag) containing a field label and set its class property to caption.
5. Remove the place holder characters where necessary.
Your page should now look like the following:
6. Save your changes.
7. Click in the top row of the original table, which is now empty, and use the context menu to use Table Items / Delete Rows…. to delete 3 rows. Repeat this step as necessary in the other empty rows.
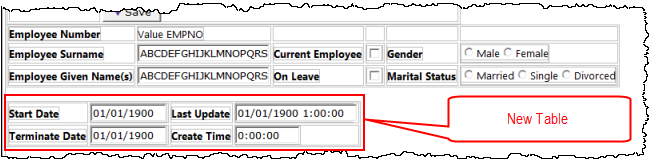
8. Insert another new table at the bottom of the page, with 2 rows and 4 columns. Drag the date and time fields and labels into the new table, or Cut and Paste each item.
9. Select each cell containing a label and change its class to caption.
10. Remove the placeholder characters. Your page should now look like the following:
11. Once again make the original table smaller by deleting the empty rows. This step is optional, since you will eventually delete this whole table. Deleting rows makes it easier to drag items to the new table.
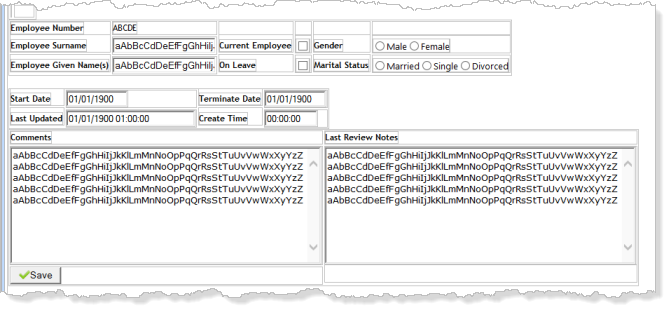
12. Insert a new table at the bottom of the page with 3 rows and 2 columns. Drag the comment and notes fields and labels into this new table. Review the image in 16. before you complete this step.
13. Select each cell containing a label and change its class to caption. Remove the place holder characters.
14. Add some ** characters to the original table, so that it remains easily visible and then drag the Save button into the bottom left hand cell.
15. Drag the Save button into the bottom left cell of the new table.
16. Save your changes. Your page should look like the following:
17. Select the corner of the original table, to select the whole table and delete it.
18. Save your changes.