Digitize Image
This button is used to open a dialog that can be used to digitize stage positions based on an SE or BSE analog image supplied by the system. This feature can acquire images from either the MicroImage-32 software, or the Win30 A/D-D/A board directly. The imaging system requires calibration in order to associate stage coordinates to beam deflection positions before it can be utilized for digitizing. See the parameters defined in the PROBEWIN.INI file [Image] section.
Both random points and traverse coordinates may be saved to the position database by simply clicking the mouse on the displayed image. If the image is supplied by MicroImage, any type of X/Y registered analog image that MicroImage is capable of acquiring may be used for the purpose (beam, stage or mosaic beam/stage scan images included) at any magnification supported by the instrument; in the case of the WIN30 direct interface only beam scan images may be acquired.
Note on the scan speed field:
ImageInterfaceType = 4 ‘ JEOL 8900/8200/850/8x30
"AD Averages/Pixel"
Specify the number of A-D conversions to average per pixel (range 1 - 1000)
ImageInterfaceType = 5 ' SX100/SXFive mapping
“mSec/Pixel”
Specify the image dwell time in msec/pixel (range 1 - 1000)
ImageInterfaceType = 6 ' SX100/SXFive Video
“Scan Rate”
Specify the image scan speed (range = 1 - 7)
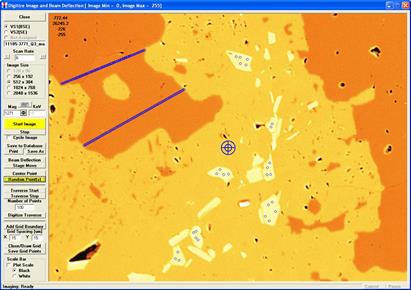
Use the Image Size options to select the image resolution, then click the analog source and click the Start Image button. The image acquisition will start. To halt the current image acquisition, click the Stop Image button. An image must be acquired before the user can begin to digitize position coordinates.
The Mag (magnification) and keV (kilovolts) fields are used by some interfaces (SX100/SXFive) to set the actual beam scan conditions for the image acquisition. For other interfaces the actual setting made to the instrument manually must be entered here so that the stage positions are correctly calculated.
Note that there are three magnifications defined in Probe for EPMA: a default magnification which is used for normal operation of the instrument between acquisitions, an analytical magnification which is used to acquire standards, unknowns and wavescans and an imaging magnification which is used to acquire images or for use with beam deflection acquisitions.
The Center Point button can be used to digitize the first point of the position sample in the exact center of the beam scan area if desired.
Once an image is acquired, use the Random (individual) Point(s) button to digitize one or more random (individual) position coordinates by simply clicking the image at the desired location(s). The stage coordinates of each mouse click is stored in the position database for sample automation purposes.
Use the Traverse Start to indicate the start position of a linear traverse, the Traverse Stop button to indicate the stop position of the linear traverse and the Number of Points field to specify the number of points in the traverse. Click the Digitize Traverse button to actually digitize the traverse and store it in the position database.