Define the Host & its Options
When you press the button, the dialog box is displayed.
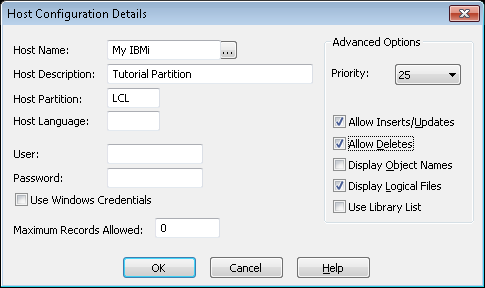
The dialog box allows you to define a host system to the LANSA Client environment as well as options relating to the use of that host system.
1. Choose these options for this tutorial:
| Option | Setting for this tutorial |
|
Host Name |
Enter the name of the host on which the has been created. |
|
Host Description |
Enter or similar name. This is the name that will appear in the Host Selection list. |
|
Host Partition |
Enter or other, applicable. |
|
Host Language |
If you are using the default language, English (ENG), for the LCL partition, leave the blank. The other languages available for this partition are French (FRA) and German (DEU). |
|
User and Password |
Enter your User ID and Password. If you leave these blank, LANSA Client will use the User ID and Password used by your communications software unless you are using a TCP/IP connection. For TCP/IP, this User ID and Password will be used. |
|
Maximum Records |
Leave at 0 for this tutorial. This means that no limit will be placed on the records retrieved from the host. |
| Advanced Options: |
|
|
Allow Inserts/Updates |
Select this option as editing data is included in these tutorials. |
|
Allow Deletes |
Select this option for the tutorials. |
|
Display Object Names |
Select this option. Object name display can also be turned on or off by the user when creating an inquiry. |
|
|
For information about the Advanced Options, refer to the Administrator Tasks in the . |
2. Press the button when you are satisfied with your entries.
You are returned to the dialog box. The Tutorial partition that you have just defined will now be included in the list in this dialog box.
This is the end of the LANSA Client Tutorial.