Step 5. Add more Commands to the new Menu
Now to add the commands for the Join and Linked queries.
1. Select the button again and type &Join Query in the box.
a. Indent your new command beneath the Queries menu item by pressing the  right arrow button at the bottom of the box.
b. Select the My Tutorial Join Query (Tutorial Join Query) from the list.
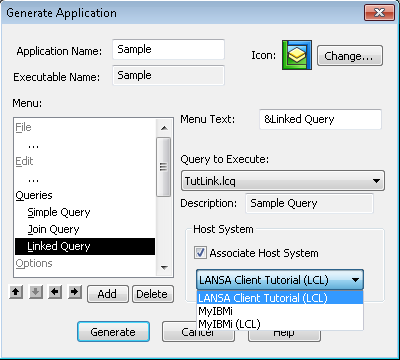
2. Select the Add button again and type &Linked Query in the box.
a. Indent your new command beneath the Queries menu item pressing the right arrow button at the bottom of the box.
b. Select the TutLink.LCQ (Tutorial Linked Query) from the list.
3. If your commands are not in the correct sequence, re-arrange them using the  up and down arrows.
You may wish to attach a different icon to this application. The LANSA Client icon in the top right corner of this dialog box is the icon that will be used unless you replace it.
4. To change the icon, select the button and then select an icon from your own files using the browse dialog box.
5. Select the Host to be associated with this application. In this example, the LANSA Client Tutorial (LCL) is the selected partition.
You are now ready to generate the LANSA Client application. Check that you have selected a for each of you new menu items. If you haven't, an error message will be displayed and the Generate will be cancelled.
6. Press the button. LANSA Client will generate the application. Reply Yes to the message telling you that your new applications will be stored in the APPS directory. (There is no option for you to choose the directory.)
If the application has generated successfully, the generated application will be included in your LANSA Client menu.
Now run the application as described in Step 6. Run the Generated Application