6.2.1 Generate Application Dialog Box
You use the Generate Application dialog box to specify all your application's requirements, both for new applications or when changing existing applications.
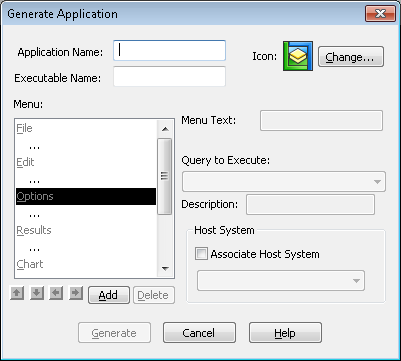
In the Generate Application Dialog Box you will:
Step 1. Give the Application a Name
In the Application Name box, enter the name or description of the application. It is best to use a description that reflects the purpose of the application.
LANSA Client does not check if this name is already in use.
Step 2. Assign a Name to the File
In the Executable Name box, enter the name of the file that will contain the definition of the application. This is a standard Windows file name and it must be unique. If you use an existing name, you will be asked if you wish to overwrite the existing file.
When your application is generated, an extension of MNU will be added to this name.
Step 3. Choose an Icon
In the top right corner of the dialog box is the icon that you will use to start the application. The LANSA Client icon is initially displayed. If you would prefer to use a different icon, select the button to browse through your files to choose another icon.
The new icon is immediately displayed in the top right corner of the dialog box.
Step 4. Select the Queries
Select the queries to be included in your application from those listed in the drop down list or use the button to locate the query. In order to execute your queries when you run your application, you need to add a command to your application's menu bar. How to do this is described in 6.3.1 Add to the Menu Bar. In 6.3 The Menu Bar section you will find a list of all the menu bar items and the commands that are supplied ready for you to use.
Step 5. Assign a Host System
You can assign a specific host system to be used with your application by selecting the Attach Host System option. From the Host System listbox, select the host system you wish to connect to when running this application.
If you don't specify a host system at this stage, and if more than one host system has been specified for the LANSA Client environment, the Select Host dialog box will be presented to allow the host system to be selected each time the application is started.
Step 6. Generate the Application
When you are satisfied with the definition of your application, press the Generate button to generate the application.
To discard the definition, select the Cancel button.
When LANSA Client has generated the application, it will create a file with an MNU extension and the name you specified as the Executable Name. The MNU file, plus a copy of all the queries included in the application are stored in the APPS folder which is a sub-folder of the LANSA Client folder.
The generated application will be added to the LANSA Client Windows Group with the icon and the application name you have selected.
If any changes are needed to the application, return to the beginning of these steps to make them. You cannot change the MNU file directly.
Further Information