Using the menu item designer
To open the menu item designer, follow these steps:
1. Make sure the Dynamic HTML menu bar weblet on your page is selected and then click on the Details tab.
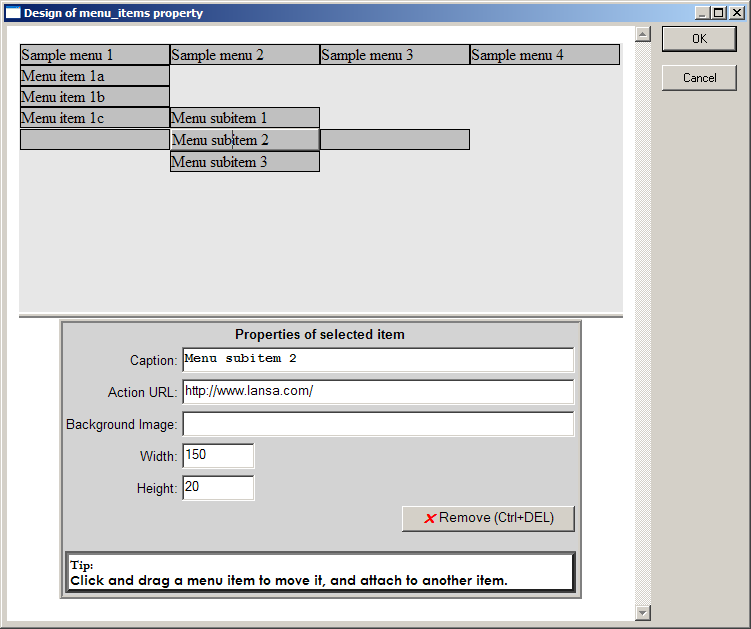
2. Move the mouse pointer over the menu_items property in the Details tab. An ellipsis should appear next to the property value. Click the ellipsis button to open the menu items designer. A window like the one shown below appears.

The top-half of the window shows a representation of the current state of the menu. Note that this is always shown in horizontal orientation irrespective of the current value of the orientation property. In this part of the window, you can:
- click on items to complete their details in the lower half;
- drag and drop items to rearrange them;
- add new items by clicking on the blank items shown adjacent to the currently selected item;
- remove items by selecting them and clicking the Remove button.
In the bottom-half of the window you can specify the details for the selected item as follows:
Caption
Specifies the text that appears on the face of the menu item. You can also enter the text directly on the face of a menu item by clicking on it in the top-half of the window and typing.
Action URL
Specifies a URL that the menu item will navigate to when clicked. You can specify a complete URL or one that is relative to the current page. The URL can invoke another webroutine by specifying an appropriate URL.
Background Image
Specifies the path and file name of an image to be displayed as background to the menu item.
Width
Specifies the width in pixels of the menu item. See Understanding menu bar and menu item width and height for information on how this value and the weblet width property determine the menu bar and item width.
Height
Specifies the height in pixels of the menu item. See Understanding menu bar and menu item width and height for information on how this value and the weblet height property determine the menu bar and item height.