Step 6 Change the Employee Number field
From LANSA WAM
Step 6. Change the Employee Number field
WAM010 - Using WEB_MAPs
In this step, you will change Employee Number to be an output only field. This will prevent the field from being changed and change the behavior you experienced in the last step. You need to be aware that fields that are displayed as output are generated as text on the page. Since it is text and not a field, the necessary tags to pass the field to the next WebRoutine are not generated.
You must add the field EMPNO a second time as a hidden field to preserve the data.
You will also see the dangers of generating XSL for ALL WebRoutines on compile, as opposed to only generating the XSL for new WebRoutines.
1. Change the GROUP_BY to display Employee Number as output only.
Group_By Name(#Empdata) Fields((#empno *output) #surname #givename #address1 #postcode)
2. Click the button in the LANSA Editor toolbar to compile the WAM component.
3. After the compile completes successfully, reopen the WMdemo WebRoutine in the Design view.
4. Notice that the Employee Number field has not changed. You could still input a value to it. This is because a compile, by default, generates the XSL for NEW WebRoutines only.
An input capable field in the view:

An output field in the view:

Note: This is the safe option because the web page design for all existing WebRoutines will remain unchanged when a WAM is recompiled.
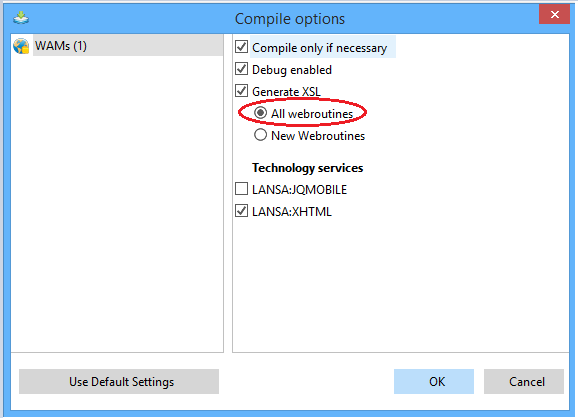
You may choose to re-generate the XSL for all WebRoutines by changing the default of the from to . If this is done then all XSL Editing changes will be lost for all WebRoutines in the WAM. Therefore you would only select this option if you wish to discard all your web page design changes for the WAM's WebRoutines.
The following images depicts the effect on WMDemo if this option was taken. Please do not perform these steps. They are only for information. You will continue the exercise at point 5.
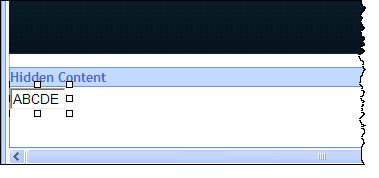
If check in the window is selected, the Design view would appear something like the following:

Notice Employee Number is displayed as an output field now, but the buttons added in the previous step have been lost.
If you were to take this approach, you would have to re-add a row to the table and recreate the buttons.
5. Add EMPNO to the page again.
a. From the WebRoutine Ouput , select the EMPNO field and drag it into the top right cell of the table, to the right of the EMPNO field that is currently on the page.
b. Delete the caption that was added when you added the field (this caption will already be selected after dragging the field onto the page).
6. Hide the input capable instance of EMPNO
a. Drag the original EMPNO field (not the one you just added) into the area at the bottom of the page.
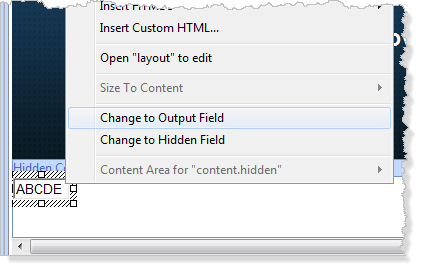
Note: You can change the display mode of a field at any time in the view by right clicking the field and selecting Input Field, Change to Output Field, or Change to Hidden Field, without having to change the WEB_MAP.
However, note that if you want to map the field into the WebRoutine, the Web_Map must have a FOR(*INPUT) or FOR(*BOTH) parameter.
7. Save your changes and test the page again.