WAM100 Using Cascading Style Sheets
From LANSA WAM
WAM100 - Using Cascading Style Sheets
Objectives
To learn how your own style sheet can be set up and used to control the appearance of specific elements of your web pages.
During this exercise you will use: Microsoft Internet Explorer, Developer Tools (included in Internet Explorer V8, V9 and V10) that enable the structure of a web page and its style rules to be explored in detail.
In order to complete this exercise you will complete the following:
Review What are Cascading Style Sheets? and What CSS files are loaded and how do I add my own?
Step 1. Create WAM iii Using CSS
Step 2. Create new Style Sheet
Step 3. Create an External Resource
Step 4. Apply Style Sheet to WAM iiiUsingCSS
Step 5. Apply External Resource to the Common Layout
Step 6. Make the Style Sheet specific to lists named EMPLIST
Before You Begin
This exercise does not depend on knowledge gained from all preceding exercises. The following exercises should have been completed:
What are Cascading Style Sheets?
A Cascading Style Sheet tells the browser how to display page elements. Cascading Style Sheet information determines things like the fonts and color schemes, DHTML effects, alignment, border size and color, but may also be used to define images and other features related to the interface. These properties can be assigned to individual elements identified by an ID, or groups of elements identified by type, location and class.
Many of the shipped weblets include style (or class) properties. The default style applied to a property, and the full set of styles available in the dropdown list associated with these properties, relate directly back to the CSS file referenced on the WAM's related layout.
For full information see http://www.w3schools.com/css
Style sheet files (CSS) are simply text and can be edited with any text editor such as Notepad. If you are working with style sheets it's a good idea to obtain a specialist style sheet editor. There are a number available, is one example. They will make your editing faster and more accurate and make it easier to navigate through and manage a large number of styles defined in a style sheet. They will also help you to more rapidly learn the options available when defining styles.
What CSS files are loaded and how do I add my own?
The std_style_v2 weblet takes care of creating all the <link> tags needed to load the CSS files so you need to include it in the <head> section of your layouts. The std_style_v2 weblet always loads std_style.min.css into every layout. This defines the non-theme related properties of all LANSA supplied weblets.
It then loads any CSS files defined by its theme_css_filename and css_files properties. These properties are provided for backwards compatibility with layouts built with older versions of the weblet. For new layouts, you should specify 'none' in theme_css_filename and use External Resources to define additional CSS files you want to include.
Next, it adds any CSS files defined as referenced in the webroutine, layout or weblets used by the webroutine.
Finally, the std_style_v2 weblet loads a stylesheet defined by the variable $lweb_std_css_language_overlay. This variable is defined in the std_locale weblet and provides a means to apply language specific CSS modifications.
For more detail on this topic see the guide.
What Cascading Style Sheets are available?
The main CSS stylesheets are in the main style directory under the images directory.
The themed CCS stylesheets are under the jQuery subdirectory—under a subdirectory named after the theme.
See the Web Application Modules guide for a full list of the other stylesheets available to WAMs.
Cascading Style Sheets in Action
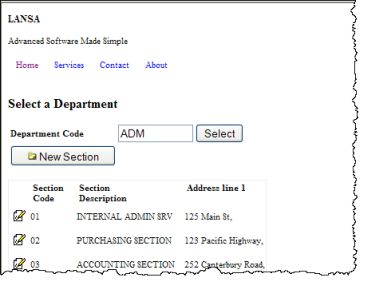
For an appreciation of how the shipped style sheets combine, this image is the begin WebRoutine in WAM with the themelet stylesheets removed:
This image is the begin WebRoutine with the style sheets applied:
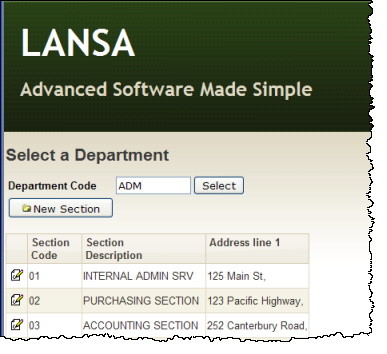
Clearly, to change the appearance of any element on your web page, you need to define a style sheet that overrides the styles defined by your chosen theme.
Use CSS with Lists and Grids
This exercise will demonstrate how to change the appearance of elements in a list. The exercise is about how to identify the elements you wish to change and then implement these changes with your own style sheet.
To use CSS effectively, you must first understand how the how the screen element you are interested in is constructed.
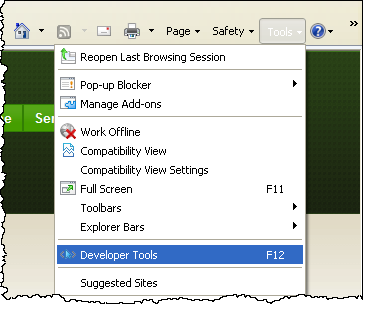
If you are using Internet Explorer 8, 9 or 10 you already have Developer Tools that may be started from the browser Tools menu, or by using F12.Tools like this are essential for understanding how your page is constructed. The browser has a similar optional tool known as .
This screen picture shows running with a WAM which displays a list of employees:
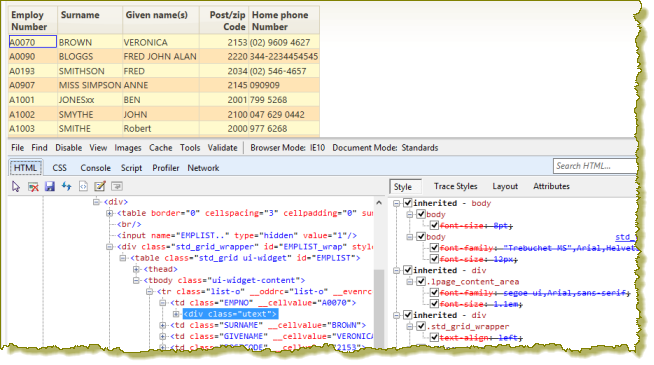
Note that the ![]() icon in Developer Tools can be used to select the element on the page that you want to examine.
icon in Developer Tools can be used to select the element on the page that you want to examine.
In this example the table containing the employee list has been selected. The then displays the HTML, attributes and styles for the selected element.
Note: also has good display source features that will help you to see in more detail how part of the screen is defined. You will use these later in this exercise.
Using and selecting the table containing the list, shows that the browselist EMPLST table is defined as: For clarity, some detail has been omitted from this code.
<DIV style="WIDTH: 617px" id=EMPLIST_wrap class=std_grid_wrapper>
<TABLE style="CURSOR: default" id=EMPLIST class="std_grid ui-widget">
<THEAD>
<TR class="list-h ui-widget-header">
<TH class="utext EMPNO std_grid_sort_indicator" __allowsort="true" __mode="input" __formattype="alpha" __decimalseparator="">
Employ
<BR>
Number
<DIV class=std_grid_cell_sizer><!--.--><!---->
</DIV>
</TH>
. . . . . . . .
<TBODY class=ui-widget-content>
<TR class=list-o __evenrc="list-e" __oddrc="list-o">
<TD class=EMPNO __cellValue="A1003">
<INPUT id=EMPLIST.0001.EMPNO class=utext onchange="return isValidText(this, ' ')" value=A1003 maxLength=5 size=5 name=EMPLIST.0001.EMPNO>
</TD>
<TD class=GIVENAME __cellValue="Robert">
<DIV class=utext>Robert<!----></DIV>
</TD>
. . . . . .
</TR>
. . . . . . .
</TBODY>
</TABLE>
Some points to note:
- A list is wrapped by a DIV with the of std_grid_wrapper.
- The DIV also has an of <listname>_wrap, where <listname> is the name of the list in the RDMLX.
- For a grid, the wrapper DIV also has a of std_grid_wrapper. The is LANSA_<gridname>_wrap where <gridname> is the name assigned to the grid in the Design view.
- The DIV wrapper provides the size and position for the grid, drawing any scrollbars as necessary.
- In a list, the row names are alternated between list-o and list-e.
- For a grid, the names for odd and even rows are defined by the grid properties odd_row_class and even_row_class, which have default values of and .
- A list's table cells (<td> tags) are given a name of the field name. This provides a way to apply styles to specific columns.
- Input fields are given a class that represents the data type of the field. Fields of type alpha, char or string will be "text", "utext" or "ltext" depending on the input case of the field. Fields of type packed, signed, integer, float, date, time or datetime will have a class name of "number". Boolean fields will be "ltext" and all other fields will be "text".
The best way to understand how it all fits together is to look at a few examples.