Editing report properties
From Alchemex 7.1
Home > Tutorials > Report Manager Tutorial > Creating a Basic Report > Editing Report Properties
Editing Report Properties
Overview
Once you have created a report, you are able to view the report's details in the Property window. You are also able to edit your report's properties in the Property window, by doing any of the following:
- Edit the report name
- Edit the report description
- Add/remove columns from the report
- Change the position of the columns
Exercise 1: Edit the report name
Use the help topic Edit Report Properties to assist with the task:
Change the name of the Document History report to Customer Document History report.
Step by Step Solution:
- Select the Document History report.
- In the property window, highlight the current report name.
- Enter the new name and click Apply. You are prompted to select an option for the template.
- Leave the selected choice unchanged and click OK. The new report name is saved.
Exercise 2: Edit the report description
Update the report description to reflect the following: Customer Document totals for current and previous year.
Step by Step Solution:
- Select the report name.
- In the property window, enter the description in the Description field and click Apply.
Exercise 3: Edit the columns in the report
Use the help topic Add or Remove Columns and Change order of Columns to assist with the task.
- Remove the following column: TotalCost
- Add the following column to the report: TotalIncl
- Arrange the columns as follows:
- CustomerCode
- CustomerName
- DocType
- DocNo
- Date
- TotalExcl
- TotalVAT
- TotalIncl
Step-by-Step Solution: Edit the report:
Remove a column:
- Select the report in the Object window. The reports properties are displayed.
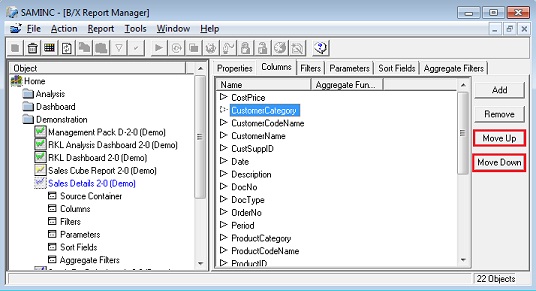
- Click the Column tab.
Select the column to be deleted.
Note: To select multiple columns use the CTRL key.
- Click the Remove button. The selected columns are deleted.
Add Columns to a report:
- Select the report in the Object window. The report’s properties are displayed.
- Click the Column tab.
- Click the Add button.
- Check the columns to be added in the Choose Column Fields dialog box.
- Click Ok. The columns are added to the report.
Rearrange the order of the columns:
- Select the report in the Object window. The report’s properties are displayed.
- Click the Column tab.
- Select the column you want to rearrange and use the Move Up and Move Down buttons to move the field to the new location.
This concludes the section on editing report properties. The next section will deal with advanced report settings.