6 33 2 Steps Required for Transforming an Existing Application
From Visual LANSA
6.33.2 Steps Required for Transforming an Existing Application
The personnel system application shown in the example above is based on the LANSA personnel demonstration system with which you may be familiar. In creating it we had to decide how to transform the existing application into an efficient and easy-to-use GUI application.
We had two choices: either redesign the entire interface or recreate the existing screens using the graphical elements. The latter choice would have resulted in a good looking application without any usability and user productivity benefits.
Our choice was to redesign the entire interface to make most use of the Visual LANSA capabilities. Much of the existing code could still be reused.
Creating this application involved three steps:
- Identifying the data and functions used in the application by examining the existing LANSA personnel system application.
- Choosing an appropriate visualization style for the components and creating them. All the components created for this system are reusable in other applications as well.
- Creating the application by putting the components on a form. This step took practically no time.
Identifying Data
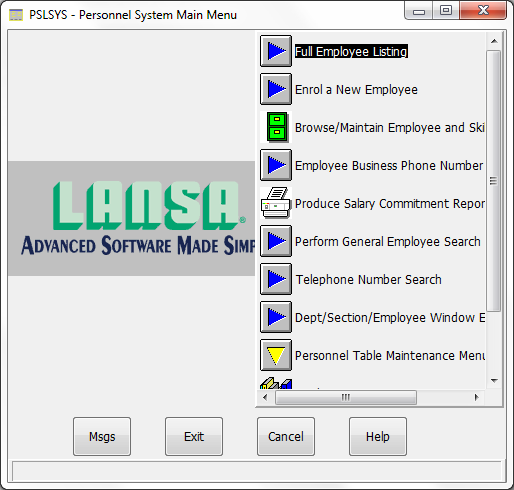
The main menu of the LANSA personnel system provides access to various functions related with employees, skills, departments and sections. There are four kinds of functions: data entry, display, maintenance and printing.
In examining the system, we discovered the following main characteristics:
- Employees are organized in sections, and sections are grouped into departments
- The main purpose of the system is to record and display various details about the employees including salary and one or more skills
- The user of the system must be able to display, add, delete and change all the information
We came up with a list of about a dozen elements needed for the application. Because we thought it might be likely that these components could be reused in other applications, we decided to make them reusable parts.
Creating the Components
We chose to build the interface around a list of employees. The employees shown would depend on the department and section selected. It would also have to be possible to find an employee by name.
List of Employees
The list of employees consists of employee names and employee numbers. We had the following choices for its visualization style:
- A list box presents lists of items from which the user can make a selection. The text in the list box cannot be changed which made it unsuitable for our purposes.
- A combo box consists of an edit box combined with a list box. New text can be entered in the edit box and when an entry in the list is selected, it is shown in the edit box and it can be edited.
- A tree view shows a hierarchical view of data. We could have created a tree view showing employees with their skills. However, because the tree view was even better suited for displaying departments and their sections, we reserved it for this use. A window with two tree views could become confusing.
- A grid shows columns of data which can all be edited. We did not want to let our users to change the employee number which made the grid unsuitable.
- The list view shows a list of items in one or more columns. The text in the first column from the left can be edited. The list can be sorted by any column. The items can be preceded by a small icon.
We chose the list view because it allowed the direct editing of the employee name but not of the employee number, and because the user could sort it either by employee name or employee number.
Departments and Sections
The obvious visualization style for departments and sections was a tree view because the relationship between departments and sections is hierarchical (departments consist of several sections).
The nodes of the tree can be expanded and collapsed by clicking on them. The nodes can be preceded by icons as in our example.
Skills
This list of skills had to be visualized as a grid, because we wanted to give the user the ability to change all the skill-related information (skill, grade, qualification date).
Salary
The salary was visualized as a edit box with spin buttons. The user can change the salary using the spin buttons.
Health Fund Member and Employment Type
The health fund member field was visualized as a check box because it represents a Yes/No choice.
The employment type (part-time and full-time) was visualized as radio buttons. Radio buttons are normally used to set a mutually exclusive choice. Therefore it should always be used in groups of two or more.
Post/Zip Code
We chose to make the post code field a combo box because in this example we assume that there is only a limited set of post codes in use (in real life this would probably not be so). We chose a combo box instead of a list box because a combo box can be defined as 'drop-down'. This means that the list part of the combo box is hidden until the user clicks on it.
Menu
We chose the MINSTDBTN menu bar as the basis for our menu. It contains the File, Edit, and Help menus.
We modified the New option of the File menu to allow the user to choose between new employee, section, and department.
Creating the Application
Once we had created all the components, creating the application was only matter of creating a form to be the main window of the application and placing the components on it.