6 18 2 Message Boxes
From Visual LANSA
6.18.2 Message Boxes
A message box is displayed on top of the current form. A message box is modal, in other words the user has to click one of the buttons in the message box to dismiss it before the underlying form is reactivated.
The message box consists of a title, an icon, message text and one or more command buttons as shown:
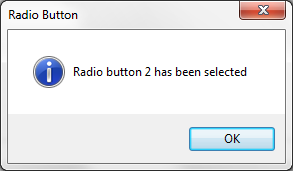
Message boxes are created using the MESSAGE_BOX_SHOW Built-In Function. Here is the source for the message box shown above:
use builtin(MESSAGE_BOX_SHOW) with_args(OK OK Information 'Radio Button' 'Radio button 2 has been selected')
The MESSAGE_BOX_SHOW function has the following arguments:
|
Argument |
Description |
Possible Values |
|
Enable Buttons |
The buttons shown in the message box. |
YesNo YesNoCancel OK OKCancel AbortRetryIgnore RetryCancel |
|
Default Button |
The button that has the focus. |
Any of the buttons in the Enable Buttons argument. |
|
Icon to Show |
The icon shown in the message box. |
Question (question mark icon) Stop (stop icon) Exclamation (exclamation point icon) Information (information icon) Warning Asterisk Error Hand None |
|
Title of Message Box |
|
The text for the title enclosed in single quotes |
|
Text to Show |
|
The message text enclosed in single quotes |
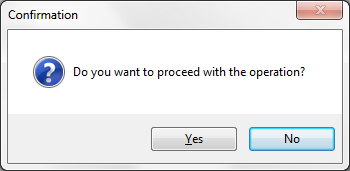
This code:
use builtin(MESSAGE_BOX_SHOW) with_args(YesNo No Question 'Confirmation' 'Do you want to proceed with the operation?')
Creates and displays a message box with two buttons, Yes and No. No is the default button. The icon is a question mark as shown here:
Getting the User's Response
When your message box has more than one button, you need to know which one the user has clicked. To get the response, use the TO_GET parameter and specify a field where you want the response stored. The field must be an alpha field of 20 characters or less.
To store the response to the Confirmation dialog box in a field named #REPLY, you would specify:
use builtin(MESSAGE_BOX_SHOW) with_args(YesNo No Question 'Confirmation' 'Do you want to proceed with the operation?') to_get(#reply)
You could then use the value of #REPLY to determine what action the program should take. For instance:
If cond'#reply *EQ Yes'
use builtin(MESSAGE_BOX_SHOW) with_args(OK OK Information '' 'Yes was
pressed')
else
use builtin(MESSAGE_BOX_SHOW) with_args(OK OK Information '' 'No was
pressed')
endif
Depending on what buttons the message box has, the return value can be:
- ABORT
- RETRY
- IGNORE
- OK
- CANCEL
- YES
- NO
Make Sure You Use the Right Buttons
When deciding which buttons to put in the message box, think carefully about the text of the message to make sure that the text and the buttons match. For example if the message box asks a question, the correct buttons will be Yes, No and possibly Cancel, never OK and Cancel.
Also think about the context where the message is displayed. For instance, an information message should not have any other buttons than OK.
Formatting the Message Text
The text of the message can be longer than in the previous examples and all or part of it can be retrieved from controls on the form (for instance fields or a grid) or from database. To create a message which consists of multiple text strings you can use either the MESSAGE_BOX_ADD or the MESSAGE_BOX_APPEND functions. The MESSAGE_BOX_APPEND function joins strings together whereas the MESSAGE_BOX_ADD adds the strings on separate lines.
MESSAGE_BOX_APPEND
The MESSAGE_BOX_APPEND function joins strings together. The text in the dialog box below was created by appending the #GiveName #Surname #Address1 #Address2 and #Address3 fields of the PSLMST file together:
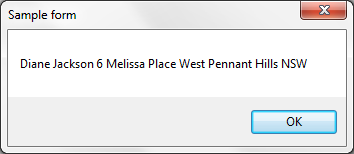
Here is the source:
change #empno 'A1234'
fetch fields(#givename #surname #address1 #address2 #address3) from_file(pslmst) with_key(#empno)
use builtin(MESSAGE_BOX_APPEND) with_args(#givename)
use builtin(MESSAGE_BOX_APPEND) with_args(#surname)
use builtin(MESSAGE_BOX_APPEND) with_args(#address1)
use builtin(MESSAGE_BOX_APPEND) with_args(#address2)
use builtin(MESSAGE_BOX_APPEND) with_args(#address3)
use builtin(MESSAGE_BOX_SHOW)
MESSAGE_BOX_ADD
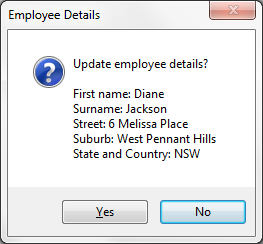
The MESSAGE_BOX_ADD function adds text strings on separate lines. This message box was created the same way as the example above but using MESSAGE_BOX_ADD statements.
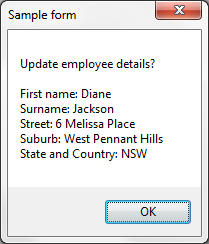
You can use up to ten items per line. For example you could add a question to the message box and static text before the fields to identify the rows:
change #empno 'A1234'
fetch fields(#givename #surname #address1 #address2 #address3) from_file(pslmst) with_key(#empno)
use builtin(MESSAGE_BOX_ADD) with_args('Update employee details?')
use builtin(MESSAGE_BOX_ADD) with_args('')
use builtin(MESSAGE_BOX_ADD) with_args('First name: '#givename)
use builtin(MESSAGE_BOX_ADD) with_args('Surname: '#surname)
use builtin(MESSAGE_BOX_ADD) with_args('Street: ' #address1)
use builtin(MESSAGE_BOX_ADD) with_args('Suburb: '#address2)
use builtin(MESSAGE_BOX_ADD) with_args('State and Country: '#address3)
use builtin(MESSAGE_BOX_SHOW)
If you do not specify any arguments in the MESSAGE_BOX_SHOW function, the form's description is used as the message box title, there is no icon and the OK button is used.
With the formatting functions you can use all the arguments of the MESSAGE_BOX_SHOW function except the last one, Text to Show (if you specify any text, it will override the formatted text). The following statement adds Yes and No buttons, the question mark icon and the title Employee Details to the message box:
use builtin(MESSAGE_BOX_SHOW) with_args(YesNo No Question 'Employee Details')