Step 4. Create iiiFN08 Server Outbound (response) binding
INT008 - Department & Employee Server
In this step, you will use the to create the outbound response binding iiiPRO06_response.jar on the server. In this binding, the list of Employee Skills will be represented with a list, but the list of Employees will be defined as a fragment, in order to avoid nested lists. The Employee fragment will be written multiple times in the RDMLX code.
1. First, create a new XML Binding Wizard solution in your Server XML Response group:
a. With the iii Training project open in Studio, right-click on the solution group and select .
b. The group should be pre-selected. Select the . Enter iiiPRO06_response in the input field. Click .
2. The panel appears. Click the button. Select the iiiPRO06_response.xml file and the click the button, then .
The main window will now appear. Change to com.iiicompany.service.xml,
3. Click the Outbound checkbox. Select the newly-created Outbound tab.
4. The bindings for the response XML are more complex than the inbound.
- The root tag and the tag need to be marked as
- EmployeeSkill needs to be marked as a
- Code, FullName, and SkillDesc need to be mapped to specific LANSA .
The Employee fragment will be written repeatedly in the RDMLX code.
To do this, map the Employee details as follows:
a. Right click on the EmployeeList root tag. Select Fragment from the pop-up menu.
b. Right click on the Employee tag. Select from the pop-up menu.
c. Right click on the Code tag and select Edit. Enter EMPNO for the Name and click OK.
d. Right click on the FullName tag and select Edit. Type FULLNAME for the Name and click OK.
e. Right click on either of the EmployeeSkill tags and select List.
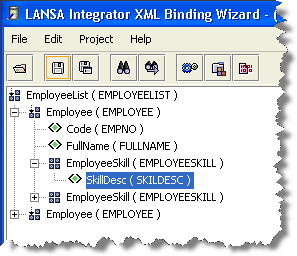
f. Expand the EmployeeSkill tags to see their sub-tags. Right click or double click on either of the SkillDesc tags to edit them. Enter SKILDESC for the Name and click OK.
Your should look like the following:

5. Your definitions are complete. Now, generate and compile the outbound response service. Select the Project menu and choose the Build option.
6. your work and the .