Step 4. Deploy the SOAP Agent solution
INT010B - SOAP Service - Define Agent
You need a server in order to complete this step. If a server is not available, you can complete this step except for Publishing the files.
You have built the SOAP Agent solution in your development environment. Now you need to deploy, or publish, these two generated files to the server:
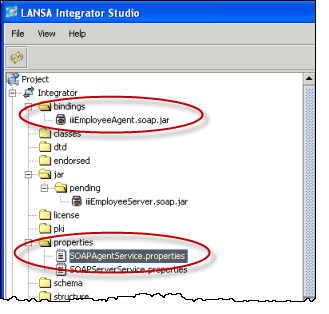
- iiiEmployeeAgent.soap.jar file
- SOAPAgentService.properties file
The SOAP Agent service is handled like the other Integrator services which you have already implemented in this workshop. When you publish your SOAP Agent files, they are moved to the folder and you will NOT need to reboot the JSM Server to run them.
1. Display the tab in the
2. Expand the folder.
3. Right click the iiiEmployeeAgent.SOAP.jar file to open the context menu.
4. From the context menu, select and then . Your file will be moved to the folder of the Project.
5. Right click on the SOAPAgentService.properties file to open the context menu.
6. From the context menu, select and then .
Both of your files are now in a folder in the folder.
7. Contract your folder and expand the folder until you can see the jar file in the folder and the properties file that you have just moved to the folder.
8. Now you must your files (that is, move them to the required JSM server). If necessary, in your tab, open the you are using, so that the server instance is shown in the right hand pane.
9. Move the jar and properties files from your local folder to the JSM Server's folder.
a. Select and right click the iiiEmployeeAgent.soap.jar file in the folder to open the context menu.
b. Select from the context menu.
Your jar file is now moved to the JSM server's folder.
c. Right click on the SOAPAgentService .properties file in the folder to open the context menu.
d. Choose from the context menu.
Your properties file is used to add a section to the SOAPAgentService properties file on the server.