Step 7. Using a CSV without Column Headings
INT004 - Using the LANSA User Agent
In this step, you will modify the CSV file to remove the column headings. The RDMLX will need to be modified to change the SVMODE keyword on the RECEIVE command to *NONE. i.e. the CSV file has no column headings. In Step 6, you modified the received working list definition to match the columns in the CSV file, so no other changes are needed to receive the CSV file. In fact, since your function only requires the first two fields, the working list could be defined as containing EMPNO and SALARY only.
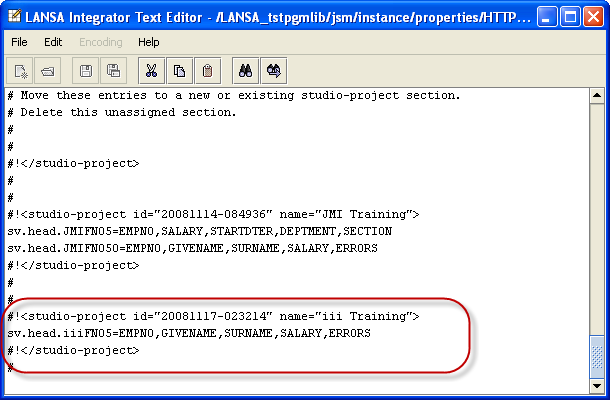
You will add a SVHEAD keyword to the SEND command with a value of iiiFN05. This will look up a project entry you will add to the HTTPService properties file for the header row to be added to the sent CSV file.
1. Start the Notepad editor in Windows to open the file iii_employee_new_salary.csv created at the beginning of this exercise. The file might appear as follows:
EMPNO,SALARY,STARTDTER,DEPTMENT,SECTION
A1004,53400,910521,ADM,01
A1005,53500,950102,ADM,01
A1006,53600,891201,MKT,02
2. Remove the first row in the file that contains the column heading data. The file might appear as follows:
A1004,53400,910521,ADM,01
A1005,53500,950102,ADM,01
A1006,53600,891201,MKT,02
3. Using the File menu, select the Save to save the file with the modified contents. You can close the file iii_employee_new_salary.csv.
4. Edit the function iiiFN05.
Locate the definition of the working list used to receive the data from the User Agent. The working list is called #S_233RCV and it might appear as follows:
DEF_LIST NAME(#S_233RCV) FIELDS(#EMPNO #SALARY #STARTDTER #DEPTMENT #SECTION) TYPE(*WORKING)
5. Locate the commands that execute the KEYWRD subroutine to build the RECEIVE command.
Change the value of the SVMODE keyword to *NONE. SVMODE(*NONE) is the default value so you could simply omit the keyword altogether.
The RDMLX might appear as follows:
CHANGE FIELD(#JSMXCMD) TO(RECEIVE)
EXECUTE SUBROUTINE(KEYWRD) WITH_PARMS(#JSMXCMD HANDLER ISVL)
EXECUTE SUBROUTINE(KEYWRD) WITH_PARMS(#JSMXCMD SVMODE '*NONE')
USE BUILTIN(JSMX_COMMAND) WITH_ARGS(#JSMXHDLE1 #JSMCMD) TO_GET(#JSMSTS #JSMMSG #S_233RCV)
EXECUTE SUBROUTINE(CHECK_STS)
6. Locate the execute KEYWRD subroutine code for the SEND command. Add a SVHEAD keyword with a value of iiiFN05. Your code should look like the following:
* BUILD THE JSM COMMAND
#JSMXCMD := SEND
EXECUTE SUBROUTINE(KEYWRD) WITH_PARMS(#JSMXCMD HANDLER ISVL)
EXECUTE SUBROUTINE(KEYWRD) WITH_PARMS(#JSMXCMD SVHEAD iiiFN05)
USE BUILTIN(JSMX_COMMAND) WITH_ARGS(#JSMXHDLE1 #JSMXCMD) TO_GET(#JSMSTS #JSMMSG #S_233SND)
EXECUTE SUBROUTINE(CHECK_STS) WITH_PARMS(#JSMXCMD)
7. Compile the function.
8. In this step you will add a section to the HTTPSERVICE properties file for your Project. This section will define the column headings to be used for the sent CSV file.
a. Open your iii Training project in Integrator Studio.
On the tab, select the you are using for training and use the right mouse menu to .
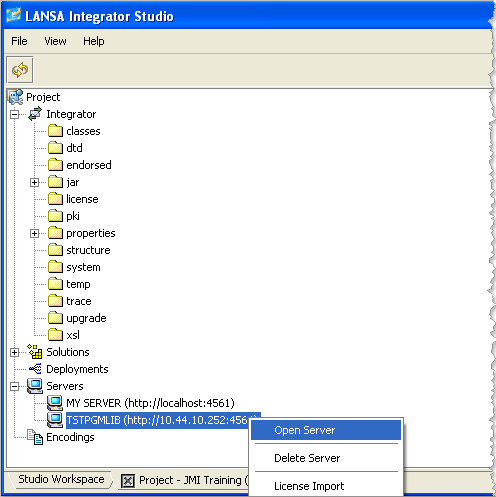
b. The server instance will open on the right hand side:
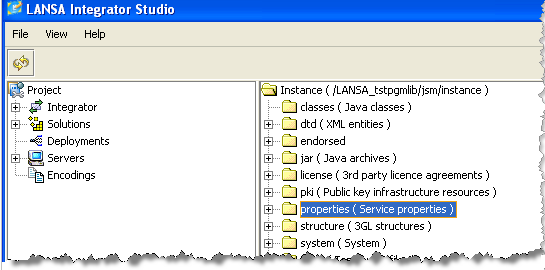
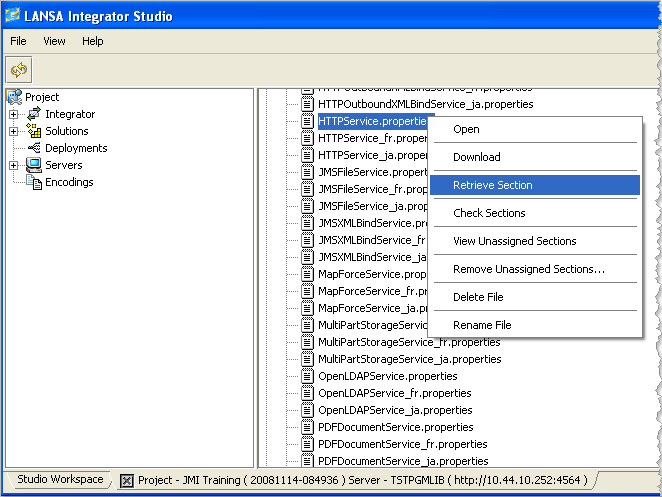
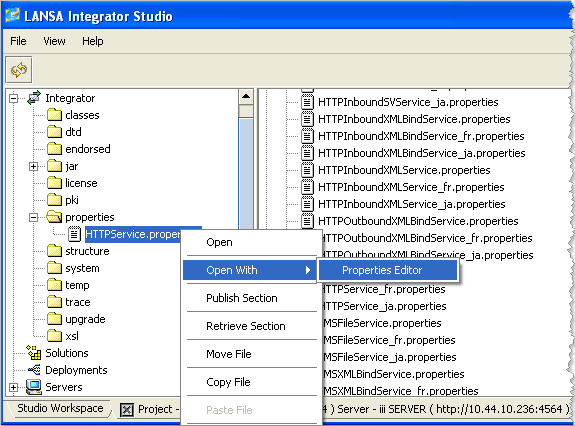
c. Open the level, and scroll down to HTTPService.properties. Select this and use the right mouse menu to .
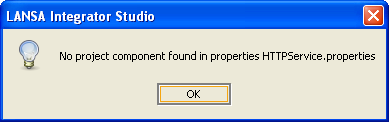
d. The following dialog box will be shown, since you do not have an HTTPService.properties section defined for your project at this point. Select and an entry HTTPService.properties will be created under on the left hand side. i.e. in your project.
e. Select / HTTPService.properties and use the right mouse menu to .
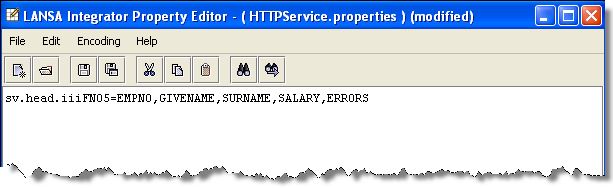
f. The will open. Add an entry which defines column headings for separated variables files, as shown in the screen shot. Save your changes and close the properties editor.
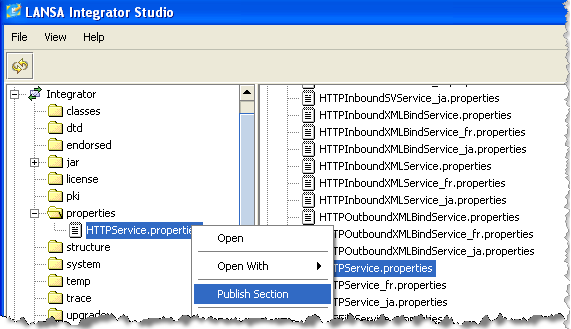
g. Select HTTPService.properties in your project and use the right mouse menu to select .
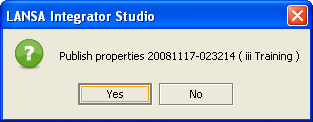
h. Select Yes in the dialog. This will add a section at the end of the HTTPService.properties file for your project.
i. On the right hand side (the JSM server instance) use the right mouse menu to select to the JSM server HTTPService properties file. Scroll to the end to view the entry you have just added.
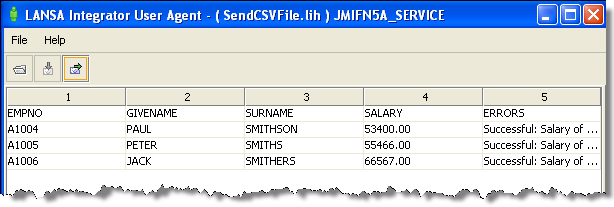
8. Use the instructions in the previous step to test the function. The response should look like the following:
 .
.