Screen Tour
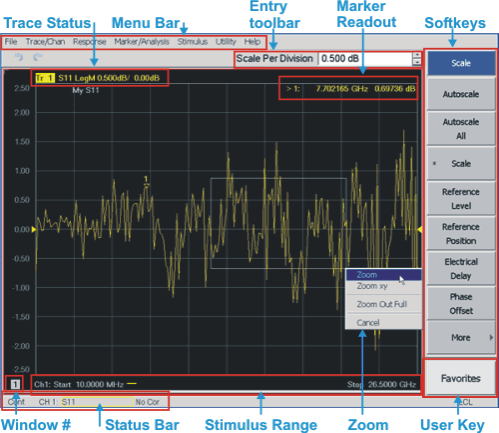
Click on image areas to learn more.


See Also
Using front-panel hardkey [softkey] buttons
Using a mouse with PNA Menus
Press System
then [Touchscreen]
then [Calibrate Touchscreen]
or
[Touchscreen ON | off]
Click Utility
then System
then Touchscreen
then Calibrate Touchscreen
or
Touchscreen ON | off
Trace Status
Provides details of each trace in the window. Highlighted trace indicates the active trace. Learn more.
Menu Bar
The mouse-driven menu closely follows the menu structure of the front-panel hardkey/softkey menus. See Hardkeys to learn more about the logic of both menu structures.
Undo / Redo Icons
Allows you to quickly undo and redo selected operations. Learn more
Entry Toolbar
Along with the softkeys, allows numeric values to be entered for settings. Learn about all toolbars.
Marker Readout
Provides stimulus and response information for markers. Learn about customizing the marker readout area. See also Marker Drag.
Window Number
Provides window identification which is useful for remote programmers. only.
Status Bar
Provides detail about all aspects of the status of the analyzer. Learn more.
Stimulus Range
Displays the start and stop values of the sweep range.
Zoom
Allows you to easily change the start and stop frequencies or start and stop power levels in a power sweep. Learn more.
See Also: Search Within
Marker Drag
Drag a displayed marker across the trace using a r a mouse. Learn more.
Expanded Mouse Capabilities
Cursor changes to a “hand” when hovering over a clickable object.
Right-click on the Entry toolbar to launch a mouse-compatible numeric pad.
Windows
Right-click on a window area to make selections pertaining to that window.
Double-click on a window area to maximize the window. To return to original window configuration, right-click on window area, then click Tile.
Left-click on X-axis annotation to select the active channel/trace.
Right-click on X-axis annotation to change stimulus properties. Applications are not fully supported.
Quickly change Scale, Reference Level, and Position. Learn how.
Right-click on Y-axis annotation to change Scale.
Drag a trace from one window to another. Click or touch either the trace or the Trace Status. Drag the trace to another window, then release the mouse or lift your finger.
Left-click a trace or Trace Status to make it the selected trace.
Double-click on a trace or Trace Status to maximize the trace. Double-click again to return to the original trace configuration. See programming commands.
Set a preference to always widen the active trace.
Set a preference to briefly widen the active trace.
Drag a trace from one window to another. Click or touch either the trace or the Trace Status. Drag the trace to another window, then release the mouse or lift your finger.
Markers
Right-click on a trace or Trace Status to add a marker.
Right-click a marker to make selections pertaining to that marker, such as Marker Search or Function.
Simulated Hardkeys
Click Utility, then System, then Keys toolbar to show and hide the simulated hardkeys.
These keys would simulate the front panel hardkeys of a standard instrument.
The combination of hard keys and softkeys allow easy access to ALL analyzer features.
Softkeys
One additional softkey is reserved as a User Key which is always visible. Learn more.
To Hide the softkeys to make more room for measurement windows, right-click any softkey.
To Show the softkeys, press any front-panel hardkey that launches a softkey menu.
The Hide/Show choice is reset to the default (Show) only on analyzer startup (NOT on Preset).
Softkey Annotations
Item |
Description |
|
|
Selection launches a dialog box. |
|
|
Selection launches another level of softkeys. |
|
|
Indicates the item (marker, trace, window) is ON. Any number of objects can be ON. |
|
|
Indicates the item (marker, trace, window) is OFF. Click to turn item ON. |
|
|
Indicates the item IS selected. |
|
|
Indicates the item is NOT selected. Click to select. Only one item in the collection can be ON. |
|
|
Enter value in Entry toolbar. |
|
|
Capitalization indicates the current setting. |
|
|
Return to the previous softkeys. |
|
|
Launches more of the same level softkeys. |
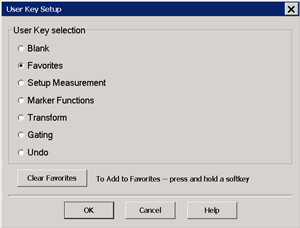
User Key
Choose from several popular menus to assign to the User key. Menu structures for existing and future applications can also be selected as the User Key. The most flexible of the User Key selections is Favorites.
How to setup the User Key |
|
Using
front-panel |
Using Menus |
|
|
Assigns the selected function to the User (soft) Key on the main display. The User Key is always visible on the display. Blank Leave the User Key Blank - no assignment. Allows you to select and display any eight softkeys from any level. Your Favorite menu selections are always two button presses away. Note: Applications softkeys that are created as Favorites do NOT survive a Preset.
Setup Measurement When assigned to the User Key, press the Setup Measurement softkey to populate the softkeys with measurement settings that are relevant for the active trace. For example, when a Gain Compression measurement is active, press Setup Measurement to quickly access the GCA setup dialog. Marker Functions, Transform, Gating When any of these functions are assigned to the User Key, one press of the User Key and the softkeys are populated with the most common settings for the corresponding function. Undo Quickly access the Undo/Redo feature. Learn more. |


