Using Calibration Sets
See Also
Save and Recall: Instrument States and Cal Set Data
At the completion of a calibration, all calibration data is stored to a Cal Set. The Cal Set can be applied later to any channel that has the same stimulus settings as the Cal Set, thereby saving the time it takes to perform another calibration. The following data is saved to a Cal Set:
Name
Cal Set Description
Cal Set Attributes - stimulus settings, cal type, port association
Standards data - The “Standards data” container in the Cal Set is intended for internal use only. External access is provided for use in diagnosing calibration problems. Users should not form any expectations as to the presence of the data or the naming conventions used.
Error term data
GUID (Globally Unique IDentifier)
Cal Registers and User Cal Sets
There are two types of Cal Sets:
Cal Registers (channel specific)
User Cal Sets
Calibration data is automatically saved to a Cal Register at the end of every calibration. You can also choose to save the cal data to a User Cal Set.
Calibration Registers
Calibration Registers are designed to simplify calibrations for most users. When a calibration is complete, the data is automatically saved to the channel's Cal Register, overwriting (or appended to) the previous cal data stored in that register. This concept is similar to 'legacy' Vector Network Analyzers.
Every channel has ONE dedicated Cal Register. They are named CHn_CALREG, where n is the channel number. The name cannot be changed.
Cal Registers are more volatile because they are overwritten (or appended) each time a calibration is performed on that channel. The Cal data is always saved, but only temporarily.
Cal Registers can be applied to other measurements, but ONLY on the same channel as the Cal Register.
User Cal Sets
At the end of a calibration, you can choose to also save cal data to an existing or new User Cal Set.
User Cal Sets can be applied to any number of channels simultaneously.
User Cal Sets are named by you for easy identification.
You can have an unlimited number of User Cal Sets.
At any time, you can copy Cal Register data to create a User Cal Set. See Cal Set Properties.
Appending Data in a Cal Set
At the end of a calibration, data is saved to the channel's Cal Register and, if you choose, to a User Cal Set. When you choose to save to an existing User Cal Set, the analyzer attempts to append the new error terms to the existing User Cal Set. The existing Cal Set data is completely overwritten UNLESS the new data can coexist with the existing data according to the following two rules:
The stimulus settings of the new data must exactly match the existing data.
The new cal must involve different ports from the existing cal.
For example:
Case 1 - An existing Cal Set contains a full 2-port cal between ports 1 and 2. Using the same stimulus settings, you perform a 1-port cal on port 3. At the end of the cal, you click Save As User Cal Set and select the existing full 2-port User Cal Set.
Result: The 1-port cal is appended to the 2-port User Cal Set. There is NO overlap between them.
Case 2 - Same situation as Case 1, except the 1-port cal is performed on port 1.
Result: The Cal Set will contain a 1 port cal on port1 and a 1 port cal on port 2. The overlapping tracking terms are removed rendering the original full 2 port cal invalid.
How to Manage and Apply Cal Sets and Cal Types
The analyzer attempts to apply a Cal Set and turn error correction ON for ALL of the measurements on the active channel. This may not always be possible. For example, suppose a channel contains both S11 (reflection) and S21 (transmission) measurements. If a Cal Set that contains only an S11 Cal Type is applied to that channel, the Cal Set does not contain the error terms to correct the S21 measurement. Error correction is turned ON for the S11 measurement and NOT turned on for the S21 measurement.
There are two ways to apply an existing Cal Set (Cal Register or User Cal Set) to a measurement:
Recalling an Instrument State with Cal data (.cst file) - A .cst file contains an Instrument State with all measurement attributes AND a 'pointer' to the Cal Set that was used to calibrate the measurement. Before saving a .cst file, be sure that a User Cal Set (NOT a Cal Register) is being used for the measurement. Because Cal Registers are automatically overwritten when a new calibration is performed, it is likely that the Cal Register data will change before the .cst file is recalled.
Create a new measurement and select a Cal Set to apply to the active channel.
Note: NEVER copy or modify Cal Sets from Windows Explorer or other applications. Cal Sets should only be accessed through the VNA Application.

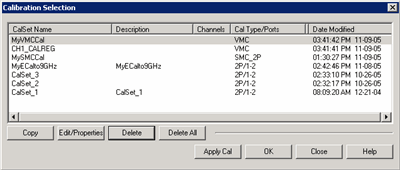
This dialog allows you to manage and apply Cal Sets Although the number of Cal Sets you can have is limited only by the amount of analyzer memory, it is considered unusual to have more than about 10 existing Cal Sets, or one current Cal Set for every unique channel setup. Old Cal Sets (with 'stale' data) should be deleted or overwritten. The active channel's Cal Register always appears, even if empty. Cal Registers that belong to other channels appear in the list of Cal Sets only if the channel exists, and only if they contain data.
To apply a Cal Set to the active channel, click a row to select that Cal Set, then click Apply Cal. Note: A Cal Set must have been generated from the same measurement class as the active channel in order for it to Applied. Columns click a heading to sort by that column Cal Set Name Name to identify the Cal Set. Description User-settable text to further identify the Cal Set. Channels Channel numbers that are currently using this Cal Set. A blank entry means it is not currently in use. CalType / Ports Type of Cal contained in the Cal Set. Learn about applying appropriate Cal Types. Cal Type Abbreviations: 1P, 2P, 3P, 4P... - Full n-Port calibration + - Indicates a Power Correction is included in the Cal Set R - Response (instead of ports, shows the measurement type that it corrects.) ER/x-y Enhanced Response, where x is the receive port; y is the source port. Modified Date and time the Cal Set was last modified. Buttons Copy Invokes the Save as User Cal Set dialog box. Type a name for the copy of the selected Cal Set data. Show / Edit Properties Starts the Cal Set Properties dialog box. This allows you to view all of the Cal Set properties. Delete Permanently deletes the Cal Set after you choose OK to a warning prompt. Delete All Permanently deletes ALL listed Cal Sets and Cal Registers after you choose OK to a warning prompt. Apply Cal Applies the selected Cal Set to the active channel. If the stimulus settings of the Cal Set and channel are different, a choice must be made. Unselect Available ONLY if the selected Cal Set is being used by the active channel. Click to 'Un-apply' the Cal Set, then click Close to exit with the Cal Set un-applied. OK Always APPLIES THE SELECTED CAL SET to the active channel, then closes the dialog box. Close Exit the dialog box. Performs no further action.
|
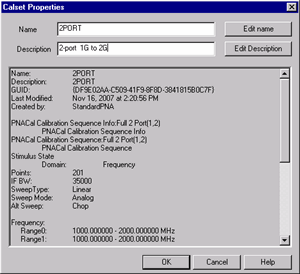
Allows you to view all of the Cal Set properties. This dialog box is started in two ways:
Name Edit name of the User Cal Set. You can NOT change the name of a Cal Register. Description Descriptive text to further identify the Cal Set. Cal Set Properties Lists descriptive information and stimulus conditions of the Cal Set. Learn how to View the Error Terms of a Cal Set.
|
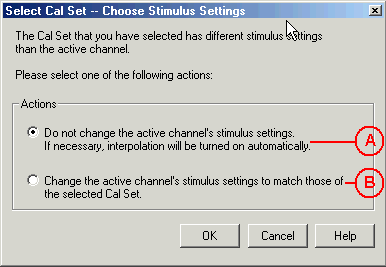
Stimulus Setting Different between Cal Set and Measurement
The Cal Set contains the channel stimulus settings that were in place when the Cal Set was saved. This dialog appears when the Cal Set channel settings are different than those of the channel to which the Cal Set is being applied. Choose between the following options.. (See above image).
OK Make the change. Cancel Cal Set will NOT be applied.
|
The following examples show how Cal Sets increase flexibility and speed in making analyzer measurements.
Using one User Cal Set with many Channels
Using one User Cal Set with many Channels
It is possible to do one calibration, then apply it to several channels.
An example:
During a manufacturing process, you may have many calibrated channels. You may wish to continuously cycle through the measurements and examine them individually. Occasionally, you may wish to refresh the calibration without having to recreate all the measurement state files.
Here is how: Examine the stimulus settings for each channel. Then make the User Cal Set stimulus range a super-set of the whole group. Each channel can then use the same User Cal Set. Some calibrations will be interpolated. Note: Make sure that interpolation is turned on.
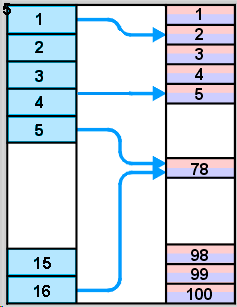
Notice in the following image, Cal Set 78 is used on more than one channel, in this case Channel 5 and 16 .
Channel Cal Set
Using one Measurement with many Cal Sets
The drawback with having one very large User Cal Set associated with many instrument states could be a loss of accuracy due to interpolation. In such cases, consider using one User Cal Set for each stimulus setting.. The stimulus conditions can then be changed for a channel by applying different User Cal Sets. Other settings (window setups, measurement definitions, scaling, limits, markers) will not change. This may result in faster state changes than if you saved and recalled *.cst files for each set of stimulus conditions.
Example #1: An amplifier needs to be measured at several input power levels. Calibrate at several power levels and save each calibration in a separate User Cal Set. Then, apply the User Cal Sets to the single measurement consecutively.
Example #2: Making an S21 Measurement, you need to measure both wide span and narrow span characteristics of the device. One Cal Set covers the wide span setup; another the narrow span setup.
Archiving Cal Sets using .cal or .csa files
Because User Cal Sets can easily be deleted, provide extra backup by also saving your calibration as a .cal or .csa file (see saving a .cal file).
Example:
One person performs a calibration, names and saves it as a User Cal Set. This Cal Set is available for any other person to use. A second user could accidentally delete or modify the User Cal Set requiring the originator to repeat the calibration.
Security can be provided for calibration data by saving the Cal Set to a .cal file or .csa file. At a later time, the file could be recalled and the original calibration restored.