ECal User Characterization
From M9370A / M9371A / M9372A / M9374A / M9375A
ECal User Characterization
See Also
Perform a 4-Port Cal with a 2-Port ECal Module
Other Calibration Topics
Overview
A user-characterized ECal module allows you to add adapters to the ECal module, re-measure the standards in the ECal module, INCLUDING the adapters, then add that data to ECal memory or save it to disk memory. This extends the reference plane from the module test ports to the adapters.
Why perform a User Characterization?
-
If you need to use adapters with your ECal module, you could characterize your ECal module with the adapters attached and perform subsequent ECals in a single step.
-
If you have a 4-port ECal module, you could configure the module with adapters of different connector types, then perform a User Characterization of the module. When you need to test a DUT with a pair of the connector types on your module, calibrate the analyzer with a 1-step ECal using the same two connectors on the User-characterized module.
-
If you test devices in a fixture, you could embed the characterization of the fixture in the characterization of the module. To do this, during the mechanical calibration portion of the User Characterization, calibrate at the reference plane of the device as you would normally calibrate. Then remove the fixturing to be embedded and insert the ECal module to be characterized. When measuring the ECal module, the analyzer removes the effects of the fixturing and stores the measurement results in the user characterized ECal module. Subsequent calibrations with that user-characterized module will also remove the fixture effects.
-
Both 2-port and 4-port ECal modules support User Characterization.
-
User Characterization does not delete the factory characterization data. The factory data is saved in the ECal module in addition to the User Characterization data.
-
The ECal Data Wipe Utility is the only way that data can be deleted from the module. Learn more at http://na.support.keysight.com/pna/apps/applications.htm.
-
A User Characterization can be performed beyond the frequency range of the ECal module. Although this practice is allowed, calibration accuracy with the extended User Characterization is likely to be degraded. To determine the level of degradation, compare measurements of a variety of devices with a mechanical cal kit calibration versus an ECal extended User Characterization calibration.
-
You can save up to 12 User Characterizations in a single ECal module. Previous releases allowed up to 5. There are memory limitations. The analyzer will determine if the contents of a User Characterization will fit inside the module before it is performed.
-
A User Characterization can be performed remotely. See programming commands.
|
User Characterizations can be saved to Disk Memory. Learn how. This feature provides the following benefits:
|
How to Perform a User Characterization
SUMMARY (A detailed procedure follows.)
|
|
1. Select adapters for the module to match the connector configuration of the DUT. |
|
|
2. Either calibrate the analyzer using mechanical standards or recall an existing Cal Set. |
|
|
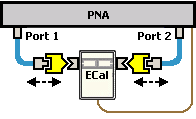
3. Measure the ECal module, including adapters, as though it were a DUT. |
|
|
4. The measurement results are the characterization data that then gets stored inside the module or to disk. |

|
A 2-port analyzer can be used to perform a User Characterization on a 4-port ECal module. However, a 4-port ECal module has SIX different port pairs. The analyzer must be recalibrated for each port pair that uses unique connecter types or gender.
When more than one calibration is required during a User Characterization, then ALL calibrations must be performed using the standard Cal Wizard, saved to Cal Sets, and then recalled from Cal Sets DURING the User Characterization. |
|
Detailed steps to Perform a User Characterization
|
|
|
Using front-panel hardkey [softkey] buttons |
Using Menus |
|
|
|
|
|
|
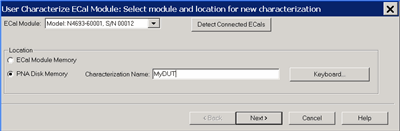
ECal Module Select one of the ECal modules that are connected to the analyzer. Detect Connected ECals Click to rescan the USB for ECal modules. Location
Keyboard Launches a keypad that can be used to type a characterization name from the analyzer front panel. Next Click to continue to the Select Connectors for the Characterization dialog box. |
|
Scroll to view all of the parameters of the stored characterizations. Select an empty location or select to overwrite an existing characterization. Next Click to continue to the Select Connectors for the Characterization dialog box. |
|
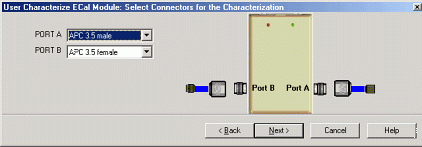
Select the adapters for the ECal module test ports. Select No adapter if no adapter is used on a port. PORT A Lists the connector types available for Port A. PORT B Lists the connector types available for Port B. PORT C Lists the connector types available for Port C (available with a 4-port ECal module). PORT D Lists the connector types available for Port D (available with a 4-port ECal module). Next Click to continue to the Calibrations to perform or recall dialog box. |
|
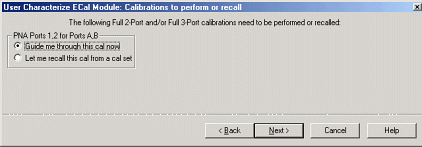
The analyzer must be calibrated before measuring the ECal module and necessary adapters. This dialog box displays the number and types of mechanical calibrations required for the characterization. Guide me through this cal now Click to perform a Guided calibration. A calibration kit is required for each connector type. If more than one calibration is required, the following selection is not available. See Note. Let me recall this cal from a cal set Click to select an existing Cal Set. You cannot select a Cal Set that is currently in use. Learn more about Using Cal Sets. Next Click to continue to either the Select Cal Kits or the Select Cal Set dialog box.
|
|
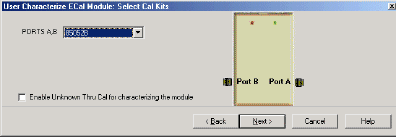
Provides a list of calibration kits to perform the calibration. Select the Cal Kit you will use for each port. Enable Unknown Thru for characterizing the module Check to enable. This reduces the number of steps required to characterize the THRU standard. Next Click to continue to the Select Cal Set dialog box.
|
|
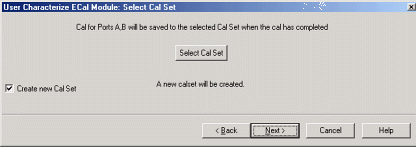
The calibration that you perform will be written to a Cal Set. This dialog box allows you to select a Cal Set to overwrite, or to write to a new Cal Set. The current choice is visible below the Select Cal Set button. Select Cal Set Click to open the Select A Cal Set dialog box. Create new Cal Set Check to create a new Cal Set to store the calibration. Clear to select and overwrite a stored Cal Set. Next Click to continue to the Guided Calibration Steps dialog box. Note: Remember the Cal Set name for future reference. |
|
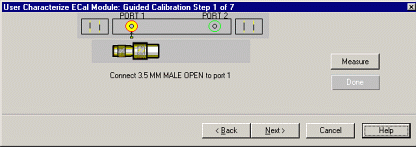
Instructs you to connect each calibration standard to the measurement port. Measure Click to measure the standard. Back Click to repeat one or more calibration steps. Done Click after a standard is re-measured and all measurements for the calibration are complete. Next Click to continue to the next calibration step. (Does not measure the standard.) Cancel Exits Calibration Wizard. The Specify nominal delay or Guided Calibration completed dialog box appears when the steps are completed. |
|
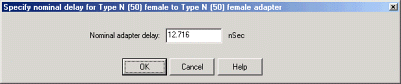
This dialog ONLY appears when Adapter Removal or Unknown Thru calibrations are performed. The following values were estimated from the measurement. Most of the time, they are adequate. However, for CW sweep or frequency sweep with large step sizes, the accuracy of the values may be improved. Nominal adapter delay To improve this value, measure and record the delay of the adapter with a dense step size. Enter that value here. Nominal phase offset (Waveguide ONLY). To improve this value, measure and record the phase offset of the Waveguide adapter with dense step size. Enter that value here. When one connector is coax and the other connector is waveguide, the phase offset has an ambiguity of 180 degrees. For consistency, the estimate provided here is always between 0 and 180 degrees. You can change this estimate to any value between -180 degrees and +180 degrees. |
|
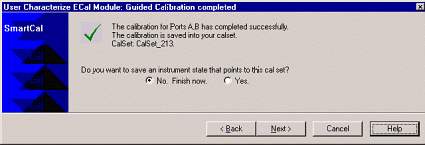
Allows you to finish the calibration and continue to the next characterization steps. No. Finish now Select to save Cal Set data. Yes Allows selection of Save options. Next Click to continue to the Exit to Inspect Quality of Calibration dialog box. |
|
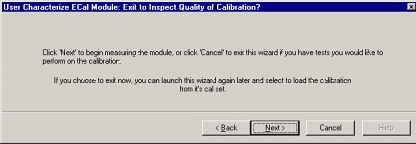
Allows you to exit User Characterization to validate the calibration before proceeding with the characterization. Back Allows you to repeat calibration. Next Click to continue to the Characterization Steps dialog box. Cancel Exits the Calibration. To return to the current step:
|
|
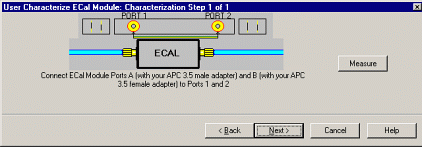
Describes the instructions for each measurement required for characterization. Measure Measures the ECal module. Next Click to continue to the Information for the New Characterization dialog box when measurements are complete. |
|
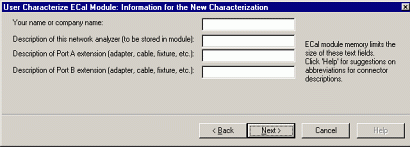
Allows you to describe the properties of the User Characterization. Suggestions for connector abbreviationsTo minimize the number of characters, we suggest using the following 3-character codes to describe the connectors listed. A User Characterization using connectors that are NOT included on this list can NOT be stored to the ECal module. But when stored to disk memory, ANY connector type is allowed. Learn more about storing to Disk Memory.
Next Click to continue to the Write Characterized Data to the ECal module dialog box. |
|
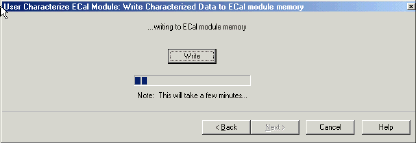
User Characterization and factory characterization data is written to either the disk memory or the ECal module memory. Write Click to write data. The Summary of new User Characterization dialog box opens after data is saved to module.
|
|
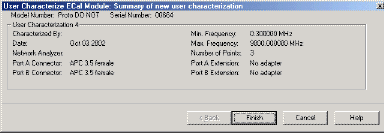
Verify the status of the ECal User Characterization.
Cancel Click to exit (characterization complete). Finish Click to exit (characterization complete). |
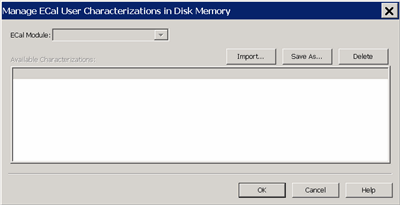
Manage ECal User Characterizations in Disk Memory
Normally, User Characterizations that are stored in disk memory can be used indefinitely without needing them to be managed. However, this dialog allows you to backup the characterizations in case they are accidentally erased, or to save them to a file that can be moved to another analyzer.
|
How to Manage ECal User Characterizations in Disk Memory |
|
|
Using front-panel |
Using Menus |
|
|
|
|
|
|
Manage ECal User Characterizations in Disk Memory dialog box help |
|
This dialog allows you to do either of the following:
Learn more about User Characterizations stored to Disk Memory. ECal Module Select an ECal Module from the list for which User Characterizations are currently stored in disk memory. Save As Saves a User Characterization that is currently in disk memory to a *.euc file. This file can be used as a backup in case the archive file is accidentally deleted, or allows you to move the file to another analyzer to be used with the selected ECal Module. Import Loads a previously saved *.euc file for use on the analyzer with the specified ECal module. Delete Removes a User Characterization from disk memory. |
When user-characterized data is written to the ECal module, the entire contents of ECal memory is also written to the disk memory, including the factory ECal data. In the unlikely event that your ECal module memory is lost, you can restore all ECal data to ECal memory.
Caution: If a new factory cal was performed after the ECal memory was written to disk memory, the new factory cal data will also be overwritten.
Note: An ECal Data Wipe Utility destroys all user data per US DoD 5220.22-M. Learn more at http://na.support.keysight.com/pna/apps/applications.htm
|
How to Restore ECal Module Memory |
|
|
Using front-panel |
Using Menus |
|
|
|
No Programming commands are available for this feature. |
|
|
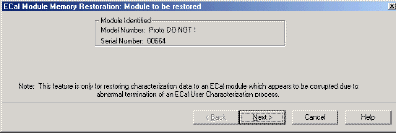
Verify the serial number of the module to be restored. If two modules are connected, choose the one to have data restored. Next Click to write data to the module. |