Calibration Wizard
The Calibration Wizard allows you to choose a Calibration method and then perform the calibration.
Using front-panel hardkey [softkey] buttons |
Using Menus |
|
|
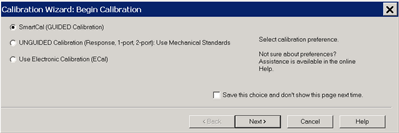
Select the calibration method: SmartCal (Guided Calibration)This method provides a step-by-step "wizard" interface. You describe the connectors on your DUT and the cal kits you will use; it walks you through the most accurate calibration possible.
Unguided CalibrationThis method provides a familiar calibration interface, but with limited capability. You choose the type of cal to perform; it allows you the flexibility to measure the standards in any order.
Use Electronic Calibration
Save Preferences
|
The Calibration Window / ChannelDuring a Guided Calibration, a 'Cal Window' is created for you to view the connection of calibration standards before standards are measured. This Cal Window uses a Cal channel that is created and duplicates the settings in the channel being calibrated. Correction is ALWAYS OFF for the displayed calibration channel. At the completion of the calibration, the calibration channel and window are deleted. The calibration standards can be measured while viewing any window configuration you choose. The Cal Window is appended to your Custom Cal Window setting, and all windows are visible and sweeping below the Cal Wizard before the Measure (cal standard) button is pressed. The windows to be viewed and channels to be swept during the cal process are specified using Remote commands. See an example. |
A Guided Calibration automatically determines the calibration type and suggests a calibration kit that matches your DUT connectors.
Guided Calibration can perform the following Cal Types:
ALL Cals EXCEPT Open, Short, and Thru Response Cals.
ECal on one or more ports.
TRL - Learn how to do TRL cals
Note: SmartCal DOES allow you to measure calibration standards in any order. However, you must click Next and Back without measuring standards until you get to the standard you want to measure.
The following dialog boxes appear when performing a Guided calibration on standard channels.
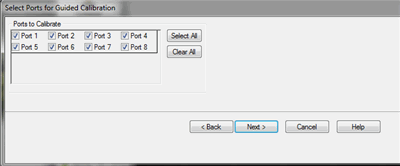
Allows you to select ports to calibrate. Cal Type Selection Select the number of ports to calibrate. N Port Cal Configuration If not calibrating all ports, specify which ports to calibrate. Show Advanced Settings (Orientation & Thru Cal Section) Available only for ECal. Back Return to Cal Wizard Begin dialog. If you did not see the 'Cal Wizard Begin' dialog but want to, click Back, then clear the Save Preferences checkbox. |
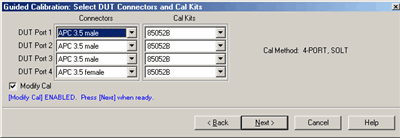
Allows you to select the connector type and Cal Kit for each DUT port to be calibrated. Connectors To change selection, click the connector field for each DUT port. If your DUT connectors are not listed, you can create your own connector type and calibration kit file. The PNA includes the following example cal kits that can be used as a template. See Calibration kits for more information.
Cal Kits Select the Cal Kit to be used to calibrate each test port. The list for each DUT Port displays kits having the same connector type as the DUT. Identical ECal models connected? ECal modules can be distinguished by serial number. This can have implications on your remote SCPI programs.
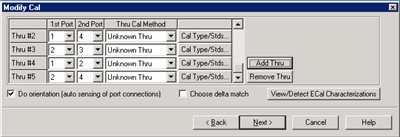
Modify Cal Check, then click Next, to Modify Cal (Standards AND Thru Method). |
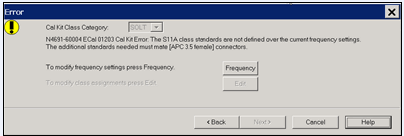
The current cal kit does not cover the current frequency range of the measurement. Do one of the following to correct the problem: Cal Kit Class Category Choose from SOLT and TRL. Not available with ECal modules. Click Edit to modify the appropriate class assignments. Frequency Change the frequency range of the active channel. Edit Modify the class assignments so that a different standard is selected. Back Select a different Cal Kit that covers the required frequency range. Cancel Exit the Cal Wizard |
Thru #nLists the proposed Thru connections to be made during the calibration process. You can change these Thru connections to better suit your test setup.
Add ThruClick to add a Thru connection. Learn more Remove ThruSelect a Thru by clicking the "Thru #N" field or the "1st Port / 2nd Port" field. Then click "Remove Thru". This selection is NOT available if the selected Thru is required for the calibration. 1st Port / 2nd PortClick to select the two ports to be included in the Thru connection. The order of the port numbers is not critical. Thru Cal MethodLists the available Thru Cal methods for the specified port pairs. Learn about the Thru Cal Method choices. Cal Type/ StdsClick to invoke the View / Modify Properties of Cal dialog box Do orientation - Appears ONLY if an ECal module is selected for use.When this box is checked (default) the analyzer automatically senses the model and direction in which an ECal module port is connected to the test ports. If power to the ECal module is too low, it will appear as if there is no ECal module connected. If you use low power and are having this problem, clear this check box to provide the orientation manually. Orientation occurs first at the middle of the frequency range that you are calibrating. If a signal is not detected, it tries again at the lowest frequency in the range. View/Detect ECal Characterizations - Appears ONLY if an ECal module is selected for use.Click to invoke the View ECal Modules and Characterizations dialog box. Displays a list of connected ECal modules. |
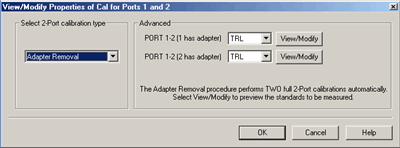
Select calibration typeAnother chance to change the Thru method. Learn about the Thru Cal Method choices. AdvancedSelect the cal method for each connector of the Thru pair.
View Modify Click to invoke the Preview and Modify Calibration Selections dialog box. Note: Changes made to the Cal Kit through this dialog are temporary that last only for this calibration. To make permanent changes to the Cal Kit, perform Advanced Modify Cal Kits. |
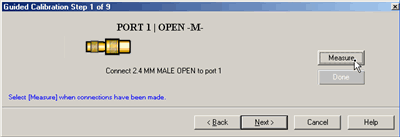
Note: Calibration can be performed with External triggers. Learn more. As each new cal step prompt appears, the traces are setup for the next standard measurement. Also, sweeps are triggered continuously until the Measure button is pressed. This way you can view the integrity of the standard connection. Prompts for standards to be measured. Measure Click to measure the standard. Done Click after a standard is re-measured and all measurements for the calibration are complete. Next Click to continue to the next calibration step. Does NOT measure the standard. If a standard is NOT measured, a warning appears and Done will not be available after the last Cal step. Note: Smart (Guided) Cal allows you to measure calibration standards in any order. However, you must click Next and Back without measuring standards until you get to the standard you want to measure. |
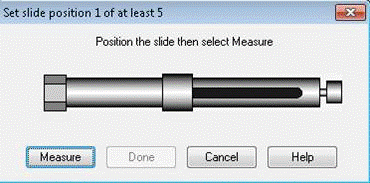
Allows you to measure the sliding load standard. To Measure a Sliding Load:
Note: Do NOT set the center conductor to be an interference fit with the center conductor of the testport.
Note: The direction in which the slide moves is NOT important. You can start with the slide at the front and move it backward or start at the back and move it forward. To minimize stability errors it is important to start at one end and move it in the same direction for each of the measurement steps.
Note: The positions of the sliding element should cover the full length of the slide, but be unequally spaced to reduce the possibility of overlapping data points. Most sliding loads have marks for each slide position.
How to Verify Sliding Load Calibration MeasurementsOnce the calibration is completed, the sliding load can be measured again. The magnitude of the return loss should remain nearly constant as the slide is moved. If the slide spacing was not adequate due to slide position selections, there will be frequency ranges where the magnitude will not remain nearly constant.
|
This dialog appears ONLY when Adapter Removal or Unknown Thru calibrations are performed. The following values were estimated from the measurement. Most of the time, they are adequate. However, for CW sweep or frequency sweep with large step sizes, the accuracy of the values may be improved. Adapter delay To improve this value, measure and record the delay of the adapter with a dense step size. Enter that value here. The required precision value is the accuracy that is required to characterize the delay value. Nominal phase offset (Waveguide ONLY). To improve this value, measure and record the phase offset of the Waveguide adapter with dense step size. Enter that value here. When one connector is coax and the other connector is waveguide, the phase offset has an ambiguity of 180 degrees. For consistency, the estimate provided here is always between 0 and 180 degrees. You can change this estimate to any value between -180 degrees and +180 degrees. |
The Calibration Complete dialog box appears after all standards are measured.
Unguided Calibration
The following dialog boxes appear when performing an Unguided calibration:
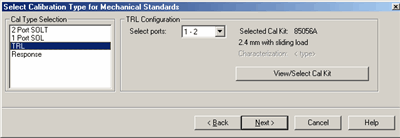
Select Calibration Type for Mechanical Standards dialog box help |
Unguided calibration does NOT support cals greater than 2 ports or ECal calibrations. Calibration Type Selection
Cal Configuration If not calibrating all test ports, specify which ports to calibrate. Back Return to Cal Wizard Begin dialog. If checked, you can clear the Save Preferences checkbox to see the Begin page when the Cal Wizard begins. View/Select Cal Kit Click to invoke the Select Cal Kit dialog box. Note: When selecting a Cal Kit with an impedance other than 50 ohms (Waveguide = 1 ohm), it is NO LONGER NECESSARY to change the System Impedance setting before performing a calibration. The impedance for the calibration is now derived from the Cal Kit impedance. Next Click to continue to Measure Mechanical Standards dialog box. |
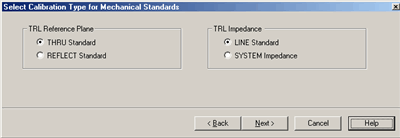
This dialog box appears ONLY when the selected Cal Type is TRL in the previous dialog box. TRL Reference Plane Select which standard to use to establish the position of the measurement reference plane. THRU Standard Select if the THRU standard is zero-length or very short. REFLECT Standard Select if the THRU standard is not appropriate AND the delay of the REFLECT standard is well defined. TRL Impedance LINE Standard Specifies that the characteristic impedance of the LINE standard should be used as the system impedance. This ignores any difference between Offset Z0, Offset Loss, and System Z0. SYSTEM Impedance Transforms the LINE standard impedance and loss to that of the system impedance for use with the calibration error terms. The TRL calibration will first compute the error terms assuming the LINE standard impedance is the system's characteristic impedance (same as previous LINE selection), then modify the error terms to include the impedance transformation. This should only be used with coax since the skin effect model used is a coaxial model. Learn how to change System Z0. To learn to substitute other calibration kits, see Advanced Modify Cal Kits |
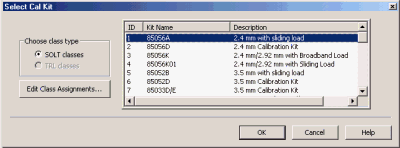
Displays the calibration kit files available for Unguided calibration. Select the desired calibration kit file and click OK. Choose class type Edit Class Assignments Allows modification of the selected Cal Kit class assignments.
Note: When selecting a Cal Kit with an impedance other than 50 ohms (Waveguide = 1 ohm), it is NO LONGER NECESSARY to change the System Impedance setting before performing a calibration. The impedance for the calibration is now derived from the Cal Kit impedance. |
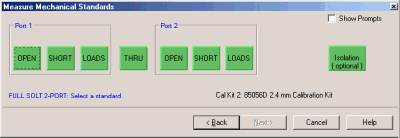
Note: Calibration can be performed with External triggers. Learn more. Displays the calibration kit file and standards required for the calibration.
Show Prompts Check to provide a reminder for the required connection when you click on the standard. |
Select the standards to be measured. Note: You may see both male and female standards. The Unguided cal has no knowledge of the gender of your connector types. Choose the gender of your DUT connector; NOT the test port. Then click OK. To modify this calibration class to show only one standard, on the Calibration menu, click Advanced Modify Cal Kits. Select the Cal kit and click Edit Kit. In Class Assignment, click Edit. Learn more about Modify Calibration Class Assignments.
|
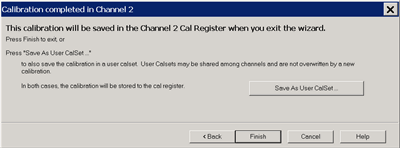
SmartCal, ECal, and Unguided Calibrations end with the following dialog box:
Finish Save to the channel's calibration register. Save As User Cal Set Invokes the Save as User Cal Set dialog box AND save to the channel's calibration register. Cancel Calibration is NOT applied or saved. Learn about Calibration Registers. Learn about User Cal Sets |
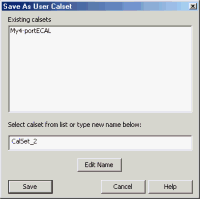
Existing Cal Sets - Lists the previously-saved Cal Set names. Select Cal Set from list or type new name below Specify a name for the new Cal Set. Either accept the suggested new name, type a new name, or select a name from the list to overwrite an existing name. Edit Name If there is no keyboard, click to start the typing tool that can be used from the front panel. Save Saves the Cal Set to the new Cal Set name. Learn about User Cal Sets |

