Port Extensions
Port extensions allow you to electrically move the measurement reference plane after you have performed a calibration.
See Also
Why use Port Extensions
You are unable to perform a calibration directly at your device because it is in a test fixture. Perform a calibration at a convenient place, then use port extensions to compensate for the time delay (phase shift), and optionally the loss, caused by the fixture.
You have already performed a calibration, and then decide that you need to add a length of transmission line in the measurement configuration. Use port extensions to "tell" the analyzer you have added the length to a specific port.
Important Note: Port Extensions and PNA Data FlowNormally, Port Extensions are applied to individual S-parameters in the Phase Correction process and only applies to displayed S-parameters. However, when Fixturing is ON or when making a Balanced Measurement, Port Extension compensation is applied in the Apply Error Terms process which affects ALL S-parameters, whether displayed or not. This allows all underlying S-parameters to have proper extensions applied. Therefore, when using Port Extensions with features that require more than a single S-parameter (such as k-factor in equation editor), do one of the following:
When Port Extension compensation is applied in the Apply Error Terms process, after a Data-to-Memory operation has been performed, further changes to Port Extensions settings will NOT be applied to the Memory trace. |
How to use Port Extensions
If you know the electrical length of the fixture or additional transmission line, enter the value directly to the Time setting.
If you know the physical length of the fixture or additional transmission line, enter the value directly to the Distance setting.
If you do NOT know either the electrical or physical length of the fixture or additional transmission line, you must be able to connect an OPEN or SHORT to the new reference plane - in place of the DUT. In most cases, removing the DUT will leave a suitable OPEN at the new reference plane.
Port Extensions can then be added manually (as follows), or by using Automatic Port Extensions.
Manual Port Extensions Procedure
Select a calibrated S11 measurement.
Select Phase format.
With an OPEN or SHORT at the calibration reference plane, verify that the phase across the frequency span is at or near zero.
Connect the fixture or added transmission line and attach an OPEN or SHORT in place of the DUT. In most cases, removing the DUT will leave a suitable OPEN at the new reference plane. On the Port Extension toolbar or dialog, increase either Time or Distance until the phase response is flat across the frequency span of interest.
If you know the loss of the additional transmission line, enter the Loss Compensation values using either one or two data points.
Note: Most OPEN and SHORT standards have delay. Therefore, adjusting delay with this method results in a delay equal to two times the delay of the OPEN or SHORT.
How to set Port Extensions |
|
Using front-panel hardkey [softkey] buttons |
Using Menus |
|
|
|
|

|
|
Port extensions settings affect all measurements on the active channel that are associated with a particular port. Learn Why and How to use Port Extensions (scroll up).
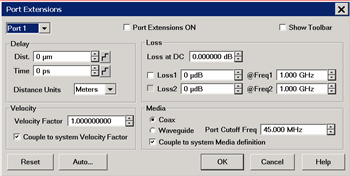
Port Select a port for delay and loss values. Port Extensions settings affect ALL measurements on the active channel that are associated with a particular port. Port Extension Turns ON and OFF port extensions on all ports. Show Toolbar Check to show the Port Extensions toolbar. The toolbar allows you to make adjustments to the port extensions while showing more of the screen. This is the only way to show or hide the toolbar. DelayEnter delay in either Distance or Time by
entering a value or clicking the up/down arrows. Click Time The amount of port extension delay in time. Enter a positive value. Distance The amount of port extension delay in physical length. Enter a positive value. Distance Units (Dialog ONLY) Select from Meters, Inches, or Feet. The Step Size setting will not change automatically. Learn more. LossThe following settings allow the entire frequency span to be corrected for loss. Loss at DC Offsets the entire frequency span by this value. Loss1 or Use1 must also be checked. To compensate for loss at DC, enter a positive value which causes the trace to shift in the positive (up) direction. Loss @Frequency Check the box, and enter values for Loss and Frequency When Loss1 or Loss1/Loss2 are used, a curved-fit algorithm is used as follows: Loss1 ONLY: Loss(f) = Loss1 * (f/Freq1) ^ 0.5 Loss1 and Loss2: Set the lower frequency to Loss1, and the higher frequency to Loss2. Loss(f) = Loss1 * (f/Freq1) ^ n Where: n = log10 [abs(Loss1/Loss2)] / log10 (Freq1/Freq2) Note: abs = absolute value VelocityVelocity Factor For each port, sets the velocity factor that applies to the medium of the device that was inserted after the measurement calibration. The value for a polyethylene dielectric cable is 0.66 and 0.7 for PTFE dielectric. 1.0 corresponds to the speed of light in a vacuum. Couple to system Velocity Factor When unchecked, the Velocity Factor is set for only the specified port and only for Port Extensions. When checked, sets the Velocity Factor for all ports. In addition, changing this value also changes this setting for the Electrical Delay and Time Domain Distance Marker features. MediaFor each port, select the media of the added transmission line or fixturing. Coax Select when the fixture or added transmission line is coax. Also specify the velocity factor of the coax. Waveguide / Cutoff Frequency Select when the fixture or added transmission line is waveguide. Also enter cutoff (minimum) frequency of the waveguide. Note: when using a Waveguide cal Kit, set System Z0 to 1 ohm before calibrating. Couple to system Media Definition. When unchecked, the Waveguide Cutoff Frequency is set for only the specified port and only for Port Extensions. When checked, sets the Waveguide Cutoff Frequency for all ports. In addition, changing this value also changes this setting for the Electrical Delay feature. Reset All port extensions settings are changed to preset values. The Port Extension ON / OFF state is NOT affected. Auto Ext. Starts the Automatic Port Extensions dialog box Note: Individual receiver port extensions (A,B, and so forth) can no longer be set. (Sept. 2004) |
|
 to start the
|
|
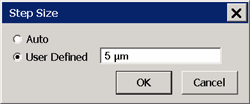
Changes the step size that occurs when the Time or Dist up/down arrows are pressed on the Port Extension toolbar. The Units for step size are changed on the Port Extension dialog. Auto Step Size is set to the default value. User Defined Enter a step size value, then click OK. This value remains the same when the units are changed. For example if a step size of 12 is entered on this dialog, then you change the units from Inches to Feet, the step size of 12 inches becomes 12 feet, not 1 feet. Therefore, change the units first, then set the step size. Learn about Port Extensions (scroll up) |
|
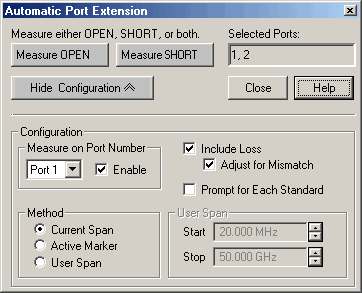
Automatic Port Extension AUTOMATICALLY performs the same operation as Manual Port Extension. By connecting a SHORT or OPEN, the reference plane is automatically moved to the point at which the standard is connected. In addition, Automatic Port Extension will optionally measure and compensate for the loss of the additional transmission line. Auto Port Extension is NOT available when:
Note: Turn OFF Equations that may exist on the active trace when using Automatic Port Extensions. Auto Port Extensions Procedure
SettingsMeasure either OPEN, SHORT, or both Press a button to make the measurement of the reflection standard. Measure either OPEN or SHORT depending on which is most convenient. An ideal OPEN and SHORT, with zero loss and delay, is assumed. Therefore, accuracy is most affected by the quality of the standard. In most cases, removing the DUT will leave a suitable OPEN at the new reference plane. When measuring both OPEN and SHORT standards, the average of the two is used and will slightly improve accuracy. Selected Ports Indicates the ports that currently have automatic port extension enabled. By default, ALL analyzer ports are enabled. To disable a port, see Measure on Port Number below. Note: Port Extensions settings affect ALL measurements on the active channel that are associated with a particular port. Show/Hide Configuration Press to either show or hide the following configuration settings in the dialog box. Measure on Port NumberSelect port number to enable or disable automatic port extension. Enable Check to enable the specified port. All enabled ports will have their reference plane automatically adjusted after performing Automatic Port Extension. Include Loss Check to automatically measure the loss in the additional transmission line and apply compensation. To calculate loss compensation, frequencies at 1/4 and 3/4 through the frequency range are usually used as Freq1 and Freq2 values. Learn more about Loss Compensation. Adjust for Mismatch Only available when Include Loss is checked. Mismatch adds ripple to the S11 and S22 traces. If the ripple is large, S11 and S22 can appear greater than 0 dB which leads to numeric instabilities in using the S-parameters. Adjust for mismatch increases the loss of the fixture so that the peak of the ripples is below 0 dB. While this adds more error (all the error is negative) it does allow the S-parameters to be used in simulators without numerical instabilities. Check - Offsets the trace to cause all of the data points to be at or below zero. Clear - Most accurate application of the curve-fit calculation, but allows positive responses. Prompt for Each Standard Check to invoke a prompt when the Measure OPEN or SHORT button is pressed. The prompt will indicate which standard to connect to which port. MethodSelect the span of data points which will be used to determine correction values for phase and loss (optional). If a portion of the current frequency span does not have flat or linear response, you can eliminate this portion from the calculations by using a reduced User Span. To calculate loss compensation, Current Span and User Span methods usually use frequencies at 1/4 and 3/4 through the frequency range as Freq1 and Freq2 values. See Loss Compensation to learn more about how loss is calculated. Current Span Use the entire frequency span to determine phase and loss values. Active Marker Use only the frequency at the active marker, and one data point higher in frequency, to calculate phase and loss values. If a marker is not present, one will be created in the center of the frequency span. User Span Use the following User Span settings to determine phase and loss values. User SpanStart Enter start frequency of the user span. Stop Enter stop frequency of the user span. Learn about Port Extensions (scroll up). See also Comparing Delay Functions |