Validity of a Calibration
This section helps you determine if your calibration is valid and how the analyzer displays correction level information for your measurement.
Frequency Response of Calibration StandardsIn order for the response of a calibration standard to show as a dot on the smith chart display format, it must have no phase delay with respect to frequency. The only standards that exhibit such "perfect" response are the following:
There are two reasons why other types of calibration standards show phase delay after calibration:
The most important point to remember is that all standards are measured in order to remove systematic errors from subsequent device measurements. As a result, if calibration standards with delay and fringe capacitance are measured as a device after a calibration, they will NOT appear to be "perfect". This is an indication that your analyzer is calibrated accurately and working properly. |
At the completion of a calibration or selection of a stored Cal Set, validation can accomplish the following:
Improve Measurement Accuracy – Once a measurement calibration has been performed, its performance should be checked before making device measurements. There are several sources of error that can invalidate a calibration: bad cables, dirty or worn calibration standards that no longer behave like the modeled standards, and operator error.
Verify Accuracy of Interpolation – You should validate the calibration if you are testing a device and the measurements are uncertain because of interpolation. For more information see Interpolation Accuracy.
Verify Accuracy of Cal Standards – To check accuracy, a device with a known magnitude and phase response should be measured.
For this test, all you need are a few calibration standards. The device used should not be one of the calibration standards; a measurement of one of these standards is merely a measure of repeatability.
The following reflection and transmission Quick Check tests can be applied to all test ports.
To verify reflection measurements, perform the following steps:
Connect either an OPEN or SHORT standard to port 1. The magnitude of S11 should be close to 0 dB (within a few tenths of a dB).
Connect a load calibration standard to port 1. The magnitude of S11 should be less than the specified calibrated directivity of the analyzer (typically less than -30 dB).
To verify transmission measurements:
Connect a THRU cable (or known device representative of your measurement) from port 1 to port 2. Verify the loss characteristics are equivalent to the known performance of the cable or device.
To verify S21 isolation, connect two loads: one on port 1 and one on port 2. Measure the magnitude of S21 and verify that it is less than the specified isolation (typically less than -80 dB).
Note: To get a more accurate range of expected values for these measurements, consult the analyzer's specifications.
ECal Confidence Check is a method to check the accuracy of a calibration performed with mechanical standards or an ECal module. The confidence check allows you to measure an impedance state in the ECal module (called the confidence state), and compare it with factory measured data stored in the module.
In order for this test to be valid, the test ports of the ECal module must connect directly to the calibration reference plane (without adapters).
Note: In the N469x series of 2-port ECal modules, from the module minimum frequency up to approximately 2 GHz, the confidence state has a very high amount of transmission loss. In this frequency range, calibrated measurements of transmission S-parameters for the confidence state may vary much more than expected from the Keysight-characterized data in the measurement memory trace. When comparing the measurement trace and memory trace you, ignore the data for frequencies up to 2 GHz.
How to Perform ECal Confidence Check:
|
|
Using front-panel hardkey [softkey] buttons |
Using Menus |
|
|
|
|
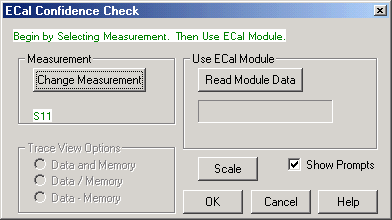
On the following ECal Confidence Check dialog box:
Notes:
|
|

Compares the accuracy of corrected (calibrated) data with stored data in the ECal module. For the check to be valid, the module test ports must connect directly to the calibration reference plane (without an adapter). Learn more about ECal Confidence Check. Measurement Change Measurement Opens the Measure dialog box.
Use ECal Module Read Module Data
Scale Opens the Scale dialog box. Show Prompts Check to show a reminder for the connection (default). Trace View OptionsData and Memory Trace Displays current measurement data and Memory trace. Data / Memory Performs an operation where the current measurement data is divided by the data in memory. Data + Memory Performs an operation where the current measurement data is added to the data in memory. |
Measuring known devices, other than calibration standards, is a straightforward way of verifying that the network analyzer system is operating properly. Verification kits use accurately known verification standards with well-defined magnitude and phase response. These kits include precision airlines, mismatch airlines, and precision fixed attenuators. Traceable measurement data is shipped with each kit on disk and verification kits may be re-certified by Keysight.
See Analyzer Accessories for a list of Keysight verification kits.