10 MHz Reference Frequency Adjustment
This routine adjusts the analyzer's internal time-base to exactly 10 MHz by changing a DAC value. This DAC value is stored in the analyzer's non-volatile memory. This routine should only be necessary in the following situations:
-
The frequency reference assembly is replaced.
-
The 10 MHz reference has drifted significantly from the factory adjusted value.
WARNING: The range of this adjustment is only about 20 Hz. It is highly recommended that a very accurate frequency standard be used to measure this 10 MHz signal.
Frequency Counter Compatibility
This procedure uses SCPI commands (over GPIB) to communicate with the frequency counter. It should work with the Keysight 5313xA, 5315xA, 53181A series of counters as well as the older 5350 series.
If no compatible counters are available, select the "Manual" mode of operation.
Procedures
Note: You must be logged onto the PNA as an Administrator to perform an adjustment. Learn more.
Click Utilities, then System, then Service, then Adjustments
At the Adjustments selection, click10 MHz Frequency Adjustment
Procedure for GPIB Counters Only
-
Connect the analyzer rear panel 10 MHz Reference output to the frequency counter .
-
Connect a GPIB cable from the analyzer to the counter. Make sure no other controllers are active on the same connection.
-
If applicable, connect the house frequency standard to the counter reference input.
-
Set the counter GPIB address to 03. Ensure that the counter is the only device at this address.
-
On the PNA, press System menu, then Service, then Adjustments, then 10 MHz Freq. Adjust.
-
Click Begin Adj. The application adjusts the internal reference for minimal error and stores the results.
-
Click Read Freq to trigger another reading of the 10 MHz signal.
-
Read the current DAC value stored in the analyzer's non-volatile memory (value = 0 - 4095).
-
When the status area indicates the adjustment is complete, click Exit.
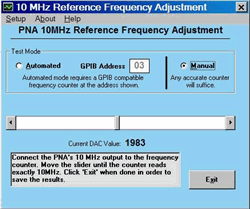
Procedure for Non-GPIB Counters
-
Connect the counter input to the rear panel 10 MHz Reference Output.
-
Set the counter to at least 1 Hz resolution.
-
If applicable, connect the house-frequency standard to the counter reference input.
-
In the analyzer System menu, point to Service, Adjustments and click 10 MHz Freq. Adjust.
-
Under Frequency Counter, select Manual.
-
Adjust the slider bar arrows until the frequency counter reads 10.0 MHz at your desired level of accuracy.
-
Click Exit to save the results.
Data Storage
-
The correction data is stored in the EEPROM on the 10MHz Ref board assembly.
Note: If the counter is misreading the frequency, it may be necessary to attenuate the input, or set the input impedance to 50 ohms, or both.
Last Modified:
|
3-Jan-2014 |
Updated per JV |
|
20-May-2013 |
Updated per JV |
|
9-May-2008 |
Updated with new UI |