Sweep Settings
A sweep is a series of consecutive data point measurements taken over a specified sequence of stimulus values. You can make the following sweep settings:
See Triggering and other 'Setup Measurements' topics
How to set Sweep Type |
|
Using front-panel hardkey [softkey] buttons |
Using Menus |
|
|
|
|
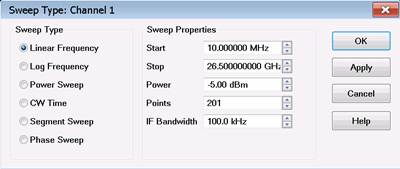
Note: Sweep Settings are not applied until either OK or Apply is pressed. Channel The active channel when Sweep Type was selected. Sweep settings will be applied to this channel. Sweep TypeLinear Frequency Sets a linear frequency sweep that is displayed on a standard grid with ten equal horizontal divisions.
Log Frequency The source is stepped in logarithmic increments and the data is displayed on a logarithmic x-axis. This is usually slower than a continuous sweep with the same number of points.
Power Sweep Activates a power sweep at a single frequency that you specify. Learn about power sweep
CW Time Sets the analyzer to a single frequency, and the data is displayed versus time. Learn more.
Segment Sweep Sets the analyzer to sweep through user-defined sweep segments. Learn how to make these settings.
OK Applies setting changes and closes the dialog box. Apply Applies setting changes and leaves the dialog box open to make more setting changes. Cancel
Closes the dialog. Setting changes that have been made since
the last Apply button click are NOT applied. |
|

A power sweep either increases or decreases source power in discrete steps. Power sweep is used to characterize power-sensitive circuits, with measurements such as gain compression.
In the Sweep Type dialog, specify Start power, Stop power, and CW Frequency. Power can be swept over any attainable range within the analyzer ALC range.
The remaining power settings apply in power sweep mode:
Test Port Power setting is not available.
Port Power can be coupled or uncoupled.
Attenuator Control is always Manual.
Power Slope (dB/GHz) is ignored (output frequency is CW).
Click Stimulus then Sweep, then Number of Points to change the step size of the power sweep.
Notes:
Using a preference setting, you can specify whether to maintain source power at either the start power or stop power level at the end of a power sweep.
Power Sweep is optimized for speed. For highest measurement accuracy during a power sweep, it may be necessary to increase the Dwell Time to allow the source more time to settle.
Segment Sweep activates a sweep which consists of frequency sub-sweeps, called segments. For each segment you can define independent power levels, IF bandwidth, and sweep time.
Once a measurement calibration is performed on the entire sweep or across all segments, you can make calibrated measurements for one or more segments.
In segment sweep type, the analyzer does the following:
Sorts all the defined segments in order of increasing frequency
Measures each point
Displays a single trace that is a composite of all data taken
Restrictions for segment sweep:
The frequency range of a segment is not allowed to overlap the frequency range of any other segment.
The number of segments is limited only by the combined number of data points for all segments in a sweep.
The combined number of data points for all segments in a sweep cannot exceed the max number of data points per trace.
How to make segment sweep settings |
|
Using front-panel |
Using Menus |
|
|
|
|
The Segment Table will be shown automatically when the Segment Table softkey menu is displayed. The Table will be hidden automatically after exiting the Segment Table menu. To display the Segment Table while using a menu other than the Segment Table menu, use the 4th softkey on the menu to control when the table is shown. The softkey offers three behaviors based on the softkey’s changing label.
To make the following menu settings available, you must first show the segment table. From the menus, click Stimulus, then Sweep, then Segment Table, then Show Table. Then choose from the following: Add Segment - adds a sweep segment at the end of the segments. Insert Segment - adds a sweep segment before the selected segment. Tip: You can also click the "down" arrow on your keyboard to quickly add many segments. Delete Segment - removes the selected segment. Delete All Segments - removes all segments. Note: At least ONE segment must be ON or Sweep Type is automatically set to Linear. To Modify an Existing Segment
The above graphic shows the Segment table with all independent settings selected, including source power uncoupled (two power settings). STATE Click the box on the segment to be modified. Then use the up / down arrow to turn the segment ON or OFF. START Sets start frequency for the segment. Click the box and type a value and the first letter of a suffix (KHz, Mhz, GHz). Or double-click the box to select a value. STOP Sets stop frequency for the segment. Click the box and type a value and the first letter of a suffix (KHz, Mhz, GHz). Or double-click the box to select a value. Note: The segment table truncates the frequency resolution. To verify the frequency resolution that you input, create a marker at the start or stop frequency settings. POINTS Sets number of data points for this segment. Type a value or double-click the box to select a value. To set IFBW, Power, and Sweep Time independently for each segment:
Note: If the following are NOT set, the entire sweep uses the channel IFBW, Power, and Time settings. IFBW Sets the IF Bandwidth for the segment. POWER Sets the Power level for the segment. You can also UNCOUPLE the test port power. See Power Coupling. TIME Sets the Sweep time for the segment. |

X-Axis Point Spacing - Segment Sweep ONLY
This feature affects how a segment trace is drawn on the screen.
How to select X-Axis Point Spacing |
On the Sweep Type dialog box, click Segment Sweep Then check X-Axis Point Spacing |
Without X-axis point spacing, a multi-segment sweep trace can sometimes result in squeezing many measurement points into a narrow portion of the x-axis.
With X-axis point spacing, the x-axis position of each point is chosen so that all measurement points are evenly spaced along the x-axis.
For example, given the following two segments:

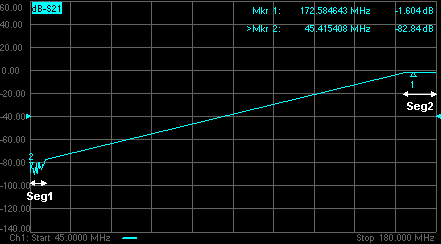
Without X-Axis Point Spacing
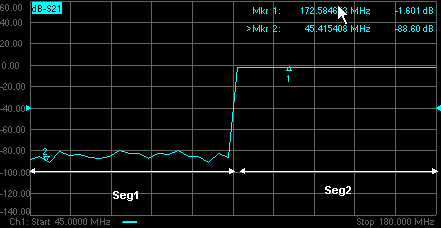
With X-Axis Point Spacing
Arbitrary Segment Sweep
This feature allows arbitrary frequencies to be entered into the segment sweep table. With this capability, segments can have:
overlapping frequencies.
the stop frequency less than the start frequency (reverse sweep).
How to enable Arbitrary Segment Sweep |
Notes:
|
The analyzer automatically maintains the fastest sweep time possible with the selected measurement settings. However, you can increase the sweep time to perform a slower sweep.
How to set Sweep Time |
|
Using front-panel |
Using Menus |
|
|
|
|
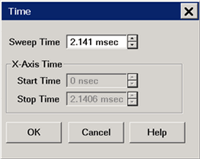
Sweep Time Specifies the time the analyzer takes to acquire data for a sweep. The maximum sweep time of the analyzer is 86400 seconds or 1 day. Learn about other settings that affect sweep speed. X-Axis Time Set Start and Stop time to be displayed on the X-axis. These settings are NEVER available. Note: Ignore CW time as labeled on the X-axis and marker readout. It is NOT at all accurate. |
|
How to make Sweep Setup settings |
|
Using front-panel |
Using Menus |
|
|
|
|
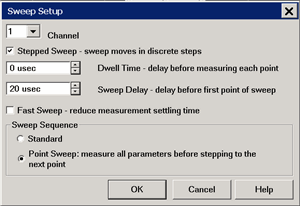
Channel Specifies the channel that the settings apply to. Stepped Sweep When checked (Stepped Sweep) the analyzer source is tuned, then waits the specified Dwell time, then takes response data, then tunes the source to the next frequency point. This is slower than Analog Sweep, but is more accurate when testing electrically-long devices. When cleared (Analog Sweep) the analyzer takes response data AS the source is sweeping. The sweep time is faster than Stepped, but could cause measurement errors when testing electrically-long devices. When the dialog check box is cleared, the analyzer could be in either Analog or Step mode. The mode can change from sweep to sweep. There is NO way to determine whether the analyzer is in Analog or Stepped Sweep. If you want to be sure what the current sweep mode is, then switch it to Stepped. Stepped sweep is automatically selected for a number of reasons. Here are some of the reasons:
Dwell Time Specifies the time the source stays at each measurement point before the analyzer takes the data. Only applies to stepped sweep. The maximum dwell time is 100 seconds. See also Electrically Long Devices. Sweep Delay Specifies the time to wait just before acquisition begins for each sweep. This delay is in addition to Dwell Time (per point) and External Trigger delay if enabled. Fast Sweep Available ONLY with Opt. 103 When checked, in Analog Sweep mode the analyzer source settling times are shortened in both frequency and power-control (ALC) circuits. In Stepped Sweep mode, the settling time at ALL data points are shortened. This nearly doubles the sweep speed at preset conditions, but at the expense of frequency accuracy and a few dB of amplitude variation. For ratioed measurements, such as S-Parameters, these errors substantially ratio out.
Sweep SequenceStandard Sweep When checked, the analyzer sweeps all data points for each source port in turn. For a 2-port analyzer, this means that all data points are swept in the forward direction, then all data points are swept in the reverse direction. Even when NO reverse parameters are displayed (S22 or S12), reverse measurements are necessary when a full 2-port calibration is correcting the channel. This is the default behavior. Point Sweep Available ONLY on standard S-parameter channels. When checked, the analyzer measures all parameters at each frequency point before stepping to the next frequency. The display trace is updated as each data point is measured.
|
|