Step 2. Create the Resources for Section Command Handler
VFW102 – Field Visualizations in a Grid
1. Create a new :
iiiVFW25
Resources for Section
2. Give the reusable part an ancestor of VF_AC010.
3. Use the ribbon, to give the reusable part an .
4. Drop a Grid component into the center of the panel, so that it is attached to all four sides.
5. Define columns in the Grid using the following fields and set the property of each column as shown in the table:
|
6. Change of each column to Caption.
7. Change the for each column to Left.
8. Change the property for all columns, except FULLNAME, to False.
9. Change other column properties as shown in the following table:
|
10. Open the field iiiONLEAVE in the editor and add a and define the following values:
|
11. Save your changes.
13. In the reusable part IIIVFW25, open the view, select the grid columns for iiiTAXPAID and then iiiONLEAVE and change the property to True.
14. Save your changes.
15. Select the Grid and change the property to ContentHeight.
16. Select the tab and create an method routine, which redefines the ancestor method:
Mthroutine Name(uExecute) Options(*redefine)
Endroutine
17. Add the following code to complete the routine:
#com_ancestor.uExecute
#avlistmanager.getCurrentInstance Akey1(#deptment) Akey2(#section)
Clr_List Named(#GRID_1)
#iiiONLEAVE := N
#iiiSTATUS := NML
#iiiTAXPAID := 1000
#iiiMEMO := 'Lorem ipsum dolor sit amet, consectetur adipiscing elit. Aliquam gravida suscipit nulla, non tincidunt est ultrices nec.'
Select Fields(#empno #surname #givename #salary #startdter) From_File(pslmst1) With_Key(#deptment #section)
#iiiEMPNO := #EMPNO
#iiiSALARY := #SALARY
#std_datex := #startdter.asdate( YYMMDD )
#fullname := #surname + ', ' + #givename
Add_Entry To_List(#GRID_1)
Endselect
18.Review this code which:
- Invokes the ancestor method
- Invokes the list manager and retrieves the keys for the current entry
- Clears the Grid
- Sets up fixed values in a number of fields
- Sets STD_DATEX to a date based on the field STARTDTER (a signed numeric, length 6) in form YYMMDD.
- Sets FULLNAME value based on SURNAME and GIVENAME
- Changes IIIEMPNO to EMPNO
- Changes IIISALARY to SALARY
- Adds an entry to Grid
19. Compile reusable part iiiVFW25.
20. Execute the Framework as a Designer.
21. Open the _Sections properties dialog by expanding a department in the instance list and double clicking on a section.
22. Select the tab, select the action and plug in the command handler iiiVFW25.
23. the Framework.
24. Select the Employees command handler for a section. Your design should look like the following:
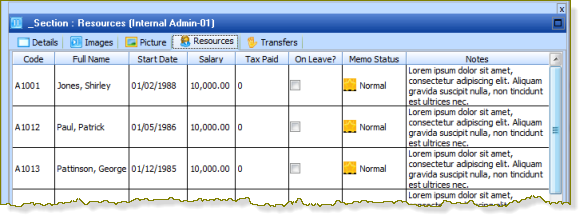
The height of each row is based on the right hand column, due to the property of ContentHeight for the grid. is taken from the right hand column.
25. When you click on the columns to edit a value, check that the behavior is as per the following list:
- Start Date displays a date prompt when you click on the prompt button in the cell.
- The Salary value displays the actual value and may be changed using its SpinEdit buttons.
- Tax Paid displays the picklist values in a dropdown when you edit its value. The value in display mode is based on the picklist value.
- On Leave is always displayed or edited as a checkbox.
- Status display the image and text from the picklist. When you click in this column the value rotates through the picklist values.
- The Memo Notes column value can be extended by typing in additional text. When you position into another cell, the column height is adjusted.