Step 1. Create Menu and Toolbars Form.
VFW082 – Toolbars, Menus and Pop–up Menus
1. Create a new :
iiiVFW17
Menus and Toolbars
2. On the tab, select and drag and drop a component to the top of the form. The component will always attach to the top of the form.
Note that the first Menu Item is displayed at the top left and can be edited in the view.
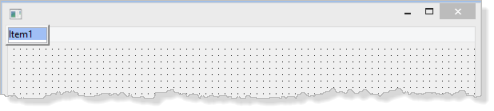
3. Review the source code. Note that two components have been defined:
A Menu Bar (MBAR_1)
A Menu Item (MITM_1) which has a parent of MBAR_1
Define_Com Class(#PRIM_MBAR) Name(#MBAR_1) Parent(#COM_OWNER)
Define_Com Class(#PRIM_MITM) Name(#MITM_1) Caption('Item1') Displayposition(1) Parent(#MBAR_1)
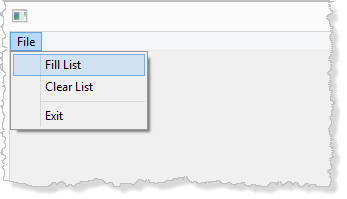
4. Return to the view and define the menu. In the following steps you will define the menu as shown in the following table:
|
Menu |
Option |
|
File |
Fill List |
|
|
Clear List |
|
|
- |
|
|
Exit |
|
Edit |
Copy |
|
|
Delete |
|
View |
Icon |
|
|
List |
|
|
Report |
|
|
Small Icon |
|
Help |
Contents |
5. Follow these steps:
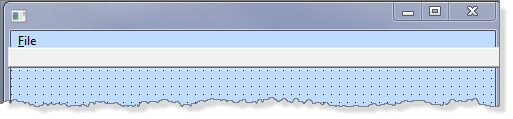
a. Replace Item1, with &File. The "F" will be the menu shortcut key. At run time, will open the File menu.
b. Press to create the next menu item. Type F&ill List. Typing "i" with the File menu open will select the Fill List option.
c. Press and the editor will move the input menu items to top of the tab. Continue to define the menu here.
d. Type C&lear List and press
e. Type a dash character (-) into the new item. This makes the menu item a divider. Press
f. In the new menu item, type E&xit and save your form.
You have created MITM_1 and its sub-menu items.
6. Once again review your source code:
Define_Com Class(#PRIM_MBAR) Name(#MBAR_1) Parent(#COM_OWNER)
Define_Com Class(#PRIM_MITM) Name(#MITM_1) Caption('&File') Displayposition(1) Parent(#MBAR_1)
Define_Com Class(#PRIM_SMNU) Name(#SMNU_1) Parent(#MITM_1)
Define_Com Class(#PRIM_MITM) Name(#MITM_2) Caption('F&ill List') Displayposition(1) Parent(#SMNU_1)
Define_Com Class(#PRIM_MITM) Name(#MITM_3) Caption('C&lear List') Displayposition(2) Parent(#SMNU_1)
Define_Com Class(#PRIM_MITM) Name(#MITM_4) Caption('E&xit') Displayposition(4) Parent(#SMNU_1)
Define_Com Class(#PRIM_MITM) Name(#MITM_5) Caption('-') Displayposition(3) Parent(#SMNU_1)
You now have a sub menu item (SMNU_1) with four menu items belonging to the sub menu which have a parent of SMNU_1.
7. Compile the form and execute it. Check that your menu looks as expected.
8. Test the shortcut keys.
9. Close the form.
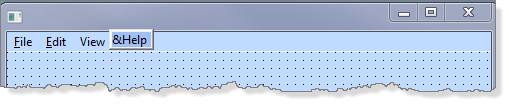
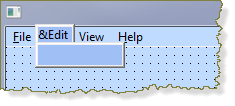
10. Switch to the view. Position the cursor in the File menu option and press the key. A new menu element will be displayed below:
11. Type &Edit in the new element and press . Type &View and press , and type &Help.
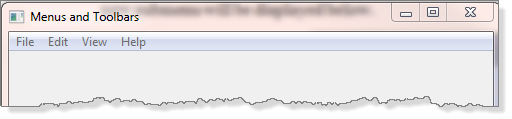
Your menu should look like the following:
12. Save your form.
13. Click in the Edit menu item. Ensure the cursor is positioned at the right hand side and press . A new submenu will be displayed below.
14. Type &Copy and press and type &Delete in the new menu item.
15. Position your cursor cursor in the menu item. Move the cursor to the right and press to create a new sub menu. You will now define four sub-menu items for the View menu:
a. In a new menu item, type &Icon and press .
b. In a new menu item type &List and press .
c. In a new menu item type &Report and press .
d. In a new menu item type &Small Icons.
16. Position your cursor in the Help menu item and move the cursor to the right. Press . In the new menu item type &Contents.
17. Compile your form and execute it.
18. Test all menu options and shortcuts.
19. Close your form.