Step 3 Add Fields to Tab Sheets and Item Got Selection logic
From VLF Windows Application Development
Step 3. Add Fields to Tab Sheets and Item Got Selection logic.
VFW060 – Using a Tree View
1. Find the DEPTAB file on the tab and add fields DEPTMENT and DEPTDESC to the Department Details tab. Review the Notes below before you continue:
Notes:
If the is not being used (as in this exercise), the fields will be manually positioned. A good approach is to select both fields (hold down the Shift key to do so) and drag and drop them together onto the tab sheet. They will then be positioned, in line and one under the other.
The dialog enables you to position fields more accurately, when you are not using a . If a number of fields (or other components) are selected, the dialog will position them relative to the first field selected.
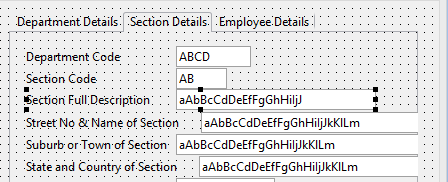
2. Find the SECTAB file and drag and drop fields DEPTMENT, SECTION, SECDESC, SECADDR1, SECADDR2, SECADDR3, SECPCODE and SECPHBUS onto the Section Details tab sheet.
Note: The DEPTMENT field will be renamed to DEPTMENT_1 as DEPTMENT already exists on this form.
Hint: If your tab sheet looks like this:
Select a field and change its property on the tab. For example = 350.
3. Find the file PSLMST and drag and drop fields EMPNO, SURNAME, GIVENAME, ADDRESS1, ADDRESS2, ADDRESS3, POSTCODE, SALARY, STARTDTE and TERMDATE onto the Employee Details tab sheet.
Hint: To drag the fields as one group: Select the first group of fields using the Shift key and then use the Control key to select the remainder (SALARY and so on).
4. Adjust field widths as necessary.
5. Save your changes.
6. Change the form event routine. Add field EMPNO to the fields retrieved from file PSLMST1.
Your code should now look like the following. The changed line is highlighted in red.
Evtroutine Handling(#com_owner.Initialize)
Set Com(#com_owner) Caption(*component_desc)
Clr_List Named(#TRVW_1)
Select Fields(#DEPTMENT #DEPTDESC) From_File(deptab)
Add_Entry To_List(#TRVW_1)
Select Fields(#SECTION #SECDESC) From_File(sectab) With_Key(#DEPTMENT)
Add_Entry To_List(#TRVW_1)
Select Fields(#EMPNO #SURNAME #GIVENAME) From_File(pslmst1) With_Key(#DEPTMENT #SECTION)
#fullname := #SURNAME + ', ' + #GIVENAME
Add_Entry To_List(#TRVW_1)
Endselect
Endselect
Endselect
Endroutine
7. Create an event handling routine for the tree view.
The logic performed will need to be based on which level in the tree was selected.
The tree view component has a property which enable the correct logic to be executed for each level.
Important: Remember that (F2) will enable you to discover in detail the and for any component.
The details for each level selected will be displayed by making the required tab sheet the "open" tab sheet. The Tab Sheet component has an property. When true this tab sheet will be the "top" tab sheet and therefore the required details will be visible.
Your code should look like the following:
Evtroutine Handling(#TRVW_1.ItemGotSelection) Options(*NOCLEARMESSAGES *NOCLEARERRORS)
#std_num := #TRVW_1.CurrentItem.level
Case (#std_num)
When (= 1)
#Sheet_1.opened := true
When (= 2)
Fetch Fields(*all) From_File(sectab) With_Key(#DEPTMENT #SECTION)
#DEPTMENT_1 := #DEPTMENT
#Sheet_2.opened := true
When (= 3)
Fetch Fields(*all) From_File(pslmst) With_Key(#EMPNO)
#Sheet_3.opened := true
Endcase
Endroutine
Note: The field DEPTMENT_1 is set to DEPTMENT for the Section details panel.
8. Compile and test your form.
You should be able to select any entry, and the relevant tab sheet will be displayed.
Note: You will probably notice that this form could be refined. For example if you click on the tab while displaying , the tab will contain values for the last employee. The event for Sheet_2 could be used to clear fields on Sheet_1 and Sheet_3.