Step 1. Define New Business Objects
VFW100 – Define a Parent/Child Instance List
In this step you will create two new business objects and define a number of actions for each, using the .
1. Open the , and start the from the menu.
a. Define two new business objects: _Departments and _Sections. Note the underscore which avoids a clash with existing demo application objects.
b. Define actions Transfers, Copy, Resources, Images and Picture.
c. Attach Details, Transfers, Copy and New to the _Departments business object
d. Attach Details, Resources, Images, Picture, Transfers and New to the _Sections business object
e. Attach _Departments and _Sections to the .
f. Click then the button to update your
Your extended Framework should look like the following:

2. Save your Framework.
3. In this step you will refine the new prototype objects which will be used in a number of the following exercises:
a. Open the _Departments dialog. Select the tab. Select the action and make it a
When the dialog appears, unselect the "Warn me…." and the dialog. You will save and restart the Framework in a later step.
b. Select the tab, and change the setting to .
c. Select the tab and give the _Departments any suitable icon.
d. Close the dialog.
e. Open the Properties dialog for the _Sections business object. Select the tab and give the _Sections business object any suitable icon.
f. the Framework.
4. In this step you will define the instance list relationship and additional columns.
a. Open the dialog for the _Departments business object.
b. Select the tab.
c. In the list of business objects, select _Sections. Define it as a Child or Descendant.
d. Unselect from Navigation Pane.
e. Unselect . Close the dialog.
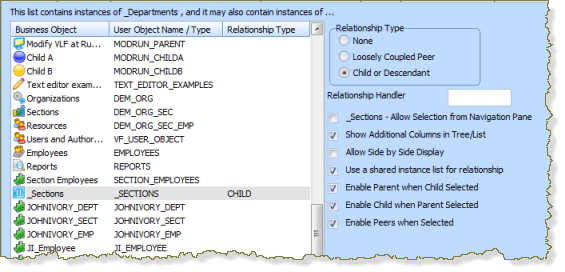
f. Define the following additional columns in the sequence shown:
|
Type Column |
Caption |
|
AColumn1 |
Address Line 1 |
|
AColumn2 |
Address Line 2 |
|
AColumn3 |
Address Line 3 |
|
NColumn1 |
Post Code |
|
AColumns4 |
Phone Number |
g. Change the VISUALID1 column to Code.
h. Close the dialog and the Framework.
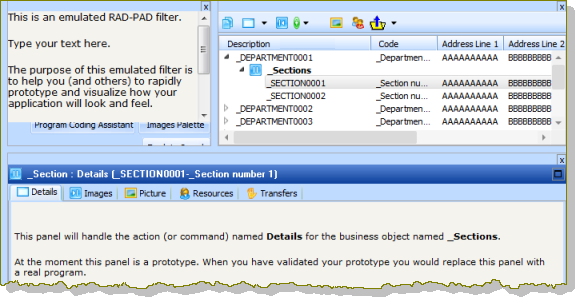
i. Execute the Framework as an End User. Click the button and expand the Instance List tree view.
Your design should now look like the following:
5. Validate your prototype _Departments and _Sections business objects.
6. Confirm the Instance list columns and the commands available for the new business objects.
7. Close the Framework.