Step 2. Make the Menus Useful
VFW082 – Toolbars, Menus and Pop–up Menus
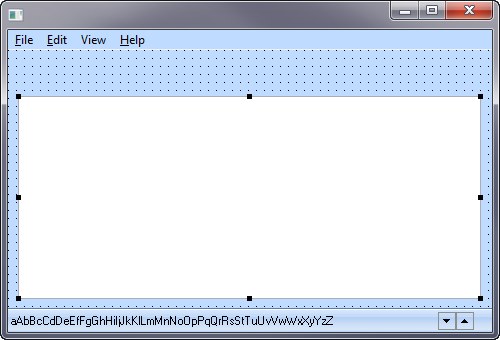
1. Add a to the form.
2. Add a component, resize it as shown. Leave space below the menu bar, where you will be adding a toolbar.
3. On the tab, find the file DEPTAB and add columns to the list view for DEPTMENT and DEPTDESC. Resize the columns to use all the space available. Note that the DEPTDESC column can be given a property of Remainder.
4. In the view, position the cursor in the File menu item and press to display the sub menu.
5. On the tab, select the tab and create a event routine.
6. Create events for the and menu items.
7. Switch to the tab and complete the event for the Fill List menu item based on the following:
- Clear the List view.
- Populate the List View with all records from the file DEPTAB.
- Add an image component to each list item.
- Set menu item 2 checked to true, if not checked.
- Set menu item 3 to checked false
Note:
- List items () have an property. This may have an Image component associated with them. The image could be set dynamically dependent on the data in each row.
- An Icon component VI_CHECK which already exists in the Repository should be used for this exercise.
- Feature Help ( is available for any component for you to investigate its Properties, Events and Methods in detail.
Your code should look like the following:
* Fill List
Evtroutine Handling(#MITM_2.Click)
Clr_List Named(#LTVW_1)
Select Fields(#LTVW_1) From_File(deptab)
Add_Entry To_List(#LTVW_1)
* Set a reference from VI_CHECK image component to list item image property
#LTVW_1.CURRENTITEM.IMAGE <= #VI_CHECK
Endselect
#MITM_2.checked := *Not #MITM_2.checked
#MITM_3.checked := false
Endroutine
8. Add the basic code for the event for the and menu items.
Your code should look like the following:
* Clear List
Evtroutine Handling(#MITM_3.Click)
Clr_List Named(#LTVW_1)
Endroutine
* Exit
Evtroutine Handling(#MITM_5.Click)
#com_owner.closeForm
Endroutine
9. The and property should be handled similarly to step 7.
Add logic to check (MITM_3) and uncheck ( MITM_2) to the event. Changes are highlighted in red.
Evtroutine Handling(#MITM_3.Click)
Clr_List Named(#LTVW_1)
#MITM_3.checked := *Not #MITM_3.checked
#MITM_2.checked := false
Endroutine
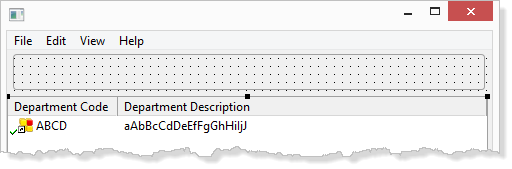
10. Compile and test your form. Your list should look like the following:

11. In the next few steps you will add logic to handle the View menu items. The component has a property. Select the and on the tab review the list of values available for the property:
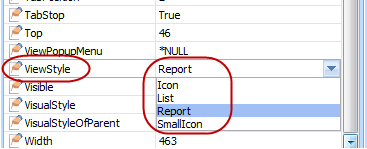
The View menu items will control the property.
12. This time, use the tab to access and select the menu items. This tab is usually open, but if necessary select it from the ribbon, menu.
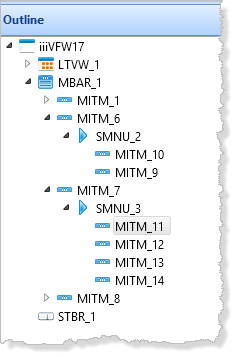
On the tab, expand sub-menu items and note that the appropriate menu is opened in the view.
13. Select the View menu items and create a event for each item. You can use the context menu on the tab to create the events.
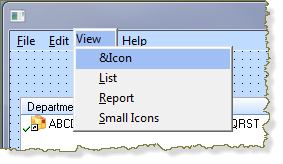
14. Add logic to each new click event routine to set the List View.ViewStyle property as required. Your finished code should look like the following:
* Icon
Evtroutine Handling(#MITM_11.Click)
#LTVW_1.viewstyle := icon
Endroutine
* List
Evtroutine Handling(#MITM_12.Click)
#LTVW_1.viewstyle := list
Endroutine
* Report
Evtroutine Handling(#MITM_13.Click)
#LTVW_1.viewstyle := report
Endroutine
* Small Icons
Evtroutine Handling(#MITM_14.Click)
#LTVW_1.viewstyle := smallIcon
Endroutine
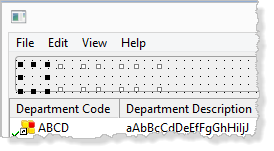
15. Compile and test your form. Use the menu options to change the appearance of the list.
16. In the next few steps you will add a Toolbar to the top of your form and implement a number of toolbar buttons.
a. Drag and drop a component to the top of the form below the and resize it:
b. Give the a property of Toolbar.
c. Set the property to 48 pixels.
Note: Remember you can move components accurately using the keys.
17. Use the ribbon to add a manager to the .
18. Use the / tab to set the . Use to set the value to 3 pixels.
19. Add four buttons to the . Use the to select all the toolbar buttons and set their property to FlatButton.
When you focus elsewhere the toolbar buttons will not be visible. You can still click on their position to select one. Select the third button and change its to Separator.
20. Select each Toolbar button and set the and properties as follows:
|
Button |
Image |
Hint |
|
SPBN_1 |
xImageNew16 |
Fill the list view |
|
SPBN_2 |
xImageCut16 |
Clear the list view |
|
SPBN_4 |
xImageExit16 |
Close the form |
21. Since the toolbar duplicates some of the menu options, you should add the new toolbar button click events to the existing logic. Your completed code should look like the following. Changes are highlighted in red.
Evtroutine Handling(#MITM_2.Click #SPBN_1.click)
Clr_List Named(#LTVW_1)
Select Fields(#LTVW_1) From_File(deptab)
Add_Entry To_List(#LTVW_1)
#LTVW_1.CURRENTITEM.IMAGE <= #VI_CHECK
Endselect
#MITM_2.checked := *Not #MITM_2.checked
#MITM_3.checked := false
Endroutine
Evtroutine Handling(#MITM_3.Click #SPBN_2.click)
Clr_List Named(#LTVW_1)
#MITM_3.checked := *Not #MITM_3.checked
#MITM_2.checked := false
Endroutine
Evtroutine Handling(#MITM_5.Click #SPBN_4.click)
#com_owner.closeForm
Endroutine
22. Compile your form.
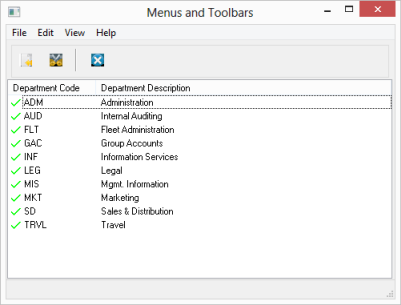
23. Test your form, especially the menu options and toolbar buttons.