When you create or update your data source in preparation for your mail merge or catalog merge project, you need to include either file names or paths for the picture files you want to merge. Do not include the actual pictures or images in your data source.
You can merge only one picture per merge field. If you want to merge several pictures for each record in your data source, you will need to add a column or data field per record to your data source for each of the pictures that you want to use.
- Open the data source file that contains the information you want to update; for example, a Microsoft Excel worksheet.
- Create a new column or data field for each picture type that you want to include.
- Type a unique column heading or name for each picture data field that you create.
These names will become the names for the merge fields that you select when you create your mail merge or catalog merge. You should make sure that each name is unique so that you can determine which picture each field represents.
- In each of the picture fields for each of the records in your data source, do one of the following:
- If you plan to save your picture files and your data source in the same folder, type the file name for the relevant picture. For example: firstphoto.jpg
- If the pictures files will be located in a different folder from the data source, type the path for the relevant picture. For example: C:\Documents and Settings\Username\My Documents\My Pictures\Catalog Project\firstphoto.jpg.
- When you have finished adding picture information to your data source, save your updated data source file.
 Insert the merge fields that represent picture files as picture fields
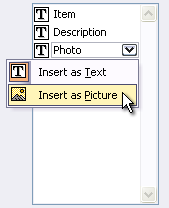
If you want to merge pictures into your publication, you need to make sure that you insert any merge field that represents a picture file as a picture field by clicking Insert as Picture when you first insert the merge field. If you do not designate the merge fields for pictures as picture fields, Microsoft Publisher will merge the picture file information from your data source as plain text.
 Insert merge fields for pictures into a mail merge publication
- If it is not already open, open your mail merge publication.
- On the Tools menu, point to Mail and Catalog Merge, and then click Insert Field.
- In your mail merge publication, click where you want to insert the merge field for a picture.
- In the Mail and Catalog Merge task pane (Step 3: Create your publication), in the list box under Create your publication, point to the field that you want to insert, click the arrow on the right, and then click Insert as Picture.

Publisher inserts a merge field within a picture frame into your mail merge publication at the insertion point you selected.
- Repeat Step 3 until you have inserted all of the fields that you want from your data source.
 Insert merge fields for pictures into a catalog merge template
- If it is not already open, open your catalog merge template.
- On the Tools menu, point to Mail and Catalog Merge, and then click Insert Field.
- In the Mail and Catalog Merge task pane (Step 3: Create your catalog merge template), point to the field that you want to insert as a a picture, click the arrow on the right, and then click Insert as Picture.

Publisher inserts a merge field within a picture frame into the Catalog Merge Area.
- Repeat Step 3 until you have inserted all of the fields that you want from your data source.