Insert merge fields
You can insert merge fields into your mail merge publication or your catalog merge template during Step 3 of the Mail and Catalog Merge Wizard. Your mail merge publication or your catalog merge template must be connected to a data source before you can insert merge fields.
 Insert merge fields into a mail merge publication
- If it is not already open, open your mail merge publication.
- On the Tools menu, point to Mail and Catalog Merge, and then click Insert Field.
- In your mail merge publication, click where you want to insert the merge field.
- Insert any of the following:
 Address block with name, address, and other information
- In the Mail and Catalog Merge task pane (Step 3: Create your publication), click Address block.
- In the Insert Address Block dialog box, click the address elements you want to include, and then click OK.
Note If the names of the data fields in your data source do not match the names of the fields that Microsoft Publisher uses for the address block, you may need to click Match Fields in the Insert Address Block dialog. In the Match Fields dialog, use the drop down lists to select the fields from your data source that correspond to the Publisher fields.
- In the Mail and Catalog Merge task pane (Step 3: Create your publication), click Greeting line.
- In the Greeting Line dialog box, select the greeting line format, which includes the salutation, name format, and following punctuation.
- Select the text you want to appear in cases where Publisher cannot interpret the recipient's name; for example, when the data source contains no first or last name for a recipient, but only a company name.
- Click OK.
Note If the names of the data fields in your data source do not match the names of the fields that Publisher uses for the greeting line, you may need to click Match Fields in the Greeting Line dialog. In the Match Fields dialog, use the drop down lists to select the fields from your data source that correspond to the Publisher fields.
- In the Mail and Catalog Merge task pane (Step 3: Create your publication), click Address fields.
- In the Insert Address Field dialog box, click the address elements you want to include, and then click OK.
Note If the names of the data fields in your data source do not match the names of the fields that Publisher uses for the address fields, you may need to click Match Fields in the Insert Address Field dialog. In the Match Fields dialog, use the drop down lists to select the fields from your data source that correspond to the Publisher fields.
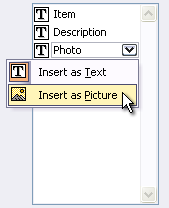
- In the Mail and Catalog Merge task pane (Step 3: Create your publication), in the list box under Create your publication, point to the field that you want to insert, click the arrow on the right, and then click Insert as Text or Insert as Picture.

If you select Insert as Text, Publisher inserts a merge field into your mail merge publication at the insertion point you selected. If you select Insert as Picture, Publisher inserts a merge field within a picture frame into your mail merge publication at the insertion point you selected.
 Insert merge fields into a catalog merge template
- If it is not already active, open your catalog merge template.
- On the Tools menu, point to Mail and Catalog Merge, and then click Insert Field.
- In the Mail and Catalog Merge task pane (Step 3: Create your catalog merge template), point to the field that you want to insert, click the arrow on the right, and then click Insert as Text or Insert as Picture.

If you select Insert as Text, Publisher inserts a merge field within a text box into the Catalog Merge Area. If you select Insert as Picture, Publisher inserts a merge field within a picture frame into the Catalog Merge Area.
Publisher inserts each merge field within a new text box or picture frame, unless a text box in the catalog merge area is already selected. If a previously inserted text box is selected when you insert a new merge field, the merge field will be inserted into this selected text box.
- Repeat Step 3 until you have inserted all of the fields that you want from your data source.
- Arrange the text boxes or picture frames containing the merge fields in the Catalog Merge Area.
Do any of the following:
 Move a text box or picture frame
- Click the text box or picture frame that you want to move to select it.
- Position the mouse pointer over the text box or picture frame until the pointer changes to the Move pointer
 .
. - Drag the text box or picture frame to a new position.
 Resize a text box or picture frame
- Click the text box or picture frame that you want to resize to select it.
- Position the mouse pointer over one of the handles on the text box or picture frame until the pointer changes to the Resize pointer
 .
. - Drag the mouse until the text box or picture frame is the size you want.
