- To insert a single row or column, click a cell in the row adjacent to where you want to add the new row or column.
To insert multiple rows or columns, select the same number of rows or columns that you want to insert.
- On the Table menu, point to Insert, and then click the option you want.
Publisher adds an empty row or column with the same formatting and size as the one you clicked initially.
To add a row to the bottom of a table, click inside the lowest-right cell, and then press TAB.
- Select the row or column you want to delete.
- On the Table menu, point to Delete, and then click the option that you want.
Note To select multiple row or columns, hold down the SHIFT key and click inside each row or column you want.
- Select the table.
- Position the mouse pointer over the boundary of the row or the column boundary (A or B) until you see the Adjust pointer (C).
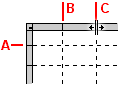
- Drag the row or column boundary to a new position.
 Resize a row or column without changing the table size
- Hold down SHIFT as you drag the boundary of the row or column.
Merge two or more columns or rows into one
- Select two or more adjacent rows or columns that you want to merge.
- On the Table menu, click Merge Cells.
If the cells contain text, the content of each cell appears in the merged cell.
If you have merged rows or columns, you can split them back apart.
- Select the merged rows or columns that you want to split.
- On the Table menu, click Split Cells.
If the merged cells contained text, the content of the merged cells will appear in one of the split cells.