
Create a bleed for your publication
To create a bleed for your publication, you need to set it up to print on a sheet of paper that's larger than the finished publication page. For example, if you are printing to a desktop printer and your publication page is a standard letter size, you would print it on tabloid paper. If you are printing to an imagesetter, you would print a specialized paper size such as Letter.Extra. The paper size you select will depend on the paper sizes your desktop printer or imagesetter accommodates.
- Set up the page size and the printer paper size.
- On the File menu, click Page Setup.
- In the Page Setup dialog box, under Publication type, select the layout you want.
Your selection represents the page size, not the printer paper size.
If you need to change the page size, enter your changes in the Width and Height boxes.
- Click the Printer and Paper tab.
- In the Size box, click the printer paper size you will use for printing.
Make sure you select a paper size that is larger than your publication page size.
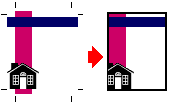
- Position the object that you want to bleed
 so that it extends beyond the edges of the publication page
  .
.
You can create a bleed with text, pictures, or any other type of object.
- After printing, trim the paper to the size of the publication by using the crop marks as your guides.
 How?
How?