- On the Tools menu, point to Commercial Printing Tools, and then click Color Printing.
- Click the Inks tab.
- Click the arrow next to the spot-color ink you want to delete, and then click Delete.
One of the following will happen:
- If the spot-color ink is labeled Not in use, Publisher will delete it.
- If the spot-color ink is labeled In use, Publisher will open the Replace Ink dialog box where you must choose a spot-color ink to replace the one you have deleted.
- In the Replace Ink dialog box, click the spot-color ink that you want to replace the deleted ink.
- Do one of the following:
- Click Maintain luminosity to maintain the same lightness value in the replacement ink as in the deleted ink. For example, you would click this option to replace a 100% tint of yellow with its equivalent in luminosity of about a 10% tint of blue.
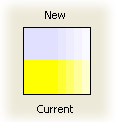
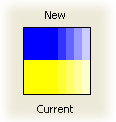
- Click Keep tint percentage to maintain the same tint in the replacement ink as in the deleted ink. For example, you would click this option to replace a 100% tint of yellow with a 100% tint of blue.
- Click Maintain luminosity to maintain the same lightness value in the replacement ink as in the deleted ink. For example, you would click this option to replace a 100% tint of yellow with its equivalent in luminosity of about a 10% tint of blue.
- Click OK.
- Click OK.
 How?
How?- On the Tools menu, point to Commercial Printing Tools, and then click Color Printing.
- Click the Colors tab.
- Click the arrow next to the spot color you want to delete, and then click Delete.
- In the Replace Color dialog box, click the color that you want to replace the deleted color, and then click OK.
- Click OK.
Note Because Publisher only lists spot colors in the Colors tab that are in use, you must always replace a spot color that you delete.