
Tips for assembling a poster or banner
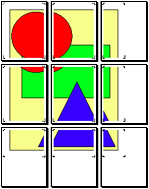
When you print a poster or banner to a desktop printer that commonly prints only on letter-sized or legal-sized paper, Microsoft Publisher creates a number of tiles that you need to trim and assemble to complete the whole publication.
When you print your publication, make sure that Crop Marks and Job Information are selected in the Advanced Print Settings dialog box (Page Settings tab). You will need to use the crop marks to align the tiles of your publication. The job information includes a tile number for each page that will help you identify which tiles adjoin.
On the printed tiles of your publication, you'll see two kinds of marks. Every corner will have a set of vertical and horizontal crop marks that indicate the trimmed area of the tile. In the right side corners you will see vertical overlap marks; in the lower corners you will see horizontal overlap marks. These marks indicate the overlap area. You can adjust the amount of overlap in the Poster and Banner Print Options dialog box (in the Page Setup dialog box, click the Layout tab, and then click Change Overlap).
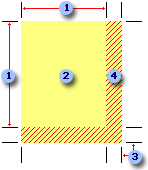
 Crop marks that show the trimmed area of the tile.
 Trimmed area of the tile.
 Overlap marks that show the overlap area.
 Overlap area of the tile. The overlap area is only on the right and lower parts of the tile.
When you assemble the tiles, start with the upper left tile and work to the right. Start by assembling each row of tiles separately, then assemble the rows, starting with the top row and working down.
- Leave the first tile in the row uncut, and then cut along the crop marks on the left side of each subsequent tile in the row. To get a straighter edge, use a metal-edged ruler and a utility knife rather than scissors.
- Line up the trimmed edge of the right tile with the crop marks on the right side of the left tile. The right tile should cover the overlap on the right side of the left tile.
- When you have the two tiles aligned, tape or glue them together. You can use transparent tape or, for a cleaner look, use glue in stick form or clear tape that is sticky on both sides.
 Assemble the rows to create the complete poster or banner
- Cut along the crop marks at the top of the lower row of tiles. To get a straighter edge, use a metal-edged ruler and a utility knife rather than scissors.
- Line up the trimmed edge at the top of the lower row with the crop marks at the bottom of the top row. The second row of tiles should cover the overlap at the bottom of the first row.
- When you have the two rows aligned, tape or glue them together. You can use transparent tape or, for a cleaner look, use glue in stick form or clear tape that is sticky on both sides.
- Once you have assembled all the rows, cut along the crop marks that remain visible on the outside edges of the assembled poster or banner.
To prevent your poster or banner from ripping and sagging, you can do one of the following:
- Glue or adhere the assembled publication to poster board, compressed cardboard, or foam core backing.
- Print the publication on fabric, vinyl, or metal. If your printer doesn't support printing on these materials, you might consider printing the publication through a commercial printing service or copy shop.