RAMP-TSAD06 Step 5. Using Multiple Command Handler Tabs
In handling this type of scenario the first option you have available is to put each of the destination screens onto its own command handler tab.
This adds value to the 5250 application in which the user cannot immediately go to data screen 3 (say) without having to go through data screens 1 and 2. Now they can move freely among all 3 data screens without having to cancel and go back to the key screen.
1. In the Framework, add three new instance level commands to the Employee business object: Name, Address and HR Details.
2. Make Name the default command and set the sequence of the commands to 1, 2 and 3. Resequence the other commands associated with Employee to that they come after these three commands.
3. In RAMP Tools link the destination screens with the commands:
|
UFRTS03_D1 |
Name |
|
UFRTS03_D2 |
Address |
|
UFRTS03_D3 |
HR Details |
4. Modify the script of the UFRTS03_R1. You need to change the SETVALUE so that the commands will be shown for the employee selected in the instance list.
case "UFRTS03_D1":
{
/* Set up data fields on form UFRTS03_R1 */
SETVALUE("EmpNo",objListManager.AKey1[0]);
SENDKEY(KeyEnter);
/* Check for arrival at UFRTS03_D1 */
Q_CHECK_CURRENT_FORM("UFRTS03_D1","Unable to navigate to form UFRTS03_D1");
}
break;
You may want to review RAMP-TS006 Step 2. Change the Script to Use the Current Instance List Entry.
5. Save and restart the Framework.
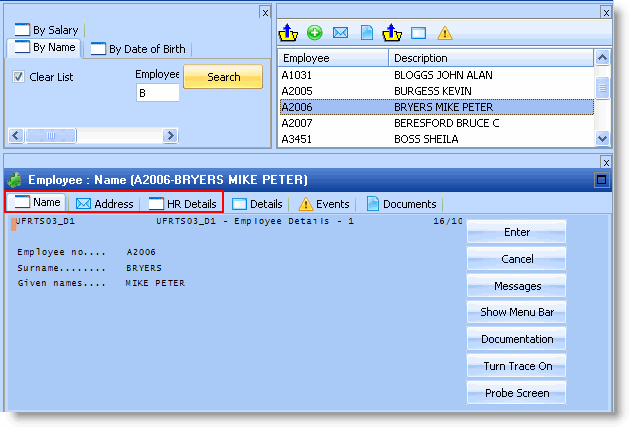
When you display an employee the command tabs should now look like this:

Notice that you can display the three 5250 screens in any combination.
You may have to trace and modify your scripts, or even demonstrate new navigations to get this example to function correctly. This is a normal part of scripting 5250 screen interactions. You should persist with doing this until all three screens function correctly. Previously completed tutorials should have equipped you with the skills required to debug your scripts until they function correctly.