The Individual Size and Position Adaptations
From combit List & Label Designer
![]()
![]()
combit List & Label
The Individual Size and Position Adaptations
Individual size and position adaptations are spatial interlinks, i.e. the size and position of the main object determines the size and position of the linked object. This automatically causes sequential interlinking as well.
If the size or position of the main object changes because the variables that it contains take up less room as the object provides, the linked objects adjust their size automatically to these changes.
Two kinds of interlinking are therefore available:
§ Position adaptation: If the position of a main object changes, the position of the linked object changes too. You have three options here:
§ Relative to begin: The interlinked object moves in relation to the upper left corner of the parent object.
§ Relative to end: The interlinked object moves in relation to the lower right corner of the parent object.
§ To end: The upper edge of the interlinked object starts at the end of the main object, irrespective of its original position. This causes an implicit size change on the first page on which the child object is printed.
§ Size adaptation: If the size of a main object changes, the position of the linked object changes too. You have two options here:
§ Proportional: The size of the linked object changes exactly like that of the parent object. E.g. if the main object becomes 10 mm shorter, the interlinked object will also become 10 mm shorter.
§ Inverse: The size of the interlinked object is adjusted inversely to the size of the main object. E.g. if the main object becomes 10 mm shorter, the interlinked object will become 10 mm longer.
You can specify whether the interlinking is to be horizontal and/or vertical in each case:
§ Vertical interlinking: The linked object adjusts its position or size to changes in the vertical position or height of the main object.
§ Horizontal interlinking: The linked object adjusts its position or size to changes in the horizontal position or width of the main object.
Example of vertical, relative to end position adjustment: You print an invoice and want to output a closing text after the table.
You therefore create a text object and position it below the table.

Figure 7.7: Text object below the list
Select the text object in the object dialog and interlink it with the table. Choose "Individual size and position adaptation" as the type of interlink. On the "Vertical Interlink" tab, enable the "Vertical" check box for the position adaptation and choose the "Relative to end" option so that the interlinked text object adjusts its size depending on the position of the lower right corner of the table.
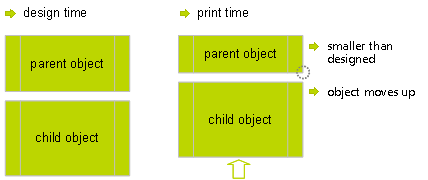
Figure 7.8: Diagram of vertical, relative to end position adjustment
If the table becomes smaller, the text object moves upwards proportionally. It doesn't matter where the table ends, the text object will always be output after the table in the specified size.

Figure 7.9: Closing text below the list
Example of vertical, relative to end position adjustment and vertical inverse size adjustment: On a multi-page invoice, the item table is to start on the first page below the address. On following pages it is to start at the upper page margin.
1. Create an invisible frame by inserting a rectangular object.
2. The upper edge of the object is positioned precisely where the invoice table is to begin on the following pages. The lower edge is positioned precisely where the invoice table is to begin on the first page.
3. Assign the "Page()=1" appearance condition to the rectangle so that it is only printed on the first page.
4. Create a table. This begins directly below the rectangular object.

Figure 7.10: Invisible rectangular object above the table
5. Now interlink the table with the rectangle (main object) and select "Individual size and position adaptation" as the type of interlink.
Figure 7.11: Spatial interlinks in the object list
On the "Vertical Interlink" tab, choose the position option "Relative to end" and the size option "Inverse".
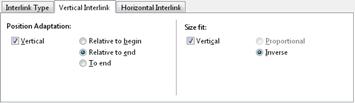
Figure 7.12: Interlink options in the object list

Figure 7.13: Diagram: Vertical, relative to end position adaptation and vertical inverse size adaptation
The table now changes its position based on the lower right corner of the rectangle (main object) and adjusts its height inversely in proportion.
The Page()=1 appearance condition prevents the rectangle from being printed on the second page. Therefore, it "shrinks" by 80 mm on the second page, and the table moves upwards proportionally and becomes 80 mm larger.


Figure 7.14: Position and size adaptation on the second page
Example: position adaptation, vertical to end: The interlinked object changes its position based on the main object. The size is also adjusted implicitly because the upper edge of the interlinked object changes based on the main object but the position of the main object does not change. The interlinked object must overlap the main object. The main object must be larger than the interlinked object. If the main object becomes smaller, the interlinked object only changes its position from above and increases its size. If the main object becomes larger, the linked object shrinks (the main object must be in the foreground).
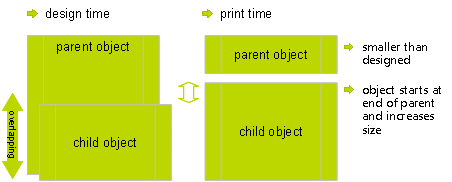
Figure 7.15: Diagram: Position adaptation vertical, to end
Example: position adaptation, vertical, relative to begin: The interlinked object changes its position based on the upper left corner of the main object. This type of interlink is the exact opposite of "vertical, relative to end". Example: The main object moves upwards due to the "Alignment bottom = True" setting in the Designer and the interlinked object follows this position adaptation in an upwards direction.
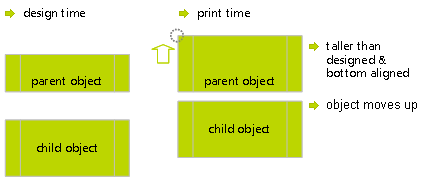
Figure 7.16: Diagram: Position adaptation, vertical, relative to begin