

combit List & Label
Adding the Item List
Use the "Report Container" object to add the item list to the report. As the name says, a report container can hold several objects: tables and freely defined content, charts and cross tabulations. You need the "Table" element for the item list, and "Free content" for the covering letter. Please see chapter Insert the Table for the Product List for an introduction about how to create tables.
1. In the "Objects" toolbar, choose the "Report Container" object type.

Figure 2.42: "Objects" toolbar
2. In the workspace, hold down the left mouse button and pull the object to the required size.
3. A selection dialog will appear for the chosen object type. Choose the "Table" object type.
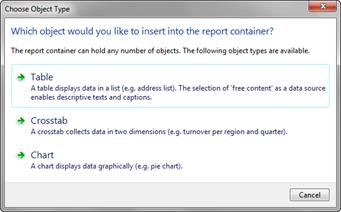
Figure 2.43: Object type selection
4. Now select the data source in the following dialog. All available tables are shown hierarchically; in other words, under the tables, you will find the related tables in each case.
Select the "Items" table because it contains the fields that we want for our item list.
5. A selection dialog will appear with all the fields in the "Items" table.
6. In this dialog, now choose the columns for the item list. Double-click one after another on the fields: "Quantity", "No", "Description1", "UnitPrice". This will add the fields to the "Columns" area. Confirm your selection with OK.
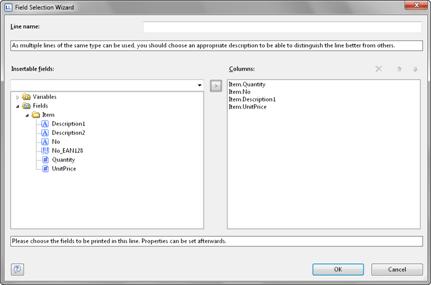
Figure 2.44: Field selection dialog
7. The table will now be displayed in the workspace. A header line with strings as the column titles and a data line with the contents of the fields will be created automatically.
List & Label adjusts the width of the columns automatically. You can adjust the width of a column manually by moving the separating line to the right or the left with the mouse.
Note: This changes all table columns, whose separators are within +/-2 mm from the mouse position. If you hold down the Ctrl key, the action will only be carried out for the line on which the mouse is positioned. The "Column width modification affects next column" option (Project > Options > Workspace), lets you alter the column width while making the next column smaller.
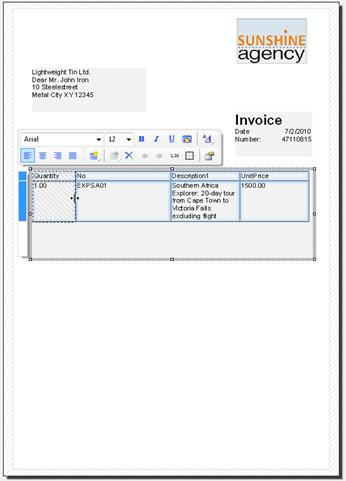
Figure 2.45: Changing column widths with the mouse
8. In the next step, you add a new column: "Total". Select the "UnitPrice" field by clicking in the upper left corner of the field. Then choose the "Append column" button in the mini toolbar.
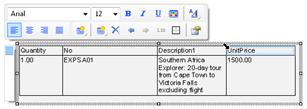
Figure 2.46: Select column
9. A menu will appear for the selected field type. Choose "Text" here.
10. The formula wizard will now appear, which you can use to define the contents of the field. Type "Total" and confirm with OK.
A message will now appear giving you the option of reducing the width of the columns to allow the new column to be inserted in the visible area. Confirm this dialog. You have now added an additional column to the header line. You now need this column in the data line as well.
11. Now select the data line field containing the item price and add a new column to it.
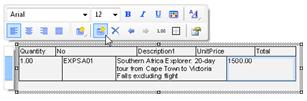
Figure 2.47: Add a new column
The total price is now to be calculated here. The total price is calculated by entering "Quantity*ItemPrice". To do this, select the relevant variables by double-clicking them.
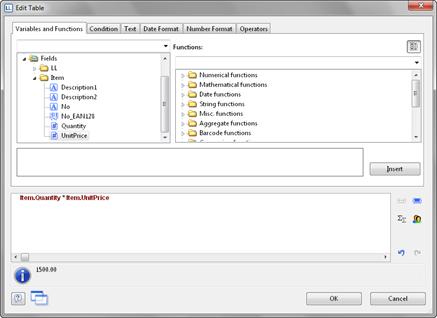
Figure 2.48: Multiplying two values in the formula wizard
Note: Open the list of available operators by clicking the "Operators" tab. Operators join two or more values or variables to give a new value. In this way, you can formulate arithmetic expressions (basic arithmetic operations) or logical expression. You can combine multiple operations in one expression. Please consider the calculation hierarchy of the operators used and place them in brackets if necessary. The "+" operator has a special meaning. It is not only suitable for additions ("Number" and "Date" value types) but is also used for joining strings.