

combit List & Label
Output Options
You can start the print function directly from the higher-level program, via a menu item or from the preview.
If you start the print from the higher-level program, the print settings dialog will normally appear once you have selected the project to print.
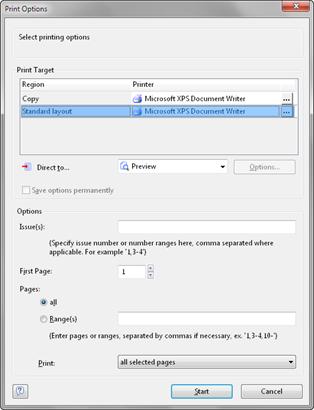
Figure 9.1: Output options
You have various configuration options here:
§ Under "Print Target", you can change the printer settings. If you have defined different layout regions in the page layout dialog, you can also change the printer settings here for the various regions. Enter the number of copies under "Issues".
§ Select the output format (e.g. preview, printer, PDF) under "Direct to".
§ The "Preview" option lets you view the output first on the screen as it would be printed. In this way, you can check the result before printing.
§ If you select the "Save options permanently" setting, your choice of printer and output format will be saved as default values for this print template.
§ With "First Page", you specify the page with which the print is to start.
§ "Pages" lets you select certain pages or a page range for printing, e.g. 1, 3-4, 10-.
§ The "Print" drop-down list lets you restrict the output to even/odd pages or the pages that you have selected above.
§ When printing labels, you have an extra "Select" button which you can use to specify the position where you want to start printing the sheet of labels.
In this way, you can also print sheets of labels that have already been partly used. You will find a sample label sheet for your label project in the dialog for selecting the start position. Click the label where the print is to start. Please take note of the selected print order. You can print not only in rows from upper left to lower right but also column for column or in the reverse direction. The labels will be printed in the specified direction starting with the selected label.

Figure 9.2: Additional print settings for labels