

combit List & Label
Create Invoice Header With Number and Date
Use the text object again to add the text "Invoice", the invoice date and the invoice number to an invoice header.
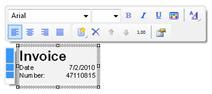
Figure 2.36: Invoice header: it should look like this.
1. In the "Objects" toolbar, choose the "Text" object type.
2. Pull the object to the required size.
3. The formula wizard will now appear, which you can use to define the contents of the text object. Type "Invoice".
4. Add another paragraph by means of the mini toolbar that appears automatically and the "Append paragraph" (insert) button.
5. The formula wizard will appear. Type "Invoice date".
6. Before you enter the invoice date, insert a tab stop so that the invoice date is aligned to the right. You can insert a tab stop by means of the "Text" tab. You create a tab stop with the "Tab" button and you define the position and alignment with the "Properties" button.
Note: Only one tab stop can be inserted on each line. A tab stop causes the preceding text to run only as far as the tab stop. A tab stop that is right aligned will cause the text that follows it to be justified to the right. The distance from the left margin determines the position of the tab stop.
Since a tab stop is also a character, it must also be enclosed in quotation marks. Alternatively, in this example, you can insert the tab stop with "Insert" to the existing "Invoice date" text.
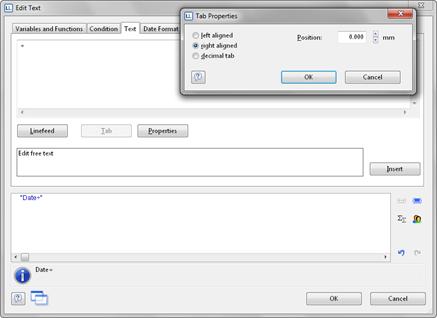
Figure 2.37: Adding a tab stop to a text expression
7. Finally, position the cursor outside of the text field and insert the "Invoice_Date" variable with the "Variables and Functions" tab.
The format will be converted automatically.
Conversion with the "Date$()" function is essential since the invoice date has the "date" type and the value that is returned is already defined as a "string" by the "Invoice date" text expression entered earlier. The return value must always be unique. The date value must therefore be converted to a string by means of a function. The "Date$()" function is one way of doing this.
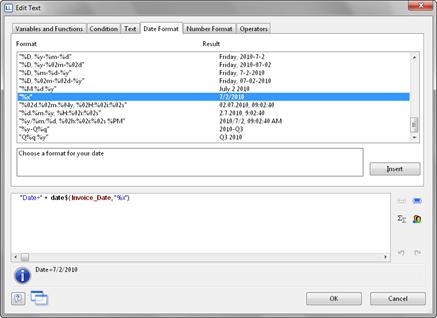
Figure 2.38: Format conversion with Date$()
The automatic format conversion uses "%x" as the formatting parameter. If you want a different output format, switch to the "Date Format" tab. You can choose a format here and then select the "Invoice_Date" variable.
8. Now add the invoice number in the same way.
The format will be converted automatically here as well.

Figure 2.39: Format conversion with Str$()
Conversion with the "Str$()" function is essential since the invoice number is a field with the "number" type and the value that is returned is already defined as a "string" by the "Invoice number" text expression entered earlier. The return value must always be unique. The number must therefore be converted to a string by means of a function. The "Str$()" function is one way of doing this. This function has 3 parameters: The first parameter is the number that is to be converted to a string; the second parameter specifies the minimum length and the third parameter the number of decimal places.
9. Now increase the font size for "Invoice". To do this, select the relevant line.
10. Set the font size to 28 by means of the "font size" button in the mini toolbar that appears automatically.
11. Now increase the distance to the next line, i.e. open the paragraph properties dialog via the "Object properties" button in the mini toolbar. In this dialog, you can define the properties for each line. Set the value for the "Paragraph Spacing" property for the first line to 12 pt.
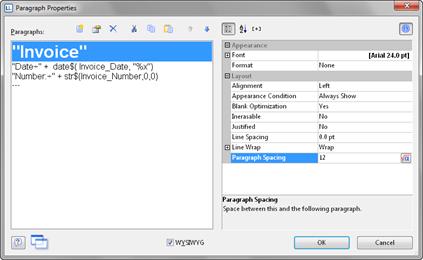
Figure 2.40: Paragraph properties dialog
12. And you now have an attractive invoice header:

Figure 2.41: Invoice header