Navigation in hierarchical data is known as drilling down. Drilling down makes it possible to "zoom in" to examine the data at different levels of detail. Different print templates are linked to each other to achieve this. This property is only available with hierarchical tables.

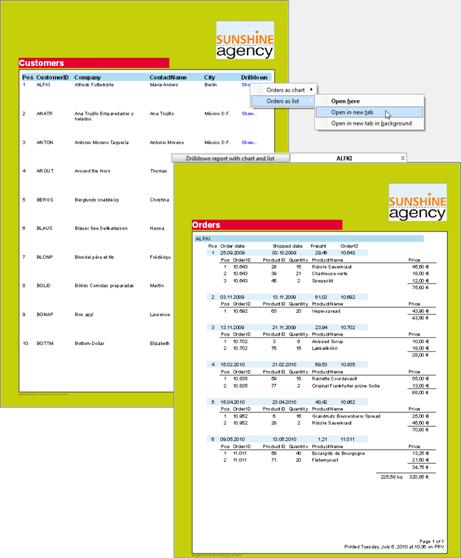
Figure 6.39: Example of a report with an open drilldown report
These reports make it possible for anyone to find the information they are looking for quickly, even with very large and complex data inventories.
Only one level is printed to start with (e.g. customers). A new detail report opens (e.g. orders) when you click on a customer.
This drilldown report can be opened in the context menu either in the same window (navigation via the green arrow button in the preview window), or in a new foreground or background tab.
The drilldown function is only available in the preview. You can export any drilldown report to another format from the preview, e.g. PDF.
Drilldown reports can be embedded in the preview file to allow them to be sent or saved as a complete unit. You will find the respective option "Embed Drilldown Reports" in the project properties.
A drilldown link relates either to a single field or an entire table row. A whole series of links can be associated with each of these elements, e.g., to present the data in different ways.
Proceed as follows to create a drilldown report:
1. In the "Objects" toolbar, choose the "Report Container" object type. In the workspace, hold down the left mouse button and pull the object to the required size. A selection dialog will appear for the chosen object type. Choose the "Table" object type.
2. In the following dialog, now select the data source. All available tables are shown hierarchically, in other words, under the tables you will find the related tables in each case.
In order to be able to open a sub-report in drilldown mode, you must select a table here that also has a sub-table! In the Sample Application, select the "Customers" table, for example, as it has "Orders" as a sub-table.
3. Now define the columns of the table with the wizard, i.e. CustomerID, CompanyName, ContactName, City.
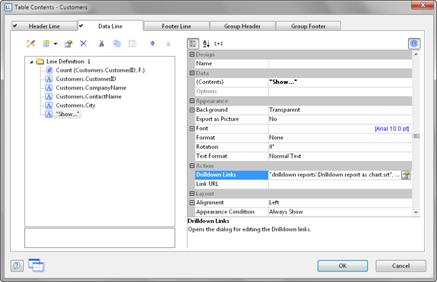
4. In the object dialog for the table, now define an additional column for the drilldown link. Enter the text "Show..." as the content.
5. Now open the dialog for creating the drilldown link by means of the "Drilldown Links" column property.

Figure 6.40: Data line with additional column for a drilldown link
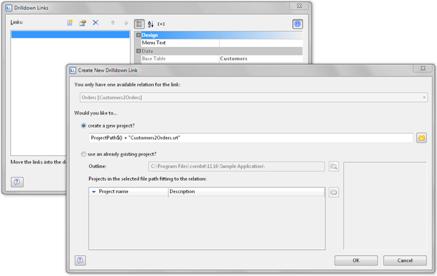
6. Create a new drilldown link with the "Insert new link" button in the dialog that appears.

Figure 6.41: Dialogs for defining the linked drilldown report
7. A dialog appears where you can create the print template for the sub-report. Select the "Create a new project" option and enter the name for the print template.
8. A second instance of the Designer opens for you to create the print template. Proceed as usual to create this sub-report. I.e. you create a report container, choose the "Table" object type, choose "Orders" as the data source and define the columns of the orders table that are to be shown in the report.
9. Once you have completed the report, close this second Designer instance.
10. Back in the "Drilldown Links" dialog, you now define the "Menu Text" property for this link. If you have more than one link, its text will be shown in a context menu. The text will also be used as the title for a tab if multiple drilldown reports are shown in a preview window.
11. You have now finished the drilldown report and you can display it in the preview.

