Multiple Module Scanning - Synchronous
Refer to the trigger topic of the switch module in Devices for possible Trigger Input locations.
PXI Options
- Setup 1—Using Internal PXI Trigger Lines
- Setup 2—Using AUX Trigger Cable Connected to Front of PXI Switch
SCXI Options
- Setup 5—Using SH9MD-AUX Cable
- Setup 6—Using AUX Trigger Cable Connected to the Front of the SCXI Switch
- Setup 7—Using Internal PXI/SCXI Trigger lines
PXI
Setup 1—Using Internal PXI Trigger Lines
All PXI switches can receive an input trigger from PXI trigger lines of a PXI chassis. In this setup, no cable is used between the DMM and the PXI switches for triggering. The DMM sends its MC signal to the PXI switches through a PXI trigger line.
- Open niSwitch Multi Switch Synch Int.
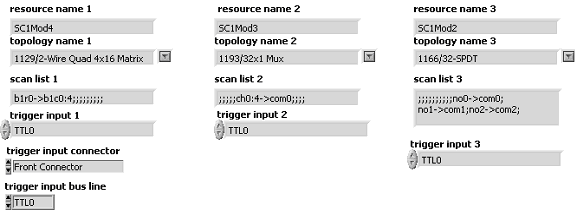
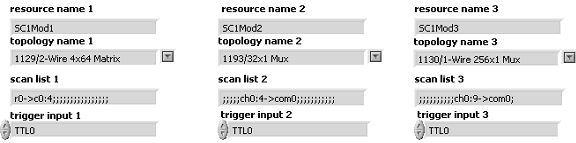
- Create scan lists according to the process described in Multiple Module Scan Lists.
- Set Trigger Input to the same PXI trigger line for all switches. This input line should coincide with the destination of the DMM MC signal.
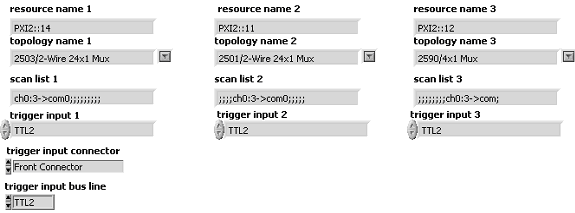
Setup 2—Using AUX Trigger Cable Connected to Front of PXI Switch
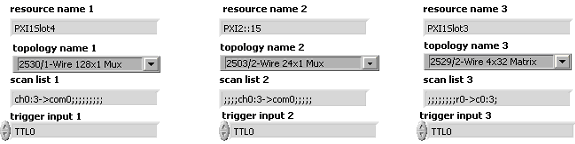
Some PXI switches can receive an input trigger from the front panel or terminal block. This setup uses the AUX trigger cable to trigger the switches.
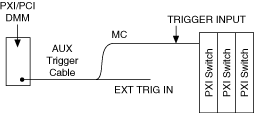
- Connect the MC signal from the DMM to the external trigger input terminal on the front panel or in the terminal block of one PXI switch.
- Open niSwitch Multi Switch Sync Ext.
- Create scan lists according to the process described in Multiple Module Scan Lists.
- Add niSwitch Route Trigger Input to the configuration of the switch where the AUX trigger cable from the DMM is connected.
- Set Trigger Input Connector to Front Connector.
- Set Trigger Input Bus Line to TTLn.
- Set Trigger Input to the same TTLn for all switches.
- Set Measurement Complete Destination to External in the DMM configuration.
SCXI
Setup 5—Using SH9MD-AUX Cable
This setup uses an SH9MD-AUX cable between the DMM and the SCXI high-voltage analog bus connected to a switch in an SCXI-1000, SCXI-1001 or PXI-1010, or to the back of a PXI-1011. The DMM controls the SCXI switches and sends triggers to advance them through their respective scan lists. Refer to SCXI Backplane Adapters in Controlling and Triggering Switches for more information.
 |
Note This program cannot be used with the NI SCXI-1127/1128. Refer to Legacy Programming for the NI SCXI-1127/1128 in Setup 5 for information on programming these modules. |
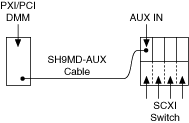
- Connect one end of the SH9MD-AUX cable to the 9-pin DIN connector on the front of the DMM.
- Connect the other end of the SH9MD-AUX cable to the 9-pin DIN connector labeled AUX IN on the SCXI high-voltage analog bus.
- Open niSwitch Multi Switch Sync Ext.
- Create scan lists according to the process described in Multiple Module Scan Lists.
- Add niSwitch Route Trigger Input to the configuration of the switch where the SH9MD-AUX cable is connected. Refer to the SCXI Backplane Adapters section to determine which module is connected to the SH9MD-AUX cable.
- Set Trigger Input Connector to Rear Connector.
- Set Trigger Input Bus Line to TTLn. The SCXI-1000 and SCXI-1001 have only SCXI trigger line 0 and 1 available. You can use all SCXI trigger lines in the NI PXI-1010 and PXI-1011.
- Set Trigger Input to the same TTLn for all of the switches.
- Set Measurement Complete Destination to External in the DMM configuration.
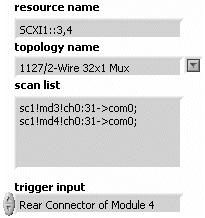
Legacy Programming for the NI SCXI-1127/1128
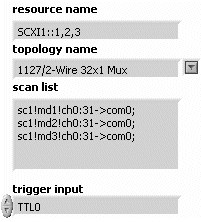
- Open niSwitch Multi 27_28 Sync.
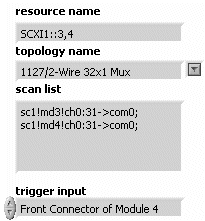
- In legacy programming, the chassis is configured in Traditional NI-DAQ (Legacy). Enter SCXI1::3,4 to include switch modules in Slots 3 and 4 of chassis 1 in the scanning operation.
- Select 1127/2-wire 32×1 Mux for the topology.
- Set the wire mode of the modules being scanned (1-wire, 2-wire, or 4-wire) in Measurement & Automation Explorer by using the Channel tab in the module property.
- In the scan list, enter the channels to be scanned as you normally would for a single module. Each entry should be preceded by scx!mdy! where x is the chassis number and y is the slot number of the switch module.
- Set Trigger Input to the rear connector of the module cabled to the DMM.
- Set Measurement Complete Destination to External in the DMM configuration.
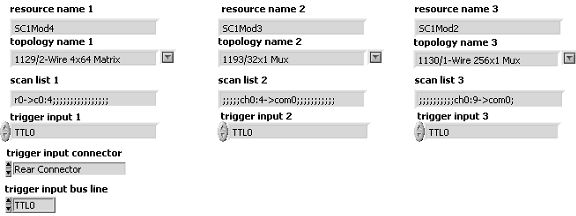
Setup 6—Using AUX Trigger Cable Connected to the Front of the SCXI Switch
Some SCXI switches can receive an input trigger on the front panel or terminal block. This setup uses an AUX trigger cable between the DMM and the front panel or in the terminal block of an SCXI switch. The switches are controlled by another device.
|
Note This program cannot be used with the NI SCXI-1127 or the NI SCXI-1128. Refer to Legacy Programming for the NI SCXI-1127/1128 in Setup 6 for more information. |
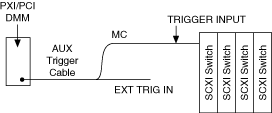
- Connect the AUX trigger cable to the 9-pin DIN connector on the front of the DMM.
- Connect the MC cable of the AUX trigger cable to the external trigger input terminal (ext trig in) on the front panel or in the terminal block of the SCXI switch.
- Open niSwitch Multi Switch Sync Ext.
- Enter channels in the scan lists according to the process described in Multiple Module Scan Lists.
- Add niSwitch Route Trigger Input to the configuration of the switch where the AUX trigger cable is connected.
- Set Trigger Input Connector to Front Connector.
- Set Trigger Input Bus Line to TTLn. The SCXI-1000 and SCXI-1001 have only SCXI trigger line 0 and 1 available. You can use all SCXI trigger lines in the NI PXI-1010 and PXI-1011.
- Set Trigger Input to the same TTLn for all of the switches.
- Set Measurement Complete Destination to External in the DMM configuration.
Legacy Programming for the NI SCXI-1127/1128
- Open niSwitch Multi 27_28 Sync.
- In legacy programming, the chassis is configured in Traditional NI-DAQ (Legacy). Enter SCXI1::3,4 to include switch modules in Slots 3 and 4 of chassis 1 in the scanning operation.
- Select 1127/2-wire 32×1 Mux for the topology.
- Set the wire mode of the modules being scanned (1-wire, 2-wire, or 4-wire) in Measurement & Automation Explorer by using the Channel tab in the module property.
- In the scan list, enter the channels to be scanned as you normally would for a single module. Each entry should be preceded by scx!mdy! where x is the chassis number and y is the slot number of the switch module.
- Set Trigger Input to the front connector of the module cabled to the DMM.
- Set Measurement Complete Destination to External in the DMM configuration.
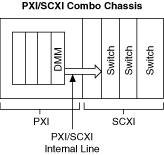
Setup 7—Using Internal PXI/SCXI Trigger Lines
This setup uses the internal trigger lines of a PXI/SCXI combination chassis to trigger and control SCXI switches. In this setup, no trigger cable is used between the NI DMM installed in the rightmost PXI slot and the SCXI switches. In the combination chassis, the rightmost slot of the PXI chassis has several internal lines available for SCXI communication and 2 internal trigger lines (TTL0 and TTL1) connected to SCXI trigger lines (SCXI Trig0 and SCXI Trig1).
|
Note This program cannot be used with the NI SCXI-1127 or the NI SCXI-1128. Refer to Legacy Programming for the NI SCXI-1127/1128 in Setup 7 for more information. |
- Open niSwitch Multi Switch Sync Int.
- Enter channels in the scan lists according to the process described in Multiple Module Scanning.
- Set Trigger Input to TTL0 for all switches.
- NI PXI-4060 Users
- Install the NI PXI-4060 in the rightmost PXI slot.
- Set Measurement Complete Destination to TTL0 to send the MC signal to SCXI TRIG0.
- NI PXI-407x Users
- Install the NI PXI-407x in the rightmost PXI slot.
- Set Measurement Complete Destination to LBR_TRIG0 to send the MC signal to SCXI TRIG0.
Legacy Programming for the NI SCXI-1127/1128
- Open niSwitch Multi 27_28 Sync.
- In legacy programming, the chassis is configured in Traditional NI-DAQ (Legacy). Enter SCXI1::3,4 to include switch modules in Slots 3 and 4 of chassis 1 in the scanning operation.
- Select 1127/2-wire 32×1 Mux for the topology.
- Set the wire mode of the modules being scanned (1-wire, 2-wire, or 4-wire) in Measurement & Automation Explorer by using the Channel tab in the module property.
- In the scan list, enter the channels to be scanned as you normally would for a single module. Each entry should be preceded by scx!mdy! where x is the chassis number and y is the slot number of the switch module.
- Set Trigger Input to TTL0.
- Set Measurement Complete Destination to LBR Trig 0 in the DMM configuration.