NI PXI-2565 Flyback Voltage Protection
When inductive loads are connected to the relays, a large counter electromotive force may occur at relay switching time because of the energy stored in the inductive load. These flyback voltages can severely damage the relay contacts and significantly shorten the life of the relay.
You can limit flyback voltages at your inductive load by installing a flyback diode for DC loads or a varistor for AC loads. The NI PXI-2565 switch module has solder connections for a diode or varistor. With this diode/varistor installed, you can limit flyback voltages when switching inductive loads.
 |
Caution Before installing the diode or varistor in your module, ensure that no signals are connected to your module front connector. |
Before installing your switch module in the PXI chassis, install the diode/varistor by performing the following steps. Refer to the following figure.
Disassemble the Module
- Ground yourself using a grounding strap or a ground connected to your PXI chassis.

Note Properly grounding yourself prevents damage to your module from electrostatic discharge. - Loosen the four screws that fasten the relay module to the carrier module and front panel.
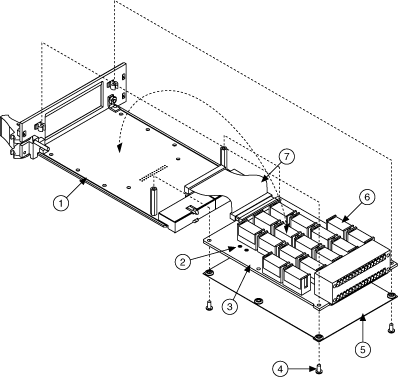
1 Carrier Module 2 Solder Location for
Flyback Voltage Protection Device3 Relay Module 4 Screws 5 Plastic Insulator Cover 6 Relay and Socket 7 Ribbon Cable - Remove the plastic insulator cover.
- Lift up the card and disconnect the ribbon cable from the relay module.
Install the Diode/Varistor
- Remove solder, as necessary, from the diode/varistor locations.
- Insert the diode/varistor into the appropriate location, labeled RVx, where x corresponds to the channel number.
- Solder and trim the leads.
Reassemble the Module
Complete the Disassemble the Module steps in reverse order to reassemble your module.