Edit measurement
From ExtrAXION
Edit measurement 
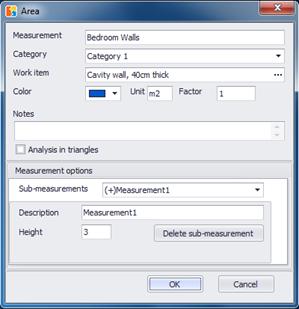
Using this button, you can view or modify the details of the selected measurement at a later stage. Correct the description or the category of the measurement, the work items of the WBS to which it is linked, change its color, insert a factor, and modify the measurement unit accordingly, or add explanatory notes. When finished, click ΟΚ.
Editing the names and parameters is performed per
sub-measurement (See Drawings/Continue
measurement). You can view and select
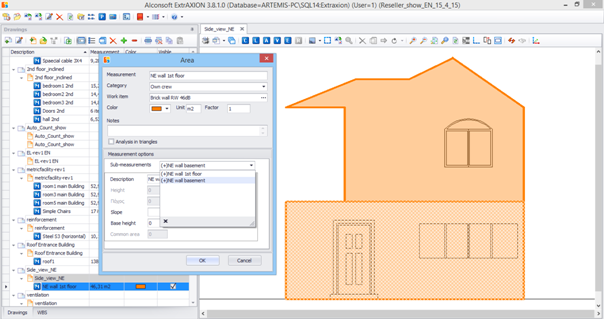
them from the drop down list. Each one will be preceded by a (+) or (-) sign,
depending on if it was created with ‘Continue measurement ![]() ’ or ‘Continue measurement
(subtract)
’ or ‘Continue measurement
(subtract) ![]() ’
respectively.
’
respectively.
![]() Parameters may vary depending on the
sub-measurement’s type, which you can change when continuing a measurement. For
example, if an area measurement
Parameters may vary depending on the
sub-measurement’s type, which you can change when continuing a measurement. For
example, if an area measurement ![]() is performed on the drawing’s level and
then continued to a sub-measurement perpendicular to the drawing, only the
latter will be associated with the ‘Common height’ parameter.
is performed on the drawing’s level and
then continued to a sub-measurement perpendicular to the drawing, only the
latter will be associated with the ‘Common height’ parameter.
![]() When you select a sub-measurement from the
dropdown list all figures that belong to that sub-measurement are marked on the
drawing.
When you select a sub-measurement from the
dropdown list all figures that belong to that sub-measurement are marked on the
drawing.
![]() If you have
selected on the drawing figures that belong to different measurements, when you
right click and select the ‘edit measurement’ option, the measurement that will
be edited is the one where the last selected figure belongs.
If you have
selected on the drawing figures that belong to different measurements, when you
right click and select the ‘edit measurement’ option, the measurement that will
be edited is the one where the last selected figure belongs.
![]() In case the values of a parameter are
defined per node, e.g. when you enter them every time you create a new point by
clicking on the drawing, this parameter doesn’t have a common value and cannot
be edited in this window. Editing such values is performed directly on the
drawing by right clicking on the nodes instead (See Measuring
in image files/Length Measurement/Measuring procedure/Figure data).
In case the values of a parameter are
defined per node, e.g. when you enter them every time you create a new point by
clicking on the drawing, this parameter doesn’t have a common value and cannot
be edited in this window. Editing such values is performed directly on the
drawing by right clicking on the nodes instead (See Measuring
in image files/Length Measurement/Measuring procedure/Figure data).