Draw measurement region 
Using this button, you can mark the areas of the drawing where the measurements have been completed. This option offers you the ability to better monitor the areas that have already been quantity surveyed. If you click the button, the following window will appear:
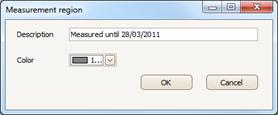
In the ‘Description’ field, enter the description of the measured area, e.g. ‘OK up to 6/3/2011’. In the ‘Color’ field, you can change the default which is used to mark each measured area. Then, click OK and draw the area where all measurements are complete by consecutively clicking on its perimeter’s nodes. To complete the marking procedure for the measured area, right-click or press the Esc key.
Once you have finished marking the measured area, you can modify it. By double clicking any part of the area, the ‘Measurement Area’ window appears and you can change both the description of the measured area and the color of the marking.
Furthermore, you may edit the marked area by changing the polyline shape (See Measurements in image files/Types and methods of measurement/Length Measurement).
