Analyze!
From EPMA Probe
Analyze!
The Analyze window is a modeless dialog that lists both data and processed data for standard, unknown and wavescan samples. The average, standard deviation and other statistical calculations are shown in the upper data grid and the individual data points in the lower data grid. In addition buttons are provided to allow the user to specify elements by fixed composition, standard and interference assignments, Time Dependent Intensity (TDI) element assignments and plots, edit sample name and description, and specify sample calculation options and many other parameters. See the detailed descriptions below for more information.
When making changes to the standard and/or unknown samples for any of these parameters, be sure that the last unknown sample in the list is also selected so that the changes made will be included in the next new sample that is created (unless loading a previously saved sample setup). Probe for EPMA, by default, always uses the last unknown sample as the basis for the next standard or unknown that is created.
The Select All button will select all the currently displayed samples in the Analyze! Window list. This is useful for making changes to large numbers of samples with a single mouse click.
Note that if the samples were acquired with the self Time Dependent Intensity (TDI) correction (see the Special Options button in the Acquire! Window), one will probably not want to change the standard assignments for more than one sample at a time. The self Time Dependent Intensity (TDI) element correction requires that the assigned Time Dependent Intensity (TDI) sample number be the sample number of the sample itself.
The Add To Setup button will add the currently selected sample to the Sample Setup list. This list is accessed from the New Sample button in the Acquire! Window or the Sample Setups button in the Automate! window to allow the user to manually or automatically load different sample setups for acquisition and automation within a single run. To rename, add or delete the sample setups, go to the Elements/Cation button in the Analyze! Window and click the save Sample Setup button.
The Save Setups button is used to quickly save a pointer to an unknown sample so the sample can later be used as the basis for creating a new sample. It will save all selected samples as sample setups using the sample name already given. If it is desired to use a different name for the sample setup, use the Save Sample Setup button from the Elements/Cations dialog. The sample setup can be loaded for new samples by using the Load Sample Setup button in the New Sample dialog.
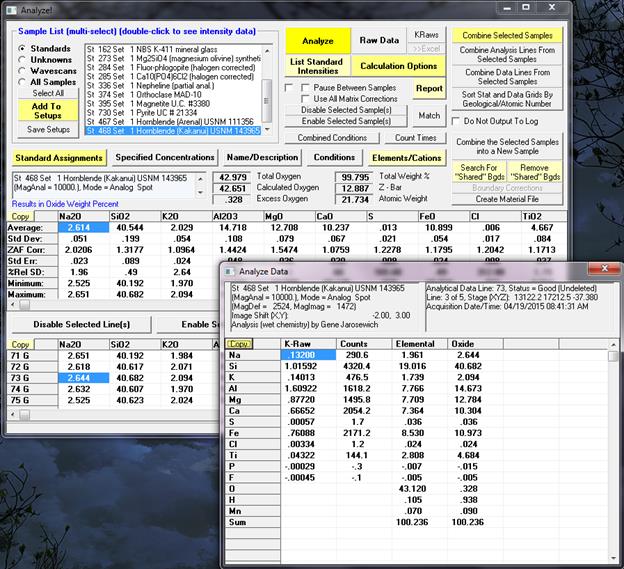
Note that one can double-click on any line in the currently analyzed sample and the program will display an additional grid (spreadsheet) with the analytical results in row format (analysis type in columns, elements in rows) for the selected line as shown below. In addition, if the row display spreadsheet is open and automatic analysis is turned on, the program will display the results for the last acquired line.