Adding a Contact
To Add a Contact
- Click on the Contact icon on the top toolbar.

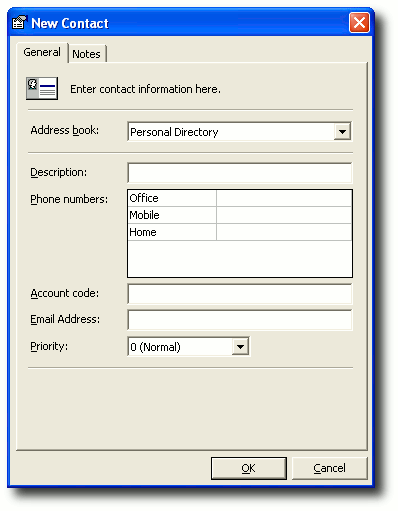
The New Contact screen will appear:

Address Book
Only an administrator has access to changing the Company Directory. A User has access to Personal Contacts only.
You can make changes to your own Personal Directory.
Description
The Contact Description that will display in the Directory.
Phone number
You can enter a number for the Office, Mobile or Home. For a Contact to be active, one number must be entered.
- Include International Calling Numbers and Area Codes.
- No spaces are required between codes.
- Do not insert a 1 or 9 to get an outside line.
Account code
If you are in a Call Centre environment and IPFX Live Desktop is networked with your own software system, you can enter an account code which will show when that caller dials in in the Call Popup Screen.
Email Address:
You can enter the email address of your contact in this field.
Priority
You can set the priority of a customer so that when two calls come in at the same time, the call with the highest priority will be answered first.
If a caller uses your Toll Free number for example, they will take priority if they are a national caller, over a customer who is local.
Preferred Queue
To select the queues you wish your customers to be directed to
- Click on the drop-down box arrow to display the list of queues.
- Select your queue.
- Click OK.
Preferred Agent
To select which Agent you would like your customer to be sent to within the queue:
1. Click on the drop-down box arrow to display the list of Agents.
2. Select your Agent.
3. Click OK.
Note: For information on setting up Preferred Agent Groups so that you can select the Preferred Agent your customer can be sent to, please refer to the IPFX Administrator Guide (Config/Groups/Preferred Agent to set up the Preferred Groups and Groups; and Config/Queues/Settings to set up agents who belong to those groups).
Note 2 This feature requires a IPFX Contact Centre module to be purchased