设置向导界面
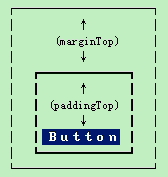
| 1、layout_marginLeft和paddingLeft区别layout_marginLeft:组件距离父组件的左边的距离 paddingLeft:组件中内容距组件左边的距离  2、使用系统的图标,可以减少apk的体积,一些系统的图片: android:src="@android:drawable/presence_online"  android:src="@android:drawable/presence_offline"  android:src="@android:drawable/presence_invisible"  3、不使用任何资源@null,比如取消继承自父style的一些样式。 <item name="android:drawableRight">@null</item> 4、TextView左右两边一个图片 <TextView style="@style/wizard_textview_content" android:drawableLeft="@android:drawable/star_on" android:text="@string/gps_track" > </TextView> |
| 1、设置向导界面1 a) \res\layout\activity_wizard_setup1.xml <?xml version="1.0" encoding="utf-8"?>
<LinearLayout xmlns:android="http://schemas.android.com/apk/res/android"
android:layout_width="match_parent"
android:layout_height="match_parent"
android:orientation="vertical" >
<TextView
style="@style/wizard_textview_title"
android:text="@string/wizard_welcome_use_phone_safe_theft" />
<TextView
style="@style/wizard_textview_content"
android:text="@string/your_phone_safe_guard" />
<TextView
style="@style/wizard_textview_content"
android:drawableLeft="@android:drawable/star_on"
android:text="@string/sim_change_alarm" >
</TextView>
<TextView
style="@style/wizard_textview_content"
android:drawableLeft="@android:drawable/star_on"
android:text="@string/gps_track" >
</TextView>
<TextView
style="@style/wizard_textview_content"
android:drawableLeft="@android:drawable/star_on"
android:text="@string/remote_destroy_data" >
</TextView>
<TextView
style="@style/wizard_textview_content"
android:drawableLeft="@android:drawable/star_on"
android:text="@string/remote_lock_screen" >
</TextView>
<LinearLayout
android:layout_width="match_parent"
android:layout_height="wrap_content"
android:gravity="center_horizontal"
android:orientation="horizontal" >
<ImageView
android:layout_width="wrap_content"
android:layout_height="wrap_content"
android:contentDescription="@string/presence_online"
android:src="@android:drawable/presence_online" />
<ImageView
android:layout_width="wrap_content"
android:layout_height="wrap_content"
android:contentDescription="@string/presence_invible"
android:src="@android:drawable/presence_invisible" />
<ImageView
android:layout_width="wrap_content"
android:layout_height="wrap_content"
android:contentDescription="@string/presence_invible"
android:src="@android:drawable/presence_invisible" />
<ImageView
android:layout_width="wrap_content"
android:layout_height="wrap_content"
android:contentDescription="@string/presence_invible"
android:src="@android:drawable/presence_invisible" />
</LinearLayout>
<RelativeLayout
android:layout_width="match_parent"
android:layout_height="match_parent" >
<ImageView
android:id="@+id/imageView1"
android:layout_width="wrap_content"
android:layout_height="wrap_content"
android:layout_centerInParent="true"
android:contentDescription="@string/wizard_setup1"
android:src="@drawable/wizard_setup1" />
<Button
style="@style/wizard_bt_previous"
android:text="@string/wizard_previous" />
<Button
style="@style/wizard_bt_next"
android:text="@string/wizard_next_step" />
</RelativeLayout>
</LinearLayout> b) \res\values\styles.xml <resources>
<style name="AppBaseTheme" parent="android:Theme.Light"></style>
<style name="AppTheme" parent="AppBaseTheme"></style>
<!-- 1、设置向导TextView标题sytle -->
<style name="wizard_textview_title">
<item name="android:textSize">20sp</item>
<item name="android:gravity">center_vertical</item>
<item name="android:textColor">@color/textview_content_color</item>
<item name="android:layout_width">match_parent</item>
<item name="android:layout_height">55dip</item>
<item name="android:background">@color/textview_bg_color</item>
</style>
<!-- 2、设置向导TextView内容sytle -->
<style name="wizard_textview_content">
<item name="android:paddingLeft">5dip</item>
<item name="android:paddingBottom">3dip</item>
<item name="android:gravity">center_vertical</item>
<item name="android:paddingTop">3dip</item>
<item name="android:layout_width">match_parent</item>
<item name="android:layout_height">wrap_content</item>
<item name="android:textSize">18sp</item>
</style>
<!-- 3、下一步 -->
<style name="wizard_bt_next">
<item name="android:layout_width">wrap_content</item>
<item name="android:layout_height">wrap_content</item>
<item name="android:layout_alignParentBottom">true</item>
<item name="android:layout_alignParentRight">true</item>
<item name="android:background">@drawable/selector_btn_green</item>
<item name="android:paddingBottom">3dip</item>
<item name="android:paddingLeft">5dip</item>
<item name="android:paddingRight">5dip</item>
<item name="android:paddingTop">3dip</item>
<item name="android:drawableRight">@drawable/wizard_next</item>
</style>
<!-- 4、上一步 -->
<style name="wizard_bt_previous" parent="@style/wizard_bt_next">
<item name="android:layout_alignParentRight">@null</item>
<item name="android:layout_alignParentLeft">true</item>
<item name="android:drawableRight">@null</item>
<item name="android:drawableLeft">@drawable/wizard_previous</item>
</style>
</resources>  |
| 2、设置向导界面2 a) activity_wizard_setup2.xml <?xml version="1.0" encoding="utf-8"?>
<LinearLayout xmlns:android="http://schemas.android.com/apk/res/android"
xmlns:tools="http://schemas.android.com/tools"
android:layout_width="match_parent"
android:layout_height="match_parent"
android:orientation="vertical" >
<TextView
style="@style/wizard_textview_title"
android:text="@string/phone_sim_bind" />
<TextView
style="@style/wizard_textview_content"
android:gravity="left"
android:text="@string/through_binding_SIM_card" />
<RelativeLayout
android:layout_width="match_parent"
android:layout_height="wrap_content"
android:background="@drawable/bind_sim_selector"
android:clickable="true"
android:onClick="bindSim" >
<TextView
style="@style/wizard_textview_content"
android:layout_marginTop="5dip"
android:background="@android:color/transparent"
android:text="@string/click_bind_sim_card" />
<ImageView
android:id="@+id/iv_setup2_status"
android:layout_width="25dip"
android:layout_height="25dip"
android:layout_alignParentRight="true"
android:src="@drawable/wizard_unlock"
tools:ignore="ContentDescription" />
</RelativeLayout>
<LinearLayout
android:layout_width="match_parent"
android:layout_height="wrap_content"
android:gravity="center_horizontal"
android:orientation="horizontal" >
<ImageView
android:layout_width="wrap_content"
android:layout_height="wrap_content"
android:src="@android:drawable/presence_invisible"
tools:ignore="ContentDescription" />
<ImageView
android:layout_width="wrap_content"
android:layout_height="wrap_content"
android:src="@android:drawable/presence_online"
tools:ignore="ContentDescription" />
<ImageView
android:layout_width="wrap_content"
android:layout_height="wrap_content"
android:src="@android:drawable/presence_invisible"
tools:ignore="ContentDescription" />
<ImageView
android:layout_width="wrap_content"
android:layout_height="wrap_content"
android:src="@android:drawable/presence_invisible"
tools:ignore="ContentDescription" />
</LinearLayout>
<RelativeLayout
android:layout_width="fill_parent"
android:layout_height="fill_parent" >
<ImageView
android:layout_width="wrap_content"
android:layout_height="wrap_content"
android:layout_centerInParent="true"
android:src="@drawable/wizard_bind"
tools:ignore="ContentDescription" />
<Button style="@style/wizard_bt_next" />
<Button style="@style/wizard_bt_previous" />
</RelativeLayout>
</LinearLayout> b) bind_sim_selector.xml <?xml version="1.0" encoding="utf-8"?>
<!-- 6、设置向导2-点击绑定sim卡的状态选择器 -->
<selector xmlns:android="http://schemas.android.com/apk/res/android">
<item android:state_pressed="true"
android:drawable="@drawable/bind_sim_bg_pressed" /> <!-- pressed -->
<item android:state_focused="true"
android:drawable="@drawable/bind_sim_bg_pressed" /> <!-- focused -->
<item android:drawable="@drawable/bind_sim_bg" /> <!-- default -->
</selector> c) bind_sim_bg_pressed.xml <?xml version="1.0" encoding="utf-8"?>
<!-- 7、设置向导2-点击绑定sim卡的状态选择器-被点击pressed -->
<shape xmlns:android="http://schemas.android.com/apk/res/android"
android:shape="rectangle" >
<corners
android:bottomLeftRadius="2dip"
android:bottomRightRadius="2dip"
android:topLeftRadius="2dip"
android:topRightRadius="2dip" />
<gradient
android:endColor="#66ff00"
android:startColor="#5566ff00" >
</gradient>
<padding
android:bottom="5dip"
android:left="5dip"
android:right="5dip"
android:top="5dip" >
</padding>
</shape> d) bind_sim_bg.xml <?xml version="1.0" encoding="utf-8"?>
<!-- 8、设置向导2-点击绑定sim卡的状态选择器-默认状态 -->
<shape xmlns:android="http://schemas.android.com/apk/res/android"
android:shape="rectangle" >
<corners
android:bottomLeftRadius="2dip"
android:bottomRightRadius="2dip"
android:topLeftRadius="2dip"
android:topRightRadius="2dip" />
<gradient
android:endColor="#5566ff00"
android:startColor="#66ff00" >
</gradient>
<padding
android:bottom="5dip"
android:left="5dip"
android:right="5dip"
android:top="5dip" >
</padding>
</shape>  |
| 3、设置向导界面3 a) activity_wizard_setup3.xml <?xml version="1.0" encoding="utf-8"?>
<!-- 11、设置向导界面3 -->
<LinearLayout xmlns:android="http://schemas.android.com/apk/res/android"
xmlns:tools="http://schemas.android.com/tools"
android:layout_width="match_parent"
android:layout_height="match_parent"
android:orientation="vertical" >
<TextView
style="@style/wizard_textview_title"
android:text="@string/setup_safe_number" />
<TextView
style="@style/wizard_textview_content"
android:gravity="left"
android:text="@string/sim_change_alarm_msg_to_safe_number" />
<EditText
android:id="@+id/et_setup3_phone"
android:layout_width="match_parent"
android:layout_height="wrap_content"
android:hint="@string/please_input_or_select_safe_number"
android:inputType="phone" />
<Button
android:layout_width="match_parent"
android:layout_height="wrap_content"
android:background="@drawable/selector_btn_green"
android:onClick="selectContact"
android:text="@string/select_contact" />
<LinearLayout
android:layout_width="match_parent"
android:layout_height="wrap_content"
android:gravity="center_horizontal"
android:orientation="horizontal" >
<ImageView
android:layout_width="wrap_content"
android:layout_height="wrap_content"
android:src="@android:drawable/presence_invisible"
tools:ignore="ContentDescription" />
<ImageView
android:layout_width="wrap_content"
android:layout_height="wrap_content"
android:src="@android:drawable/presence_invisible"
tools:ignore="ContentDescription" />
<ImageView
android:layout_width="wrap_content"
android:layout_height="wrap_content"
android:src="@android:drawable/presence_online"
tools:ignore="ContentDescription" />
<ImageView
android:layout_width="wrap_content"
android:layout_height="wrap_content"
android:src="@android:drawable/presence_invisible"
tools:ignore="ContentDescription" />
</LinearLayout>
<RelativeLayout
android:layout_width="fill_parent"
android:layout_height="fill_parent" >
<ImageView
android:layout_width="wrap_content"
android:layout_height="wrap_content"
android:layout_centerInParent="true"
android:src="@drawable/wizard_phone"
tools:ignore="ContentDescription" />
<Button
style="@style/wizard_bt_previous"
android:text="@string/wizard_previous_step" />
<Button
style="@style/wizard_bt_next"
android:text="@string/wizard_next_step" />
</RelativeLayout>
</LinearLayout>  |
| 4、设置向导界面4 a) activity_wizard_setup4.xml <?xml version="1.0" encoding="utf-8"?>
<!-- 12、设置向导界面4 -->
<LinearLayout xmlns:android="http://schemas.android.com/apk/res/android"
xmlns:tools="http://schemas.android.com/tools"
android:layout_width="match_parent"
android:layout_height="match_parent"
android:orientation="vertical" >
<TextView
style="@style/wizard_textview_title"
android:text="@string/congratulation_setup_success" />
<CheckBox
android:id="@+id/cb_setup4_status"
android:layout_width="match_parent"
android:layout_height="wrap_content"
android:text="@string/prevent_status" />
<LinearLayout
android:layout_width="match_parent"
android:layout_height="wrap_content"
android:gravity="center_horizontal"
android:orientation="horizontal" >
<ImageView
android:layout_width="wrap_content"
android:layout_height="wrap_content"
android:src="@android:drawable/presence_invisible"
tools:ignore="ContentDescription" />
<ImageView
android:layout_width="wrap_content"
android:layout_height="wrap_content"
android:src="@android:drawable/presence_invisible"
tools:ignore="ContentDescription" />
<ImageView
android:layout_width="wrap_content"
android:layout_height="wrap_content"
android:src="@android:drawable/presence_invisible"
tools:ignore="ContentDescription" />
<ImageView
android:layout_width="wrap_content"
android:layout_height="wrap_content"
android:src="@android:drawable/presence_online"
tools:ignore="ContentDescription" />
</LinearLayout>
<RelativeLayout
android:layout_width="fill_parent"
android:layout_height="fill_parent" >
<ImageView
android:layout_width="wrap_content"
android:layout_height="wrap_content"
android:layout_centerInParent="true"
android:src="@drawable/wizard_phone"
tools:ignore="ContentDescription" />
<Button
style="@style/wizard_bt_previous"
android:text="@string/wizard_previous_step" />
<Button
style="@style/wizard_bt_next"
android:text="@string/wizard_next_step" />
</RelativeLayout>
</LinearLayout>  |
| strings.xml <?xml version="1.0" encoding="utf-8"?>
<resources>
<string name="app_name">Mobilesafe</string>
<string name="action_settings">Settings</string>
<string name="activity_home">主界面</string>
<string name="home_title">我是您的手机卫士,我保护您的安全!我是您的手机卫士,我保护您的安全!</string>
<string name="app_icon">程序ICON</string>
<string name="activity_setting_center">设置中心</string>
<string name="input_password">输入密码</string>
<string name="please_input_ever_setup_password">请输入您所设置的密码</string>
<string name="bt_ok">确定</string>
<string name="bt_cancel">取消</string>
<string name="sutep_password">设置密码</string>
<string name="please_input_ever_setup_password_again">请再次输入您所设置的密码</string>
<string name="change_name_menu">更改手机防盗的名称</string>
<string name="please_input_a_newname_for_phone_theft">请输入新的名字</string>
<string name="wizard_welcome_use_phone_safe_theft">1.欢迎使用手机防盗</string>
<string name="your_phone_safe_guard">您的手机防盗卫士:</string>
<string name="sim_change_alarm">SIM卡变更报警:</string>
<string name="gps_track">GPS追踪:</string>
<string name="remote_destroy_data">远程销毁数据:</string>
<string name="remote_lock_screen">远程锁屏</string>
<string name="presence_online">正在当前页面</string>
<string name="presence_invible">当前页面不在线</string>
<string name="wizard_setup1">设置向导界面1</string>
<string name="wizard_next_step">下一步</string>
<string name="wizard_previous_step">上一步</string>
<string name="phone_sim_bind">2.手机卡绑定</string>
<string name="through_binding_SIM_card">通过绑定SIM卡:\\n下次重启手机如果发现SIM卡变化\\n就会发送报警短信</string>
<string name="click_bind_sim_card">点击绑定SIM卡</string>
<string name="setup_safe_number">3.设置安全号码</string>
<string name="sim_change_alarm_msg_to_safe_number">SIM卡变更后\\n报警短信会发送给安全号码</string>
<string name="please_input_or_select_safe_number">请输入或者选择安全号码</string>
<string name="select_contact">选择联系人</string>
<string name="congratulation_setup_success">4.恭喜您,设置完成</string>
<string name="prevent_status">防盗保护的状态</string>
</resources> |