The Zero length files window
This frame will appear while scanning only if the option Handle separately together with Present to user is selected in the Zero length files frame and of course only if at least one file which is zero bytes long is found.
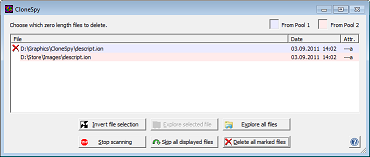
The window elements
In the first line on the left the number of zero length files found is displayed. On the right side of this line a legend is presented in some cases. This happens if you have chosen one of the last three options in the Mode frame in the Main window. Left-clicking on the legend icon for pool 1 or pool 2 allows you to select all files from that pool at one time. Right-clicking on those items allows you to change the color used for highlighting the corresponding files in the list box.
The list box
In the center of the window the list of all zero length files is presented. The header of the list can be left-clicked to sort the list entries according to the content the selected column.
At the start of each list entry an icon shows the status of the displayed file. A file can be marked or not. If files from a CSC-file are presented, the icon shows a prohibition sign. Of course, these files cannot be marked because they are not removable.
In order to mark a file for deletion the file entry has to be double clicked. Likewise you can press the Ctrl key on your keyboard plus the left mouse button. You can also mark a highlighted file in the list by pressing the Space bar on your keyboard. In order to unmark a file either double click the file, press Ctrl plus left mouse button or press Space again.
If you press the right mouse button on a file entry in the list box then a context menu will pop up showing the following options:
The six buttons on the bottom of the window are:
This frame will appear while scanning only if the option Handle separately together with Present to user is selected in the Zero length files frame and of course only if at least one file which is zero bytes long is found.
The window elements
In the first line on the left the number of zero length files found is displayed. On the right side of this line a legend is presented in some cases. This happens if you have chosen one of the last three options in the Mode frame in the Main window. Left-clicking on the legend icon for pool 1 or pool 2 allows you to select all files from that pool at one time. Right-clicking on those items allows you to change the color used for highlighting the corresponding files in the list box.
The list box
In the center of the window the list of all zero length files is presented. The header of the list can be left-clicked to sort the list entries according to the content the selected column.
At the start of each list entry an icon shows the status of the displayed file. A file can be marked or not. If files from a CSC-file are presented, the icon shows a prohibition sign. Of course, these files cannot be marked because they are not removable.
In order to mark a file for deletion the file entry has to be double clicked. Likewise you can press the Ctrl key on your keyboard plus the left mouse button. You can also mark a highlighted file in the list by pressing the Space bar on your keyboard. In order to unmark a file either double click the file, press Ctrl plus left mouse button or press Space again.
If you press the right mouse button on a file entry in the list box then a context menu will pop up showing the following options:
- File properties: If you click this option, then the Windows file properties dialog is shown for the selected file.
- Copy folder path / file name / file path to clipboard: These options enable you to copy a file path or parts of it into the clipboard. You can then paste this information anywhere you need it.
- Show CSC-file names: This option is only available if a pool is compared against CSC-files. In this case a separate column can be added to the list box showing for all files from a CSC-file the name of the corresponding CSC-file.
- Show grid lines: This option switches grid lines for the list box on/off.
The six buttons on the bottom of the window are:
- Invert file selection: If you click this button, all marked files will change to not marked and vice versa.
- Explore selected file: Click this button to explore the highlighted file in the list. The program to explore the file can be specified in the Explore equal files with external program frame. The same effect can be achieved by pressing the middle mouse button on the file.
- Explore all files: Click this button to explore all files in the list. The program to explore the files can be specified in the Explore equal files with external program frame. The same effect can be achieved by pressing the middle mouse button on the list header.
- Stop scanning: In order to cancel the whole scanning process, click this button.
- Skip all displayed files: Press this button to ignore all files (even if marked) and to continue with the scan.
- Delete all marked files: If you press this button, CloneSpy handles all files marked in the list box as selected in the How to delete frame in the Options window. Then, CloneSpy continues with the scanning process.